background image

17

2000225008D

 6  Commissioning

IMPORTANT NOTE

The WARNING NOTICE attached to the front casing 

must only

be removed by the 

user.

Please ensure the “Benchmark” logbook is completed and left
with the user, and the magnetic lighting instruction label is
placed on the surface of the boiler casing.

6.1 All Systems

Commissioning should be carried out by a competent person in
accordance with the current issue of BS6798.

UNDER ALL CIRCUMTANCES the case must be correctly
fitted and sealed, unless fault finding.

Make sure that the system has been thoroughly flushed out with
cold water without the pump in place.

Refit the pump, fill the system with water, ensuring that all the
air is properly vented from the system and pump.

6.2 Initial Lighting and Testing

CAUTION.    This work must be carried out by a competent
person, in accordance with the  current issue of BS6798.

Make sure that all naked lights and cigarettes are extinguished.

Refer to ‘Instructions for Use’ and identify the controls.

Check that the boiler is isolated from the electrical supply.

Turn the gas service cock “On” , see diagram 6.1.

Purge in accordance with the current issue of BS6891.

WARNING.    The multifunctional control and fan operate on
mains voltage, terminals will become live.

If programmer control is fitted, make sure it is in the ON mode.

Make sure that any remote controls are calling for heat.

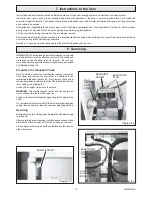
Diagram 6.1

BOILER COMPONENTS

10052

A  CONTROL BOX
B  PHIAL POCKET
C  GAS SERVICE COCK
D  "BURNER ON" NEON
E  RESET NEON
F  TEMPERATURE CONTROL
G  BURNER PRESSURE TEST POINT
H  GAS PRESSURE ADJUSTMENT SCREW
J   DATA LABEL

E

D

A

G

Turn the boiler temperature control clockwise to “Max”.

The ignition system will operate to light the boiler.  After a pre-
set time if ignition has not taken place the boiler will shutdown.

To re-start the lighting sequence, turn the boiler temperature
control to “O”, then fully clockwise to “Max”.

"Max" is approximately 82

°

C (180

°

F).

After the burner has lit, the “Burner on” neon on the control panel
will come on.

Isolate the boiler from the electrical supply.

Loosen the burner pressure test point screw and connect a
suitable pressure gauge, see diagram 6.1.

Switch on the electrical supply to the boiler.

WARNING.  The multifunctional control and fan operate on
mains voltage, terminals will become live.

6.3 Testing - Electrical

Turn the boiler temperature control fully clockwise to the
maximum setting.

The lighting sequence is automatic as follows:

The fan operates and after a short period of time, the spark
ignition operates, the solenoid opens, then the burner will light
shown by the “Burner On” neon on the control panel lighting up.

The burner will remain alight until switched off, either by the
boiler temperature control, programmer (if fitted) or any remote
system control.

To make sure that the flame supervision device is working
correctly the following should be done.

With the burner alight, turn the gas service cock “Off”, see
diagram 6.1.

After a short period the burner will go out.

F

B

C

H

A

J

Summary of Contents for Buckingham 4 CFF80

Page 1: ...an integral part of the appliance and must to comply with the current issue of the Gas Safety Installation and Use Regulations be handed to the user on completion of the installation To b e l e f t w...

Page 2: ...provide information on substances hazardous to health Ceramic Fibre Insulation Pads GlassYarn These can cause irritation to skin eyes and the respiratory tract If you have a history of skin complaint...

Page 3: ...the boiler be drained off to avoid the risk of freezing up If an immersion heater is fitted to the hot water cylinder make sure it is switched off Maintenance Toensurethecontinuedefficientandsafeoper...

Page 4: ...trol wait at least 30 seconds before switching on again When the boiler switches off the burner will go out The automatic lighting sequence will operate again when heat is required It should be noted...

Page 5: ...290lb Water content 5 76 litre 1 27gallons Gas connection Rc1 2 1 2 in BSPT Water connection Rc1 1in BSPT Electrical supply 230V 50Hz fused 3A Burner Aeromatic GENERAL DIMENSIONS given in millimetres...

Page 6: ...s installation using the pressure drop method and suitable leak detection fluid purge in accordance with the current issue of BS6891 1 6 Electrical WARNING This boiler must be earthed The electrical i...

Page 7: ...hat nothing will obstruct the openings vents in the compartment A compartment used to enclose the boiler must be designed and constructed specifically for this purpose An existing cupboard or compartm...

Page 8: ...rom the boiler a minimum static head of 1metre 3ft3in must be provided between the water line of the feed tank and the centre of the waterway see diagram 2 2 2 5 Circulation Pump Normallythepumpshould...

Page 9: ...sealed and clamped using proprietary fittings suitable for the flue liner used see diagram 3 1 The flue should preferably end above ridge height but at the least above the eaves of a pitched roof Use...

Page 10: ...containingtheboilermusthavethedoorremoved for ventilation reasons The air vents must have minimum areas see Compartment Air Vent table Thefiguresquotedrefertotheminimumacceptable effective area Both t...

Page 11: ...ay be used Heating return The water distributor tube must be fitted into either of the front lower connections on all installations see diagram 4 2 This tube is in the fittings pack Domestic return An...

Page 12: ...lbowisused Ifthepipeworkisrequired to run back to the wall make sure that it will clear the boiler air duct and if working to minimum clearance does not project too far from the boiler see diagram 4 5...

Page 13: ...er connections are made on both sides of the boiler or if the boiler is screened by fixtures The in fill panel will usually be fitted on the side where there are no pipework connections Insert the pus...

Page 14: ...screw select and fit appropriate restrictor Marked C then secure in place with the previously removed screw To connect a condensate drain remove plastic end stop by depressing the collet Slide the Ch...

Page 15: ...ndensate drain connection on the chimney flue adapter remove the end stop see diagram 4 14 A 22mm plastic overflow pipe should be used to fit on to the drain connectionanddischargetoadrain Thedrainpip...

Page 16: ...ke sure the cable is suitably secured When making connections make sure that the earth conductor ismadeofagreaterlength thanthecurrentcarryingconductors so that if the cable is strained the earth cond...

Page 17: ...COMPONENTS 10052 A CONTROL BOX B PHIAL POCKET C GAS SERVICE COCK D BURNER ON NEON E RESET NEON F TEMPERATURE CONTROL G BURNER PRESSURE TEST POINT H GAS PRESSURE ADJUSTMENT SCREW J DATA LABEL E D A G T...

Page 18: ...dent on the heat setting Turn the boiler temperature control fully anti clockwise to 0 Isolate from the electrical supply Remove the pressure gauge from the test point and refit screw making sure a ga...

Page 19: ...be assured conform to the safety and performance specification that we require Do not use reconditionedorcopypartsthathavenotbeenclearlyauthorised by Halstead Boilers Ltd Products of Combustion Check...

Page 20: ...that secures the top of the heat shield and carefully hinge down control box and heat shield see diagram 8 6 Release the two toggle latches that secure the fan access door and remove see diagram 8 7...

Page 21: ...rear of the burner to release the burner see diagram 8 10 Clean the burner Use a vacuum cleaner or suitable stiff brush not wire to clean the burner thoroughly making sure that all the burner ports a...

Page 22: ...side and rear insulation panels in the combustion chamber Check the condition of the seals on the boiler access door and the combustion chamber cover Examinethefluehoodandterminaltomakesuretheyare cl...

Page 23: ...controls are calling for heat and circuit water is cold If neon 6 is lit flame failure has occured Reset boiler by turning temperature control to Off waiting 30 seconds and then on If fault persists...

Page 24: ...CUIT BOARD CONNECTIONS b b b N b N MAINS SUPPLY 230v 50Hz 9 2 Electrical Supply Failure Failure of the electrical supply will cause the burner to go out Operationwillnormallyresumeontherestorationofth...

Page 25: ...3 NEON 4 NEON 5 NEON 6 NEON KEY see P C B FAN P C B CONTROL BOARD GAS CONTROL VALVE TERMINAL BLOCK THERMISTOR AIR PRESSURE SWITCH NEON 1 NEON 5 NEON 4 NEON 6 NEON 2 NEON 3 F4A FUSE p y g p b bk bk bk...

Page 26: ...ove front panel to gain access see section 6 8 Remove control box lid by undoing the four securing screws two on control box two on the heat shield and lift off see diagram 10 1 Carefully pull the boi...

Page 27: ...iagram 10 5 When fitting the replacement make sure that the air pressure tubes are fitted as shown in diagram 10 5 and the electrical connections are made as shown in wiring diagram 9 4 10 9 Fan Remov...

Page 28: ...serial number information from the data label The data label is positioned on the heat shield see diagram 6 1 Key No Part No Description GC Part No 1 2000461752 Multifunctional control 2 221732 Fan 3...

Reviews: