background image

10

NEEDS 
CHARGING

In normal operation, a 
small on-screen battery-
level indicator shows 
the battery status. When you are 
charging the battery, a full-screen 
icon appears briefl y to show that 
charging is taking place.

When does HALO 
need charging?

When the small on-screen 
battery-level indicator changes 
to a plug icon, you have about 5% 
battery life left and it is time to 
recharge your device.

In typical use, the HALO Digital 
Goniometer should operate for a 
working week.* 

*Based on 12–15 patients per day for 
between 1 and 2 minutes per patient.

Summary of Contents for Digital Goniometer

Page 1: ...Quick start Quick start Guide Guide Digital Digital Goniometer Goniometer Digital Goniometer Quick start Guide ...

Page 2: ......

Page 3: ...cument or information found on the HALO product the HALO Medical Devices website or the Quick Start Guide is expressly prohibited unless otherwise agreed to by HALO Medical Devices expressly granted in writing to consent to reproduce retransmit or republish the material Disclaimer While every care has been taken to ensure that the information contained in this document is the best available at the...

Page 4: ...worn when using the HALO HALO Medical Devices accepts no responsibility if the laser has been used incorrectly if the beam is stared into or the device misused or if this safety warning has not been adhered to If you do not know what a normal blink reflex is you should seek advice from your doctor By using the HALO the user takes full responsibility for determining if it is safe to use on patients...

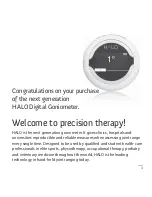
Page 5: ...ves clinics hospitals and universities reproducible and reliable measures when assessing joint range every single time Designed to be used by qualified and student health care professionals in elite sports physiotherapy occupational therapy podiatry and veterinary medicine throughout the world HALO is the leading technology in hand held joint ranging today ...

Page 6: ... your agent or sales outlet or email HALO Medical Devices direct See the Learn HALO section of the HALO Medical Devices website for tutorials and video demonstrations or call the HALO Help Line Website www halomedicaldevices com Email techsupport halomedicaldevices com http www facebook com HALOMedicalDevices ...

Page 7: ... a manual goniometer 5 Turning the HALO on and off 6 Before you use the lasers 7 Activating the lasers 8 Charging your HALO 9 When does HALO need charging 10 How to take measurements with HALO 11 Holding the HALO 11 The 3 step overview 12 Taking measurements more detail 14 First measurement 16 Taking another measurement 17 Automatic Vertical mode 18 Caring for your HALO 19 Extending battery life 1...

Page 8: ...O 22 Using the menus 23 PE Cell Photo sensor 25 Mode 26 Diagnostics 27 About 28 General Information 29 Support and troubleshooting 29 Does the battery need replacing or maintenance 29 Are the lasers safe 29 Disposal of the device 30 Specifications 31 Warranty 32 Copyright 33 Liability Statement 34 References 35 ...

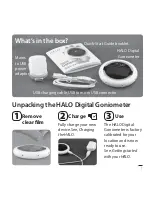
Page 9: ...tal Goniometer is factory calibrated for your location and is now ready to use See Getting started with your HALO Use Fully charge your new device See Charging the HALO HALO Digital Goniometer Mains to USB power adaptor USB charging cable USB to micro USB connector Quick Start Guide booklet 3 2 1 ...

Page 10: ...e impact resistant polycarbonate case Operating Button 1 Operating Button 2 On Off Photo sensor for faster start time Micro USB port to charge from wall or computer Grip for optimal control Indicator lines Safe low level lasers align over anatomical landmarks 2 Getting started with your HALO ...

Page 11: ...CD display shows readings in degrees A battery level indicator in the top right corner of the display shows the battery status Each step in the measurement process is shown by a white bar with a number on it When activated a photo sensor on the back of the HALO conserves battery life by putting the device into STANDBY MODE when it is laid on flat surface Pick the HALO up to start it immediately Pl...

Page 12: ... You measure from one landmark to another and HALO automatically calculates the angle between them First establish the origin of the angle first position then rotate the HALO Digital Goniometer to establish the second position The HALO will calculate the angular difference between position one and position two and display the result in degrees on its large LCD screen Advanced motion detectors allo...

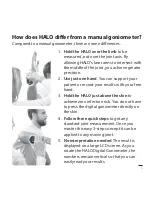
Page 13: ...ur patient or record your results with your free hand 3 Hold the HALO just above the skin to achieve zero infection risk You do not have to press the digital goniometer directly on the skin 4 Follow three quick steps to get any standard joint measurement Once you master this easy 3 step concept it can be applied to any moving joint 5 No interpretation needed The result is displayed on a large LCD ...

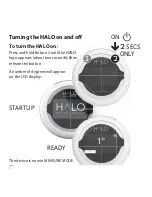
Page 14: ...urn the HALO on Press and hold Button 2 until the HALO logo appears about two seconds then release the button ALO hen 2 1 2 SECS ONLY ON READY STARTUP A number of degrees will appear on the LCD display The device is now in MEASURE MODE ...

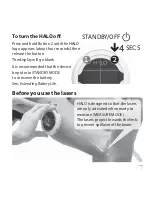
Page 15: ... button The display will go blank It is recommended that the device be put into STANDBY MODE to conserve the battery See Extending Battery Life HALO then e 2 1 4 SECS STANDBY OFF HALO is designed so that the lasers are only activated when ready to measure MEASURE MODE The lasers project towards the limb to prevent spillover of the beam ...

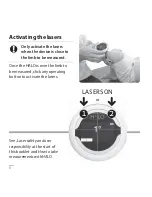
Page 16: ...asers when the device is close to the limb to be measured Once the HALO is over the limb to be measured click any operating button to activate the lasers See Laser safety and user responsibility at the start of this booklet and How to take measurements with HALO ...

Page 17: ...evice Using the Mains to USB power adaptor supplied plug one end of the USB charging cable into the micro USB port on the HALO Digital Goniometer and the other end into the USB power adaptor Plug the power adaptor into a mains 240V wall socket The device will be fully charged in less than two hours Alternatively you can plug the HALO Digital Goniometer into a USB port on your computer to charge it...

Page 18: ...riefly to show that charging is taking place When does HALO need charging When the small on screen battery level indicator changes to a plug icon you have about 5 battery life left and it is time to recharge your device In typical use the HALO Digital Goniometer should operate for a working week Based on 12 15 patients per day for between 1 and 2 minutes per patient ...

Page 19: ...ing and holding Button 2 for two seconds Then follow The 3 Step overview process to take a measurement Holding the HALO The HALO Digital Goniometer is designed to be used one handed leaving your other hand free to support the patient s limb With the display facing you curve your hand around the HALO with your fingers resting on Buttons 1 or 2 whichever is most comfortable Only activate the lasers ...

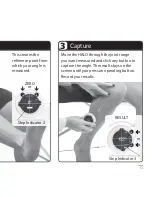
Page 20: ...s over the limb to be measured click any operating button to activate the lasers The lasers are used to line up the bony landmarks as you normally would with a manual goniometer Step Indicator 1 Once HALO s lasers are aligned over a bony landmark click any operating button to zero the HALO ...

Page 21: ...ence point from which your angle is measured Move the HALO through the joint range you want measured and click any button to capture the angle The result stays on the screen until you press an operating button Record your results Step Indicator 2 Step Indicator 3 ...

Page 22: ... In MEASURE MODE both Button 1 and Button 2 have the same function Either button can be used to take a measurement You cannot go back a step If you make a mistake move forward through Steps 2 and 3 and return to Step 1 Once the HALO is over the limb to be measured you will first activate the lasers establish the origin of the angle first position then rotate the HALO Digital Goniometer to establis...

Page 23: ...ing proximal segment After setting the zero point Step 2 move the HALO over the middle of the limb below the joint you are measuring distal segment Complete Step 3 to display your result Method 2 For example measuring ankle dorsi flexion or plantar flexion Hold the HALO over the middle of the limb below the joint you are measuring distal segment and zero the HALO Step 2 Move the HALO with the limb...

Page 24: ...hand position and indicates Step 1 2 To mark the origin of the measurement angle zero degrees align the laser on the part of the body representing the origin point wait until the readout steadies and press a button once The Step Indicator moves to the middle position and shows Step 2 3 Rotate the HALO Digital Goniometer to the second position using the lasers for alignment wait until the readout i...

Page 25: ... returns to 1 2 Begin your measurement by marking the origin of the measurement angle zero degrees then when the readout is steady press a button once The Step Indicator moves to 2 3 Turn the HALO Digital Goniometer to the second position and press any button again The Step Indicator moves to 3 Your result is displayed on the screen Repeat these steps to take further measurements recording your re...

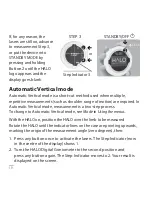
Page 26: ...sured Rotate the HALO until the indicator lines on the case are pointing upwards marking the origin of the measurement angle zero degrees then 1 Press any button once to activate the lasers The Step Indicator now in the centre of the display shows 1 2 Turn the HALO Digital Goniometer to the second position and press any button again The Step Indicator moves to 2 Your result is displayed on the scr...

Page 27: ...al agent to provide an additional level of protection WAKE UP Extending battery life The photo electric PE cell on the back of the HALO Digital Goniometer disabled by default senses when the device is face up and resting on a flat surface such as a desk In this position no light reaches the sensor on the back and the device is put into STANDBY MODE to conserve the battery When the device is picked...

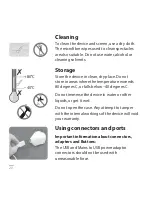
Page 28: ... where the temperature exceeds 80 degrees C or falls below 40 degrees C Do not immerse the device in water or other liquids or get it wet Do not open the case Any attempt to tamper with the internal workings of the device will void your warranty Using connectors and ports Important information about connectors adapters and Buttons The USB and Mains to USB power adaptor connectors should not be use...

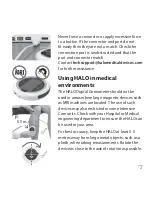
Page 29: ...al environments The HALO Digital Goniometer should not be used in areas where large magnetic devices such as MRI machines are located The use of such devices may also restricted in some Intensive Care units Check with your Hospital or Medical engineering department to ensure the HALO can be used in your area For best accuracy keep the HALO at least 0 5 metres away from large metal objects such as ...

Page 30: ...onds The HALO welcome logo will appear followed by the screen displaying a readout in degrees The Unit should now return to MEASURE MODE 2 1 15 SECS RESET If you are still having problems contact your agent or sales outlet See the Learn HALO section of the HALO Medical Devices website for tutorials and video demonstrations or call the HALO Help Line READY ...

Page 31: ... four seconds The menu list appears Exit the menu To exit from the menu hold down Button 1 for four seconds This returns you to MEASURE MODE Scrolling Scroll down with Button 2 up with Button 1 An arrow shows the currently active option A blue highlight shows your selection 2 2 1 1 4 SECS MENU SCROLL ...

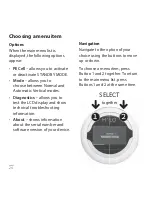
Page 32: ...ical modes Diagnostics allows you to test the LCD display and show technical troubleshooting information About shows information about the serial number and software version of your device 2 1 SELECT together Navigation Navigate to the option of your choice using the buttons to move up or down To choose a menu item press Button 1 and 2 together To return to the main menu list press Buttons 1 and 2...

Page 33: ...MODE when it is laid on flat surface The HALO comes from the factory with the PE Cell disabled There are two options in this list Enable PE Cell Disable PE Cell To move between options scroll down with Button 2 up with Button 1 Select an option by pressing both buttons together To return to the main menu list press Buttons 1 and 2 together Exit the menu To exit from the menu hold down Button 1 for...

Page 34: ...oronal to take measurements Automatic Vertical mode Automatic Vertical mode reduces the number of steps required to take a measurement to two In this mode the device uses gravity to reference the vertical plane and sets that plane as the zero point from which to begin the measurement of an angle The indicator lines on the case must point upwards zero degrees when starting a measurement To move bet...

Page 35: ... functions are operating correctly A stream of diagnostic data is displayed This information can be interpreted with the aid of a HALO Medical Devices Help Line assistant or the HALO Medical Devices website To move between options scroll down with Button 2 up with Button 1 Select an option by pressing both buttons together To return to the main menu list press Buttons 1 and 2 together Exit the men...

Page 36: ...your device To move between options scroll down with Button 2 up with Button 1 Select an option by pressing both buttons together To return to the main menu list press Buttons 1 and 2 together Exit the menu To exit from the menu hold down Button 1 for four seconds This returns you to MEASURE MODE ...

Page 37: ...r shows the battery status Normal charge discharge cycles are all that is required for the product s life No special discharge or deep cycling measures are necessary Do not attempt to replace the battery in your device If your HALO Digital Goniometer is within the warranty period return the device to HALO Medical Devices Instructions on this process can be found at www halomedicaldevices com under...

Page 38: ... Laser safety and user responsibility Therapeutic Goods Administration of Australia US Food and Drug Administration A normal blink reflex is usually described as when exposed to light your eyes blink automatically and regularly Disposal of the device If your device is five or more years old and is not working at full capacity it should be discarded responsibly To discard the device locate a mobile...

Page 39: ...D is TFT type Battery Lithium Ion Polymer rechargeable battery Laser Low level Class 1 safe beam laser Casing Polycarbonate integrated with antibacterial protection Charging Via Micro USB port or Standard Wall plug Operating temperature range 40 C to 80 C Compatibility PC Mac no data is transferred Compliance Designed to comply with IEC 60601 1 and CE mark of European Conformity ...

Page 40: ... with a new device The warranty does not cover Damage to the outer case damage to the hardware or software when the device has been exposed to any liquid being dropped from a height greater than 1 5 metres or any form of misuse This warranty is void if the device is opened by the user dropped from a height greater than 1 5 metres put through a washing machine or exposed to any liquid It is at the ...

Page 41: ...ectual property in the Software Hardware or Design to you under this statement or otherwise and that HALO Medical Devices retains all right title and interest to the Software Hardware and Design No part of the HALO Digital Goniometer may be reproduced stored in a retrieval system or transmitted in any form or by any means under any circumstance Note that each HALO Digital Goniometer is traceable a...

Page 42: ...estruction or unauthorized access to or alteration of the HALO Medical Devices Website or its Medical Devices including without limitation any liability for Damages to your computer hardware data information or business and any liability for special or consequential Damages even if HALO Medical Devices or a HALO Medical Devices authorized representative has been advised of the possibility of such ...

Page 43: ... References for this guide include ISO 15223 1 2012 FDA Labelling guide TGA Labelling and Package Guide These guidelines have been created in consultation with the company Regulatory Consultant and the Manufacturer ...

Page 44: ...www halomedicaldevices com techsupport halomedicaldevices com ...

Reviews: