Halfords Bike Trailer Owner'S Manual Download Page 10


10 
 

Step 5 – Installing wheel guard/parking brake 


Your trailer is equipped with a combination wheel guard and parking brake for added safety. The 
wheel guard helps to deflect the tire from obstructions that might stop the trailer and result in an 
accident. 
 

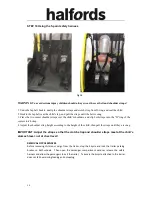
Installing the wheel guard 
 

Parts list 


1.  Hex Key   


1 ea 

2.  Screws 


4 ea 

3.  Wheel guard   


        1 set 


Installation 


1.  Unpack polybag and check that all parts are included 

2.  located the 2 holes in the front of the side frame, just in front of the wheel. 

3.  Place screws through holes in frame 

– from inside to outside. 

4.  Place the Wheel Guard Assembly against the frame, and use the hex key wrench 

provided to tighten the screws until snug.   

Note:    The nut is secured inside so 

you will not need a wrench or plier to hold the nut while tightening the fixing 

screw.


Summary of Contents for Bike Trailer

Page 1: ...res should be inflated to 35 40 PSI for maximum comfort Check tire pressure before each use Use a foot pump or hand pump to inflate tires Pressurized air hoses can cause overinflation Periodically re...

Page 2: ...safety harness tow bar tow bar coupler 1 Safety flag and rear wheel brackets attached Assembly Tools included Meets EN Norm for Cycle Trailers EN 15918 2011 A2 2017 Certified by Mechanicals and Hardg...

Page 3: ...WARNING Not for infants under 12 months of age Children must be able to hold head up with helmets on Children must always use seat belt and bike helmets Never leave child unattended Always ride defen...

Page 4: ...embling the trailer make sure that wheels are correctly and securely installed as described in the assembly instructions If you are not familiar with the type of wheels used on this trailer contact yo...

Page 5: ...nd practice in a safe area Do not use your trailer until you have become accustomed to how it affects your bicycle handling Further safety strategies include the following Never assume you will be giv...

Page 6: ...trailer Helmets are recommended for all passengers and may be required by law Please check national and local laws regarding trailers and helmet use prior to operation Make sure that your child is se...

Page 7: ...remove the white foam from the wheel axles until STEP 4 STEP 2 Open Frame Fig 2 Fig 2a Fig 2b Fig 2c Fig 3 Fig 4 Remove trailer and all components from carton Unfold trailer by pulling the frame and...

Page 8: ...rame is now assembled Fig 4 The two upper window tubes are not the same NOTE The two upper window tubes are not the same They are marked R and L and must be assembled in correct order for the frame to...

Page 9: ...et so the wheel is in the use position Fig10 4 Tip trailer frame to allow access to the underside of trailer Locate hole in end of hub axle 5 Slide the quick release pin tethered to the bike frame nea...

Page 10: ...x Key 1 ea 2 Screws 4 ea 3 Wheel guard 1 set Installation 1 Unpack polybag and check that all parts are included 2 located the 2 holes in the front of the side frame just in front of the wheel 3 Place...

Page 11: ...lever from inside to outside of the trailer base to engage the braking function The brake shoe will contact the tire to lock the wheel The WARNING Always use brakes when loading or unloading trailer...

Page 12: ...to keep passengers and cargo dry and warm in inclement weather It also protects the passengers from flying debris The four season cover can be rolled up to allow for added ventiltion in hot weather E...

Page 13: ...ove wheel 2 Slide hitch onto skewer with the angled tab facing out and reinstall the skewer through the axle Position with hitch tab facing rear of bike roughly parallel to the ground 3 Tighten QR axl...

Page 14: ...brakes or other moving components Clip to D ring on the tow arm WARNING Safety strap must attach to the bike frame when using this product in trailer mode REMOVING TRAILER FROM BICYCLE 1 To remove th...

Page 15: ...he D ring of the center crotch strap 4 Adjust the shoulder strap height according to the height of the child then pull the straps until they are snug IMPORTANT Adjust the straps so that the crotch str...

Page 16: ...n above a Remove 4 season Rain cover b Press red button on QR connector and pull apart from both sides b Fold frame down as shown c Fold in until trailer is flat Maintenance Before each ride check the...

Reviews: