background image


Page 18 of 33 


V1.1 

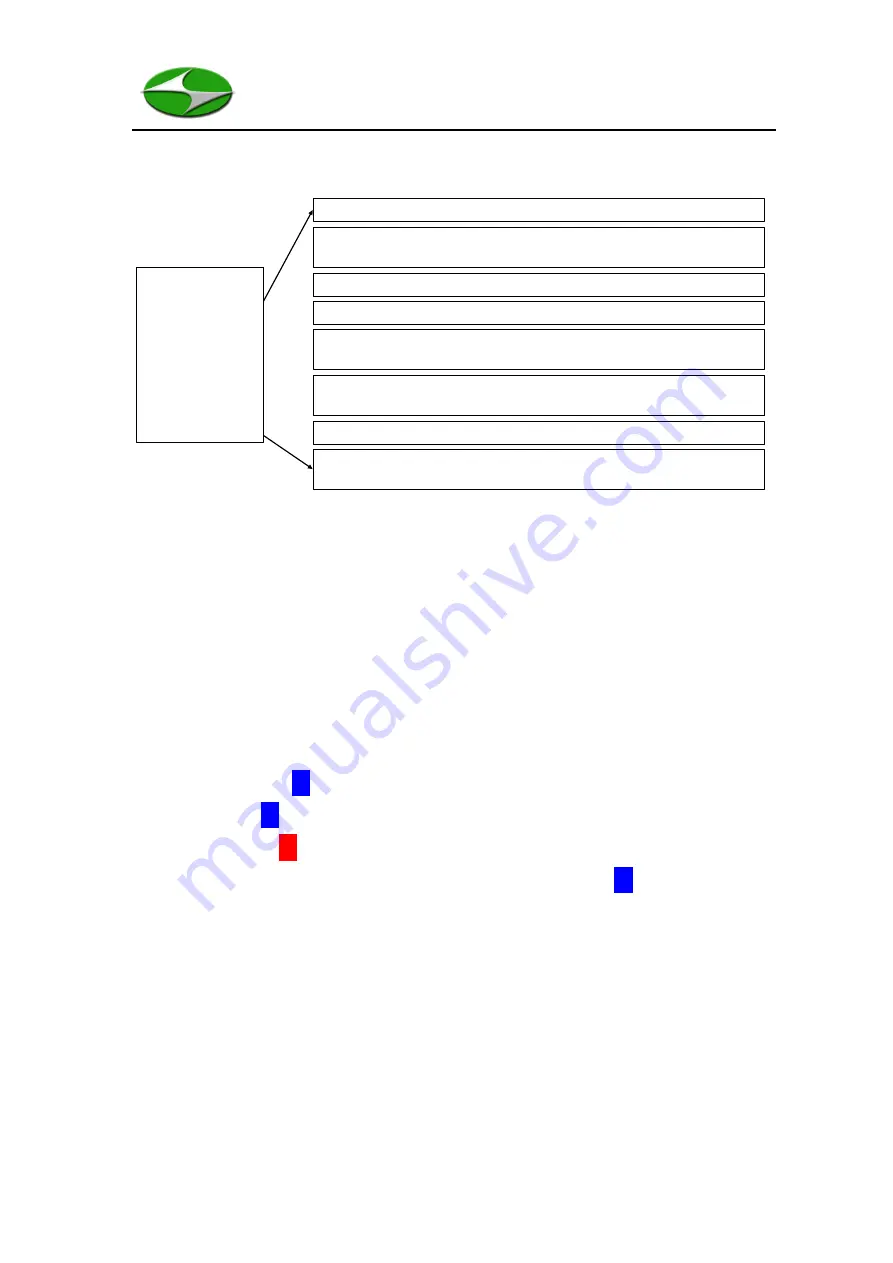
Figure 8

 shows the parameters that can be set via the Setting Screen. 


Figure 8: The parameters that can be set via the Settings Screen 


Once the user has entered the Settings Screen by pressing Enter, scroll through the 

various options using the 

UP

 and 

DOWN

 keys. Enter a sub-menu by pressing 

ENTER

.       


Once selected, a parameter will highlight in blue. For example, if the user wishes to edit 

the sample duration setting in the Sample Parameters screen they will first press the 

ENTER

 key while Sample Duration is selected. The first portion of the entry will 

highlight blue, like so 

00

:00. Pressing the 

UP

 or 

DOWN

 key will move between minutes 

and seconds (00:

00

). Pressing the 

ENTER

 key will highlight the selected portion in red 

and enable editing (

00

:00). The 

UP

 and 

DOWN

 keys will now edit the Sample Duration 

appropriately. When finished press the 

BACK

 key to stop editing (

00

:00). 


Particle Sizes 

Modify particle sizes on Channels 1 - 6

Sample Parameters 

Modify Start Delay, Interval, Duration, Number of 

Samples, Material Density (MC and PM only), Count Mode, and Location

Date & Time 

Modify the units Date & Time settings

Preferences

Modify the units color theme and temperature unit

Alarm/Sound Levels 

Modify the alarm (FED, ISO, or manual) and the Sound 

settings. Turning off the sound does not inhibit the alarm.

Print/Save Options 

Modify the Print (On or Off) settings and the Save (On, 

Off, or Average) settings.

SETTINGS

Particle Sizes

Sample Parameters

Date & Time

Preferences

Alarm/Sound Levels

Print/Save Options

Bluetooth Settings

Factory Settings

Bluetooth Settings 

Modify settings for the optional printer.

Factory Settings 

Firmware update (reserved), Calibration (protected), Clear 

Last Record, and Factory Reset.

Summary of Contents for HAL-HPC301

Page 1: ...f 33 V1 1 HAL HPC301 Handheld Particle Counter Operational Manual 7970 Cherry Ave Suite 303 Rancho Cucamonga CA 91730 USA Phone 866 438 4258 Fax 855 402 9190 Info haltechnologies com http haltechnolog...

Page 2: ...Page 2 of 33 V1 1 This page intentionally left blank...

Page 3: ...tion 12 2 1 Handheld Unit Overview 12 2 2 Key Functions 12 2 3 Graphical User Interface GUI 13 2 3 1 Main Screen 13 2 3 2 Measure Screen 14 2 3 3 Browse Screen 16 2 3 4 Settings Screen 17 2 3 5 Modify...

Page 4: ...33 V1 1 Version Table Date Version Comment February 10 2017 1 1 Added Data Downloader instructions December 20 2016 1 0 Formal Release April 15 2015 0 2 Pre release updating April 7 2015 0 1 Pre relea...

Page 5: ...oducts it describes at any time without notice or obligation Published in the United States of America Copyright 2016 by Hal Technology All rights reserved No part of the contents of this manual may b...

Page 6: ...hat may be damaged by improper handling The warranty is void for any unauthorized opening of the instrument Environmental Requirements To avoid accidents or damage to the instrument please avoid using...

Page 7: ...33 V1 1 annually at least Please contact Hal Technology to schedule your calibration or any services needed The HAL HPC301 can only be serviced at Hal Technology or by a Hal Technology authorized pro...

Page 8: ...light and generate electrical pulses proportional to the size of the incident particles The HAL HPC301 is a completely self contained particle counter that is no other parts are required to start moni...

Page 9: ...ons are available to include Mass Concentration and Particulate Matter measurements Optional accessories also include a digital temperature relative humidity and pressure probe as well as an isokineti...

Page 10: ...accurate measurement Up to 260 unique location labels No less than 6 hours of continuous operation Bluetooth Wireless printing capabilities Compatible with Window XP 7 8 10 operation systems 1 2 Spec...

Page 11: ...er battery discharged Interface USB Bluetooth Power Rechargeable Lithium ion battery 7 4V 5200mAh AC adapter 100 240VAC to 9VDC 1 5A Dimension 93 W 180 H 48 D mm Weight Approximately 900 grams Environ...

Page 12: ...rface is composed of a six key interface ENTER BACK Each button controls the following features Power button While the unit is off press and hold the power button for approximately 2 seconds to turn o...

Page 13: ...flashes during charge cycle and becomes steady after the charge cycle is finished Ethernet Interface This feature is not standard for the HPC301 and is a future option 2 3 Graphical User Interface GUI...

Page 14: ...reen one can navigate to the Settings Screen by pressing the UP key the Browse Screen by pressing the DOWN key or start taking data by pressing the RUN STOP key The Measure Screen also shows the statu...

Page 15: ...al is to be set below 5 seconds the other must be greater or equal to 5 seconds For example if you want a Sample Duration of 4 seconds or less the Sample Interval must be at least 5 seconds The instru...

Page 16: ...easurements can be calculated as 2 3 3 Browse Screen Figure 6 shows the Browse Screen of the HPC301 From this screen one can navigate to the Measure Screen by pressing the UP key the Settings Screen b...

Page 17: ...From this screen one can navigate to the Browse Screen by pressing the UP key the Measure Screen by pressing the DOWN key or enter the settings screen by pressing the ENTER key All the unit s paramet...

Page 18: ...e editing 00 00 The UP and DOWN keys will now edit the Sample Duration appropriately When finished press the BACK key to stop editing 00 00 Particle Sizes Modify particle sizes on Channels1 6 Sample P...

Page 19: ...low the user to modify the following parameters over the following ranges Start Delay 00 00 to 59 59 Sample Interval 00 00 to 59 59 Sample Duration 00 00 to 59 59 Number of Samples 0 to 500 Material P...

Page 20: ...et to Avg only the average across the number of samples will be stored When setting this number keep in mind the run time of the entire sampling procedure Depending upon the battery charge the user ma...

Page 21: ...m the following standard Count Modes Cumulative Counts Differential Counts Counts Per Liter Counts Per Cubic Foot Counts Per Cubic Meter and the following optional Count modes Mass Concentration Parti...

Page 22: ...he following preset alarm levels ISO 3 FS209E 1 ISO 4 FS209E 10 ISO 5 FS209E 100 ISO 6 FS209E 1 000 ISO 7 FS209E 10 000 ISO 8 FS209E 100 000 ISO 9 FS209E 1 000 000 The custom alarm level is a count li...

Page 23: ...ed The optional Bluetooth printer is required to print If you would like to purchase the printer contact Hal Technology info haltechnologies com Bluetooth Settings The Bluetooth settings are for the o...

Page 24: ...uired contact services haltechnologies com The Clear Last Record option is available in case the unit were to lose power while saving data If this were to occur it is possible the last record could be...

Page 25: ...the instructions in the file named Readme txt that is usually provided on the compact disc After successful installation it is preferable to have the HPC301 powered off when using the software to dow...

Page 26: ...d Go to the Factory Settings page under Settings and Clear the last record If this does not fix the problem try a Factory Reset all memory will be cleared The unit does not appear to be saving my chan...

Page 27: ...of 33 V1 1 Printer does not print 1 Ensure the printer is in working order turned on and has thermal paper 2 Ensure Bluetooth is enabled on the HPC301 3 Run a connection test from the Bluetooth Settin...

Page 28: ...un specified environmental condition Abnormal operation due to required instrument calibration Limitation of Warranty A Hal Technology warrants that all equipment shall be free from defects in materia...

Page 29: ...Hal Technology s option be terminated C Warranty repairs shall be completed at a Hal Technology authorized service location by an authorized service technician or on site at buyer s facility by a Hal...

Page 30: ...he warranty period Buyers may select a faster method of shipment at their own expense Contact Information HAL TECHNOLOGY LLC 7970 Cherry Avenue Suite 303 Rancho Cucamonga CA 92336 USA Phone 866 438 42...

Page 31: ...a CA 92336 USA Fax 855 402 9190 toll free Or send relevant registration information to the email address below services haltechnologies com Company Contact Person Address City State Country Postal Zip...

Page 32: ...o meets the 0 3 m threshold So both the 0 3 m and 2 5 m channel counts are incremented Differential Counts The relative number of counts for a channel referenced to the next largest channel For exampl...

Page 33: ...Page 33 of 33 V1 1 Time Passing Wait Sample Wait Sample Wait Sample Wait Sample...

Reviews: