background image

5. INITIAL SETUP

When connecting or disconnecting the 

cord assembly, hold the plug.

Be sure to turn off the power switch before connecting or 

disconnecting the cord assembly for the handpiece to 

and from the receptacle to avoid damaging the unit.

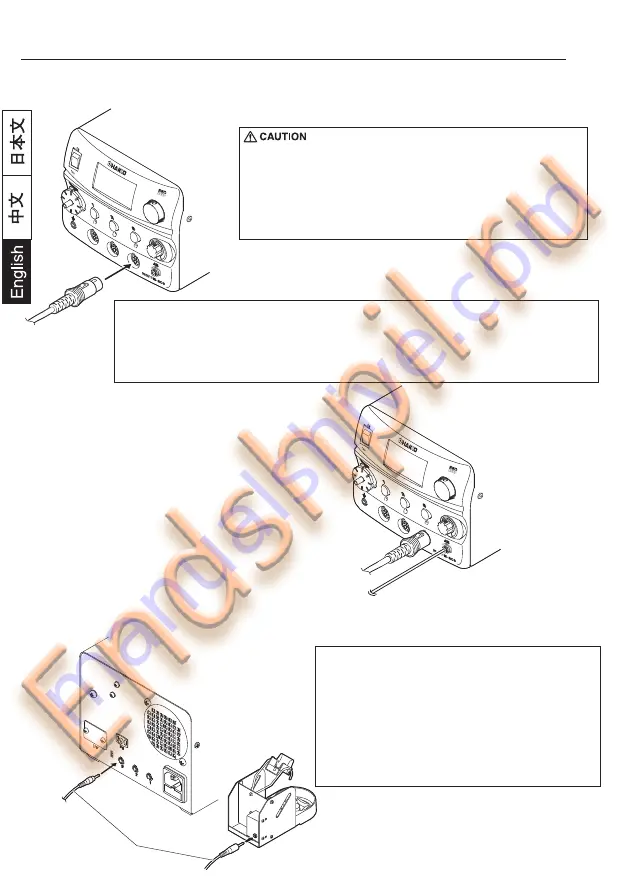
The HAKKO FM-2029 can be connected to channel 3 connector.
Insert the plug until it stops and try to remove it without pressing the release pin. 
If it stays in the receptacle, it is properly seated.

NOTE :

Push on the plug until it stops, making sure it is securely connected.

2. Connect the tube of the handpiece to HAKKO FM-206. 
    (Fig.3)

3. Insert one end of the connecting cable into the jack at the back of the handpiece holder 
    and the other end into the jack at the back of the station to connect them. (Fig.4)

Connecting cable

When using the HAKKO FM-2029, be sure to 
insert the connecting cable for the handpiece 
holder into the jack for channel 3. Inserting the 
connecting cable into the incorrect jack 
will cause the system to not function 
correctly.

NOTE :

B. Connect to HAKKO FM-206

1. Connect the cord assembly of HAKKO FM-2029 to channel 3 connector for HAKKO FM-206. (Fig.2)

19

(Fig.2)

(Fig.3)

(Fig.4)

Summary of Contents for FM-2029

Page 1: ...2029 can not be operated by itself Read the instruction manual for the HAKKO FM 206 Rework System used in conjunction with the HAKKO FM 2029 1 PACKING LIST AND PART NAMES 2 SPECIFICATIONS 3 COMPATIBLE STATIONS 4 WARNINGS CAUTIONS NOTES AND EXAMPLES 5 INITIAL SETUP 6 OPERATION 7 TROUBLE SHOOTING GUIDE 8 PARTS LIST 9 NOZZLE STYLES 17 17 17 18 19 20 21 22 22 SINGLE HOT AIR Instruction Manual CAUTION ...

Page 2: ...product is protected against electrostatic discharge Instruction manual in the language of Japanese English Chinse French German and Korean can be downloaded from the HAKKO Document Portal Please note that some languages may not be available depending on the product HAKKO FM 2029 Use the HAKKO FM 2029 with the HAKKO FM 206 soldering station 3 COMPATIBLE STATIONS 140W 24V 2 Ω 2m V 232 mm 9 1 in wit...

Page 3: ...erience and knowledge unless they have been given supervision or instruction concerning use of the appliance by a person responsible for their safety Children should be supervised to ensure that they do not play with the appliance Do not strike the handpiece against hard objects This will damage the handpiece Do not modify the unit Use only genuine HAKKO replacement parts Do not allow the HAKKO FM...

Page 4: ...til it stops making sure it is securely connected 2 Connect the tube of the handpiece to HAKKO FM 206 Fig 3 3 Insert one end of the connecting cable into the jack at the back of the handpiece holder and the other end into the jack at the back of the station to connect them Fig 4 Connecting cable When using the HAKKO FM 2029 be sure to insert the connecting cable for the handpiece holder into the j...

Page 5: ...til cooling stops A Remove component 1 Heating Apply the hot air to the component to be removed and melt the solder Fig 5 Be careful not to touch the component with the nozzle 2 Grab the component using tweezers While applying the hot air grab the component using the tweezers When grabbing the sides that are not soldered this will help to prevent the heat from escaping We recommend SMD tweezers wh...

Page 6: ... be considered carefully If you set the air flow too high the part or the solder may be blown out of place Reduce the air flow level when soldering parts 21 The unit does not operate when pressing the Hot Air button CHECK Is the nozzle inserted properly ACTION Insert the nozzle completely CHECK Is the connection cord broken ACTION If the cord assembly is broken replace the HAKKO FM 2029 CHECK Is t...

Page 7: ... 35 in 22 HAKKO FM 2029 Handpiece holder FM2029 01 FM2029 02 HAKKO FM 2029 HAKKO FM 2029 24V 140W Conversion kit 24V 140W Item No Part No Part Name Specifications C1574 Part No Part Name Specifications Item No Handpiece holder 1 2 3 4 1 2 1 2 3 4 B3253 B2300 Item No Part No Part Name Specifications Connecting cable Heat resistant pad 9 NOZZLE STYLES 3 4 φB φA ...

Page 8: ...23 http www hakko com 2011 3 MA02254XZ110303 Copyright 2011 HAKKO Corporation All Rights Reserved ...

Reviews: