Haier RTC1700EBSS User Manual Download Page 8

7

English

USING YOUR OVEN

Caution!

During the baking process, be sure that no metallic accessory

comes into contact with the heating elements.  Always wear an oven
mitt or use a handgrip or tongs to remove food from the oven. 

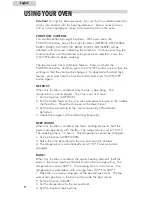
FUNCTION CONTROL

This control button has eight functions.  When you press the
FUNCTION button, one of the eight functions (DEFROST, KEEP WARM,
BAKE1, BAKE2, SLOWCOOK, BROIL, ROAST, ROTISSERIE) will be
selected, with an arrow indicating the selection.  Continue pressing the
function button until the desired setting has been selected.  Press the
ON/OFF button to begin cooking.

The toaster oven has a child lock feature.  Press and hold the
FUNCTION button, and then press the ON/OFF button once to lock the
settings so that they cannot be changed.  To deactivate the child lock
feature, press and hold the function button and press the ON/OFF
button again.

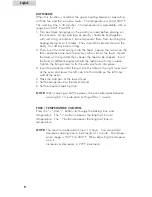
DEFROST

When this function is selected, only the fan is operating. The
temperature is not displayed.  The time is set at 2 hours.
1. Set the function to DEFROST.
2. Put the frozen food on the wire rack and place the rack in the middle

shelf position.  Place the drip pan at the lowest level.

3. Set the time according to the size and quantity of food to be

defrosted.

4. Check the progress of the defrosting frequently.

KEEP WARM

When this function is selected, the lower heating elements (half the
power) are operating with the fan.  The temperature is set at 150º F.
The cooking time is 1.5 hours.  The temperature cannot be changed.
1. Set the function to KEEP WARM.
2. Select the time according to the size and quantity of food.
3. The temperature is automatically set at 150º F and cannot be
changed.

BAKE1

When this function is selected, the upper heating elements (half the
power), the lower heating elements and the fan are operating.  The
temperature is set at 350º F.  The cooking time is 40 minutes.  The
temperature is adjustable, with a range from 150º F to 450º F.
1. Place the wire rack or drip pan at the desired rack level.  The top
and center positions in the oven will provide the best results.
2. Set the function to BAKE1.
3. Set the temperature to the desired level.
4. Set the required cooking time.

Summary of Contents for RTC1700EBSS

Page 1: ... RTC1700EBSS Guide de l Utilisateur RTC1700EBSS Manual del Usuario Modelo RTC1700EBSS Quality Innovation Style Convection Rotisserie Oven Mini Four Rotissoire Convection Naturelle La Convección Horno de Rotisserie ...

Page 2: ...epair or adjustment 7 The use of accessory attachments not recommended by the manufacturer may cause hazard or injury 8 Do not place on or near a hot gas or electric burner or in a heated oven or in a microwave oven 9 When operating the oven keep at least four inches of space on all sides of the oven to allow for adequate air circulation 10 Unplug the unit from the outlet when not in use and befor...

Page 3: ...cised when using containers constructed of any material other than metal or glass 19 Do not place any of the following materials in the oven cardboard plastic paper or anything similar 20 Do not store any materials other than the manufacturer s recommended accessories in this oven when not in use 21 This appliance has a tempered safety glass door The glass is stronger than ordinary glass and more ...

Page 4: ...Cord 1 Parts and Accessories 5 Before Using Your Oven 6 Using Your Oven 6 Function Control 6 Roasting 6 Rotisserie 6 Time Temperature Control 6 Cleaning and Maintenance 8 Troubleshooting 9 Limited Warranty 10 English 3 TABLE OF CONTENTS ...

Page 5: ...rized alternating current line plug one blade is wider than the other This plug fits into a polarized power outlet only one way This is a safety feature If you are unable to insert the plug fully into the outlet try reversing the plug If the plug still fails to fit contact a qualified electrician to replace the obsolete outlet Do not attempt to modify the plug in any way Do not defeat the safety p...

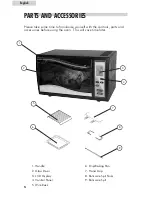
Page 6: ... Display 4 Control Panel 5 Wire Rack 6 Drip Baking Pan 7 Hand Grip 8 Rotisserie Spit Forks 9 Rotisserie Spit Please take some time to familiarize yourself with the controls parts and accessories before using the oven This will save time later 1 2 3 4 7 6 5 8 9 ...

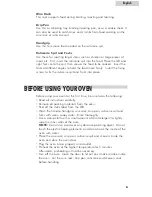
Page 7: ...e oven at the highest temperature for 5 minutes Afterwards preheating will not be necessary Turn off the oven Open the door to let out any smoke residue inside the oven Let the wire rack drip pan rotisserie and skewers cool before handling Wire Rack This rack supports food during broiling roasting and toasting Drip Pan Use this as a baking tray broiling roasting pan or as a cookie sheet It can als...

Page 8: ...is set at 2 hours 1 Set the function to DEFROST 2 Put the frozen food on the wire rack and place the rack in the middle shelf position Place the drip pan at the lowest level 3 Set the time according to the size and quantity of food to be defrosted 4 Check the progress of the defrosting frequently KEEP WARM When this function is selected the lower heating elements half the power are operating with ...

Page 9: ... The working time is 30 minutes The temperature is adjustable with a range from 300º F to 450º F 1 Place the wire rack at the highest level If there is insufficient space move the rack down to the next level The drip pan should be placed at the lowest level The wire rack and drip pan should be kept apart at different levels for proper air circulation 2 Set the temperature to the desired level 3 Se...

Page 10: ...he forks at different angles to hold the food more firmly in place Tighten the fixing screws to fix the rotisserie forks into place 3 Insert the pointed end of the spit into the hole on the right inner wall of the oven and lower the left side into the cradle on the left inner wall of the oven 4 Place the drip pan at the lowest level 5 Set the temperature to the desired level 6 Set the required coo...

Page 11: ...lb counterclockwise to remove Replace the new bulb in the socket and turn the bulb clockwise to tighten Replace the light bulb cover and tighten the screw If the oven has not been used for a long time be sure to wipe off any dust and moisture before operating TROUBLESHOOTING 1 The oven does not become hot after being turned on Check that the unit is plugged in Make sure that the cooking time has b...

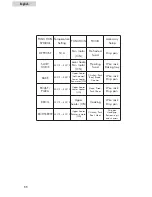
Page 12: ... 400 F 450 F Upper heater half power Lower heater Fan motor ON Chicken Pork Beef Bread Cookies Wire rack Drip pan ROAST PIZZA 400 F 450 F Upper heater Lower heater ON Steak Pizza Pork Chops Wire rack Drip pan BROIL 320 F 420 F Upper heater ON Cooking Wire rack Drip pan ROTISSERIE 320 F 420 F Upper heater Rotisserie motor ON Chicken Pork Beef Meat Drip pan Handgrip Rotisserie pit and skewers Englis...

Page 13: ... need assistance with this product please contact Haier Customer Satisfaction Service at 1 877 337 3639 between 9 00 AM and 5 00 PM EST Monday to Friday Before calling please have the following information available Model number of your appliance The name and address of the store you purchased the unit from and the date of purchase A clear description of the problem Haier will repair or replace an...

Page 14: ... SERVICE IMPORTANT Ne pas Réexpédier ce Produit au Magasin Pour tout problème concernant ce produit veuillez contacter le service des consommateurs Haier Customer Satisfaction Center au 1 877 337 3639 UNE PREUVE D ACHAT DATEE EST REQUISE POUR BENEFICIER DE LA GARANTIE IMPORTANTE No regrese este producto a la tienda Si tiene algún problema con este producto por favor contacte el Centro de Servicio ...

Reviews: