background image

49-88074-1

17

ENGLISH

GLASS COOKTOP

Normal Daily Use Cleaning

ONLY use CERAMA BRYTE® Ceramic Cooktop Cleaner on 
the glass cooktop. Other creams may not be as effective.

To maintain and protect the surface of your glass cooktop, 
follow these steps:

1.  Before using the cooktop for the first time, clean it with 

CERAMA BRYTE® Ceramic Cooktop Cleaner. This helps 
protect the top and makes cleanup easier.

2.  Before using the cooktop for the first time, clean it with 

CERAMA BRYTE® Ceramic Cooktop Cleaner. This helps 
protect the top and makes cleanup easier.

3.  Shake the cleaning cream well. Apply a few drops of 

CERAMA BRYTE® Ceramic Cooktop Cleaner directly to 
the cooktop.

4.  Use a paper towel or 

CERAMA BRYTE® Cleaning 
Pad for Ceramic Cooktops 
to clean the entire cooktop 
surface.

5.  Use a dry cloth or paper 

towel to remove all cleaning 
residue. No need to rinse.

NOTE: It is very important that 
you DO NOT heat the cooktop 
until it has been cleaned 
thoroughly.

Burned-On Residue

NOTE: DAMAGE to your glass surface may occur if you use 
scrub pads other than those recommended.

1.  Allow the cooktop to cool.

2.  Spread a few drops of CERAMA BRYTE® Ceramic 

Cooktop Cleaner on the entire burned residue area.

3.  Using the included CERAMA BRYTE® Cleaning Pad 

for Ceramic Cooktops, rub the residue area, applying 
pressure as needed.

4.  If any residue remains, repeat the steps listed above as 

needed.

5.  For additional protection, after all residue has been 

removed, polish the entire surface with CERAMA 
BRYTE® Ceramic Cooktop Cleaner and a paper towel.

Heavy, Burned-On Residue

1.  Allow the cooktop to cool.

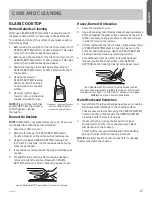
2.  Use a single-edge razor blade scraper at approximately a 

45° angle against the glass surface and scrape the soil. It 
will be necessary to apply pressure to the razor scraper 
in order to remove the residue.

3.  After scraping with the razor scraper, spread a few drops 

of CERAMA BRYTE® Ceramic Cooktop Cleaner on the 
entire burned residue area. Use the CERAMA BRYTE® 
Cleaning Pad to remove any remaining residue.

4.  For additional protection, after all residue has been 

removed, polish the entire surface with CERAMA 
BRYTE® Ceramic Cooktop Cleaner and a paper towel.

Metal Marks and Scratches

1.  Be careful not to slide pots and pans across your cooktop. 

It will leave metal markings on the cooktop surface.


 These marks are removable using the CERAMA BRYTE® 
Ceramic Cooktop Cleaner with the CERAMA BRYTE® 
Cleaning Pad for Ceramic Cooktops.

2.   If pots with a thin overlay of aluminum or copper 

are allowed to boil dry, the overlay may leave black 
discoloration on the cooktop.


This should be removed immediately before heating 
again or the discoloration may be permanent.

NOTE: Carefully check the bottom of pans for roughness 
that would scratch the cooktop.

CARE AND CLEANING

Clean your cooktop after each 

spill. Use CERAMA BRYTE

®

Ceramic Cooktop Cleaner.

ÞöèäÌÎÛÊÖÊËÛâÝÎ

®

 Cleaning Pad for Ceramic Cooktops.

ÝëèÌÎÛÊÖÊËÛâÝÎ

®

 Ceramic Cooktop Scraper and all 

recommended supplies are available through our Parts Center. 

See instructions under “To Order Parts” section on next page.

NOTE: Do not use a dull or nicked blade.

Summary of Contents for QAS740

Page 1: ...User Manual Manual del usuario QAS740 Electric Compact Ranges Cocina Eléctricas compactas 49 88074 1 09 18 GEA ...

Page 2: ......

Page 3: ..._________________________________________________ Date of purchase TABLE OF CONTENTS SAFETY INFORMATION 4 USING THE RANGE 8 Surface Units 8 Oven Controls 9 Sabbath Mode 10 Cookware Guidelines 11 Cooking Modes 11 Oven Racks 12 Oven Air Vents 12 Aluminum Foil and Oven Liners 12 Cooking Guide 13 CARE AND CLEANING 14 Oven 14 Cooktop 14 Door and Drawer 16 Oven Light 17 Oven Door 17 TROUBLESHOOTING TIPS...

Page 4: ...e back of the range being careful not to grab or bend the rear trim piece Tilt the range forward slightly and confirm the anti tip bracket engages the back of the range limiting the forward tip of the range If the anti tip bracket does not engage the range and prevent it from tipping verify the anti tip bracket has been properly installed If this does not solve the problem or the anti tip bracket ...

Page 5: ...f the oven These surfaces may be hot enough to burn even though they are dark in color During and after use do not touch or let clothing or other flammable materials contact the surface units areas nearby the surface units or any interior area of the oven allow sufficient time for cooling first Other surfaces of the appliance may become hot enough to cause burns Potentially hot surfaces include th...

Page 6: ...rface unit will also improve efficiency Only certain types of glass glass ceramic earthenware or other glazed containers are suitable for cooktop service others may break because of the sudden change in temperature To minimize the possibility of burns ignition of flammable materials and spillage the handle of a container should be turned toward the center of the range without extending over nearby...

Page 7: ...p the oven vent unobstructed Keep the oven free from grease buildup Grease in the oven may ignite Place oven racks in desired location while oven is cool If rack must be moved while oven is hot do not let pot holder contact hot heating element in oven When using cooking or roasting bags in the oven follow the manufacturer s directions Pull the oven rack to the stop lock position when loading and u...

Page 8: ...ly interrupted when a pot or pan exceeds expected cooking temperatures Even after the surface units are turned off the surface unit retains enough heat to continue cooking To avoid overcooking remove pans from the surface units when the food is cooked Avoid placing anything on the surface unit until it has cooled completely Cookware for Coil Cooktops The following information will help you choose ...

Page 9: ...rom the surface units when the food is cooked Avoid placing anything on the surface unit until it has cooled completely Water stains mineral deposits are removable using the cleaning cream or full strength white vinegar Use of window cleaner may leave an iridescent film on the cooktop The cleaning cream will remove this film Don t store heavy items above the cooktop If they drop onto the cooktop t...

Page 10: ...oktop glass The enamel can melt and bond to the ceramic cooktop Glass ceramic Poor performance Will scratch the surface Stoneware Poor performance May scratch the surface Cast Iron Not recommended unless designed specifically for glass cooktops Poor conductivity and slow to absorb heat Will scratch the cooktop surface More about Cookware Place only dry pans on the surface elements Do not place lid...

Page 11: ...ing To Adjust the Thermostat 1 Pull the Oven Temp knob off the range and look at the back side To make an adjustment loosen approximately one turn but do not completely remove the two screws on the back of the knob 2 With the back of the knob facing you hold the outer edge of the knob with one hand and turn the front of the knob with the other hand To increase the oven temperature move the top scr...

Page 12: ...e during the Sabbath and holidays For the latest list of models see star k org Start Baking To start baking simply turn the thermostat knob to the desired temperature Because a thermostat model will respond with a clicking sound when the thermostat knob is used to turn on the oven this operation should take place before the Sabbath or Holidays begin Adjusting the Temperature To adjust the oven tem...

Page 13: ...rees Always preheat when using this mode Baking times may be slightly longer for multiple racks than what would be expected for a single rack To use this mode turn your Oven Mode Knob to Convection Bake and Oven Temperature Knob to the recommended temperature setting Warm on some models Warm mode is designed to keep hot foods hot Cover foods that need to remain moist and do not cover foods that sh...

Page 14: ... of the rack onto the rack supports Tilt up the front of the rack and push the rack in until it stops Then lay the rack flat and push it in until it is all the way into the oven Racks may become difficult to slide To improve sliding conditions use a soft cloth or paper towel to rub vegetable oil on the left and right edges of the racks and or rack supports NOTE Remove unused racks when using the o...

Page 15: ... Leave uncovered use a low sided pan such as a broil pan Bone in chicken breasts legs thighs Broil Bake 1 or 2 If breaded or coated in sauce avoid Broil modes Broil skin side down first Watch food closely when broiling Boneless chicken breasts Broil Bake 1 or 2 Move food down for more doneness less searing and up for greater searing browning when broiling Whole turkey Bake 1 or 2 Leave uncovered u...

Page 16: ...f the oven COOKTOP Control Panel and Knobs Wipe the control panel after each use of the oven with a damp cloth For cleaning use mild soap and water or a 50 50 solution of vinegar and water Rinse with clean water Polish dry with a soft cloth Do not use abrasive cleansers strong liquid cleansers plastic scouring pads or oven cleaners on the control panel they will damage the finish Stainless Steel S...

Page 17: ...lish the entire surface with CERAMA BRYTE Ceramic Cooktop Cleaner and a paper towel Heavy Burned On Residue 1 Allow the cooktop to cool 2 Use a single edge razor blade scraper at approximately a 45 angle against the glass surface and scrape the soil It will be necessary to apply pressure to the razor scraper in order to remove the residue 3 After scraping with the razor scraper spread a few drops ...

Page 18: ...oor gasket it has an extremely low resistance to abrasion If you notice the gasket becoming worn frayed or damaged in any way or if it has become displaced on the door you should have it replaced Cleaning the Door Exterior If a stain on the door vent trim is persistent use a mild abrasive cleaner and a sponge scrubber for best results Do not use this method on any other surface Stainless Steel Sur...

Page 19: ...Do not lift door by the handle To Remove the Door 1 Fully open the door 2 Pull the hinge locks up and away from the range frame to the unlocked position 3 Firmly grasp both sides of the door near the top 4 Close door until the top of the door is approximately 6 from the range frame 5 Lift door up and away from the range until both hinge arms are clear of the slots in the range frame To Replace the...

Page 20: ...inum foil on broil pan wrap tightly and add slits conforming to those in the pan to allow grease to drain Oven temperature too hot or too cold Oven temperature needs adjustment See the Oven Controls section Oven appears not to work A fuse in your home may be blown or the circuit breaker tripped Replace the fuse or reset the circuit breaker Oven controls improperly set See the Using the Oven sectio...

Page 21: ...HIRUH QH W XVH 6HH WKH OHDQLQJ WKH JODVV FRRNWRS VHFWLRQ RW VXUIDFH RQ D PRGHO ZLWK D OLJKW FRORUHG FRRNWRS 7KLV LV QRUPDO 7KH VXUIDFH PD DSSHDU GLVFRORUHG ZKHQ LW LV KRW 7KLV LV WHPSRUDU DQG ZLOO GLVDSSHDU DV WKH JODVV FRROV 3ODVWLF PHOWHG WR WKH VXUIDFH RW FRRNWRS FDPH LQWR FRQWDFW ZLWK SODVWLF SODFHG RQ WKH KRW FRRNWRS 6HH WKH ODVV VXUIDFH SRWHQWLDO IRU SHUPDQHQW GDPDJH VHFWLRQ LQ WKH OHDQLQJ W...

Page 22: ...and exclusive remedy is product repair as provided in this Limited Warranty Any implied warranties including the implied warranties of merchantability or fitness for a particular purpose are limited to one year or the shortest period allowed by law This limited warranty is extended to the original purchaser and any succeeding owner for products purchased for home use within the USA If the product ...

Page 23: ...e following products and more are available ACCESSORIES Accessories Small Broiler Pan 8 x 1 x 13 Parts Oven racks Oven burners Light bulbs Cleaning Supplies CitruShine Stainless Steel Wipes CERAMA BRYTE Stainless Steel Appliance Cleaner CERAMA BRYTE Cleaning Pads for Ceramic Cooktops CERAMA BRYTE Ceramic Cooktop Cleaner CERAMA BRYTE Ceramic Cooktop Scraper Kit Kit includes cream and cooktop scrape...

Page 24: ...24 49 88074 1 ENGLISH NOTES ...

Reviews: