background image

Getting Started

EN-19    Digital LCD Television Instruction Manual 

Press 

5


button to select the item requires adjusting.

Press

3

 button to adjust the selection item.

When you are satisfied with your choice, press the


EXIT

 button to return to normal viewing or press 

MENU

 button to return to the previous menu.
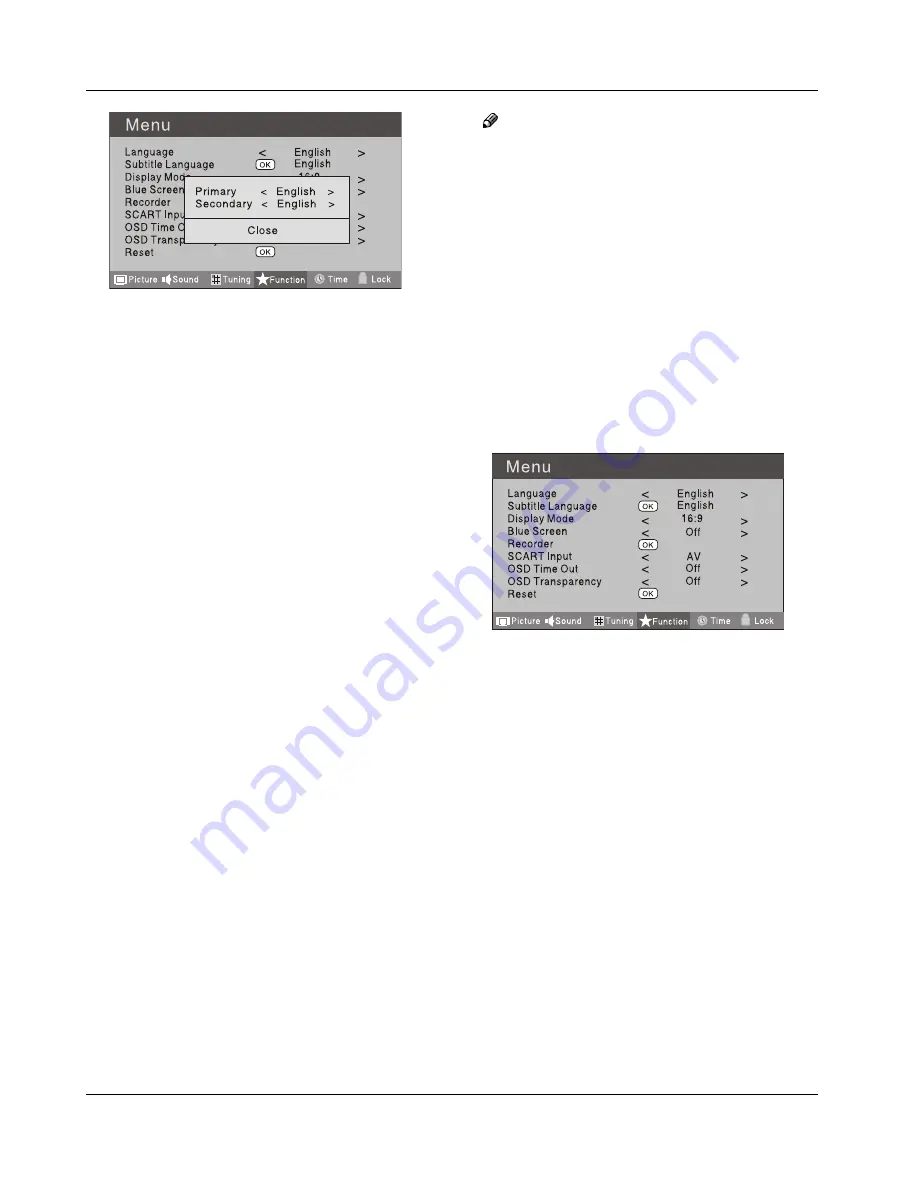
Display Mode


To set the picture proportion, press

3

 button to 

select 4:3/Zoom1/Zoom2/Wide/16:9/Auto. You can 

quickly select the desired mode by

 ARC

 button on 

the remote control.

4:3 mode


Choose 

4:3 

when you want to view a picture 

with an original 4:3 aspect ratio, with gray bars 

appearing at both the left and right sides. 

16:9 mode


Choose 

16:9 

when you want to adjust the picture 

horizontally, in a linear proportion to fill the entire 
screen.

Zoom1


Choose 

Zoom1 

when you want to view the picture 

without any alteration. However, the top and 

bottom portions of the picture will be cropped. 

Zoom2


Choose 

Zoom2 

when you want the picture to be 

altered, both vertically extended and cropped. 

The picture taking a halfway trade off between 

alteration and screen coverage. 

Wide


Choose Wide when you want to adjust the picture 

in a non-linear proportion, that is, more enlarged 

at top sides and no alteration, at bottom side.

Blue Screen


This will select the character background colour.

 Note

The Blue Screen function is only available for 


ATV mode.

Recorder


To recorder the DTV program. Details of Recorder are 

described in the page of 25, 26.

SCART Input


When you use the SCART2 input ,make sure the input 

source is AV or S-VIDEO, and set the SCART INPUT 

option.

OSD Time Out


To set how long you want the menus to appear  

on-screen. Each press of 

3

 button repeatedly to 

select the number of preset minutes, the Time will be 

set in sequence: off, 10sec, 15sec, 30sec, 45sec, 60sec.

OSD Transparency


To set the transparency background of OSD, the 

transparency will be set in sequence: Off, 25%, 50%, 

75%, 100%.

Reset


To recover to the default value.

TIME SETTINGS

Clock


Press 

MENU

 button.

Press 

3

 button to select 

Time 

menu, press 


button to enter.

Summary of Contents for LT19K3CW2

Page 1: ...RNAL SOURCE OTHER THAT TV 10 AUTO SEARCH 10 DIGITAL MANUAL SEARCH 10 Analog Manual Search 11 Channel Edit 11 RENAME 12 MOVE 12 Setting favourite channel 12 SKIP 12 GUIDE Electronic Program Guide 12 COMMON INTERFACE 13 Software Update function 13 Operation 14 USING YOUR TV 14 How to select the TV program 14 HOW to adjust volume 14 CH LIST function 15 ADJUSTING PICTURE SETTINGS 15 Changing the Pictu...

Page 2: ...HELP LINE THERE IS A LIGHTNING ARROW SYMBOL IN THE TRIANGLE THIS SYMBOL INDICATES HIGH VOLTAGE IS PRESENT INSIDE IT IS DANGEROUS TO MAKE ANY KIND OF CONTACT WITH ANYINSIDE PART OF THIS PRODUCT THERE IS A EXCLAMATION MARK IN THE TRIANGLE THIS SYMBOL ALERTS YOU THAT IMPORTANT LITERATURE CONCERNING OPERATION AND MAINTENANCE HAS BEEN INCLUDED WITH THIS PRODUCT CAUTION TO REDUCE THE RISK OF ELECTRIC SH...

Page 3: ...lugs and keep electric cord away from heat sources to avoid electric shocks or fire hazards Do not connect excessive sockets in parallel or share the same socket by multiple plugs to avoid fire hazards The product must be placed on a solid and stable surface to avoid collapse Unauthorized disassembly of the television is prohibited to avoid electric shocks or fire hazards Contact authorized after ...

Page 4: ...s poor electric connection might cause fire When antenna is used measures should be taken to prevent water from flowing down along the cable into the television Unplug the television use soft fabric never chemicals if you are going to make cleaning of the product Make sure that no water drops in the product The plug and electric cable must be kept clean to avoid electric shocks or fire hazards Dis...

Page 5: ...h 2 SOURCE Call the Input Source menu Confirm button when operating menu 3 MENU Presstoselectthemainmenu 4 VOL Volume down Left orientation to adjust the item in the OSD VOL Volume up Right orientation to adjust the item Press to enter 5 CH TV channel down to select the item in the menu CH TV channel up to select the item in the menu 6 Power indicator 7 Remote Sensor ...

Page 6: ...About your LCD TV Digital LCD Television Instruction Manual EN 6 Rear Terminals Control ...

Page 7: ...ut 5 HDMI IN input 6 PC IN input 7 PC DCI AUDIO IN input 8 TV SCART input 9 AUDIO IN input AV IN input A COMPONENT IN input 1 SOURCE Call the input Source menu Confirm button when operating menu 2 MENU Presstoselectthemainmenu 3 VOL Volumedown Leftorientationtoadjusttheitem intheOSD VOL Volumeup Rightorientationtoadjusttheitem intheOSD 4 CH TVchanneldown toselecttheiteminthemenu CH TVchannelup tos...

Page 8: ...RT input 2 Component input 3 Component Audio input 4 PC input 5 PC DVI AUDIO input 6 HDMI3 IN input 7 HDMI2 IN input 8 Common Interface 9 Earphone 0 ANTENNA input A Optical output B USB C HDMI1 IN input 1 SOURCE Toggles between all the available input sources 2 MENU Press to see an on screen menu of yourTV s features 3 VOL Press to increase or decrease the volume 4 CH Presstochangechannels 5 POWER...

Page 9: ...n L Cursor Mover button M Back button only for USB N Exit Screen Display O REPEAT only for DVD USB REC Timeshift CANCEL button P Zoom only for DVD USB Teletext index only forTV REC index Q Play Pause button only for DVD USB Timeshift R Stop only for DVD USB REC Timeshift S Fast Reverse only for DVD USB REC Timeshift T FastForward onlyforDVD USB REC Timeshift U Previous only for DVD USB REC Timeshi...

Page 10: ...sent F change the VGA mode to another resolution change the refresh rate to another rate or adjust the brightness and contrast on the menu until the picture is clear CONNECT A DVD PLAYER TO YOUR TV Connect the DVD video outputs Y Pb Pr to the COMPONENT Y Pb Pr IN socket on your TV Turn on the DVD player and insert a DVD A Press the button to select B Refer to the DVD player user guide for operatin...

Page 11: ...emote Close the cover of the battery compartment C BATTERY CAUTION Confirm there is no object between the remote control and the remote sensor of the TV set Sunshine or other strong light will interfere with the signal sent by the remote control In this situation turn the TV set to avoid the direct light source Do not put the remote control in direct heat or in a damp place as you may damage the r...

Page 12: ...ou have attached a DVD player or similar external device to the TV you will need to tell the TV to display the content from it Simply press SOURCE which will bring up the source menu in the left corner of the screen use the 5 and button to highlight the required source and press OK select For details of how to plug in other equipment see GET TO KNOW YOUR TV on page 5 AUTO SEARCH Press A MENU butto...

Page 13: ...ed to select the lower frequency channel And then select Storage To press E 34 button to select the position number you want the channel on Once a channel is located you can press red button to save it Press EXIT button to exit Sound System Press button to select Sound System then press 4 button to select the correct sound system Current CH Press 34 button to select the channel number to edit Stor...

Page 14: ...n to select the position Press B 56 button to select the number position you want to remove to press yellow button to confirm You can press the C EXIT button to cancel the changes at anytime Setting favourite channel Press A 56 button to select the channel press red button to set your favourite channel You can press the red button to cancel the changes B at anytime Press C FAV button on the remote...

Page 15: ...Common Interface slot Insert the CAM correctly then Smart Card to the CI A slot that is located at the side of the TV CI Slot CAM Smart Card Turn on the TV and it will display the below message B if the CA module is detected Wait for few moments until the card is activated Press the C MENU button to display the Main Menu and use the and button to highlight the Common Interface line and press the O...

Page 16: ... begin to upgrade Or else the TV will be back the DTV source Load the receiver identification This process may G also take several minutes You can press EXIT button to cancel the download and your TV set will be back the DTV source 100 15 Press EXIT to cancel download Updating in progress Do not turn off the TV After the download has finished your TV set will H enter burning state and the indicato...

Page 17: ...ect the darker areas of the picture Colour This will adjust the saturation level of the colours to suit your personal preference Sharpness This will adjust the sharpness of fine details in the picture Tint Allows you to select the colour mix Tint of the picture Note The Tint function is only available in NTSC mode Mode This will select the picture mode Select Standard Mild User Vivid according to ...

Page 18: ... on the remote control AVL Automatic volume control This will reduces the differences in volume level among broadcasters SRS TS XT This will control the Woofer output Press button to select SRS TS XT Press 34 button to set SRS TS XT as OFF ON Digital Audio Output This will control the Digital Audio Output Press button to select Digital Audio Output Press button to set Digital Audio Output as OFF P...

Page 19: ...e Zoom2 when you want the picture to be altered both vertically extended and cropped The picture taking a halfway trade off between alteration and screen coverage Wide Choose Wide when you want to adjust the picture in a non linear proportion that is more enlarged at top sides and no alteration at bottom side Blue Screen This will select the character background colour Note The Blue Screen functio...

Page 20: ... A MENU button Press B 34 button to select Time menu press button to enter Press C button to select Off Time item press button to enter setting Press button to select Repeat option and then press4button to set it on Press56 button to select hour or minute press 34 button to adjust the value When the off time has arrived the TV set will enter into standby mode On Time Press A MENU button Press B 34...

Page 21: ...e sub menu and you will be required to enter the password The initial password of the television is 0000 If you forget your password you can always input 9443 to regain control CHANGE PASSWORD Press A 56button to select Change Password item Press button to enter the submenu When you have inputted the four digits you will B be prompted to enter it again Your new password will then be automatically ...

Page 22: ...is below maximum volume customer set volume will stay unchanged Initial Volume The TV will remember it after your setting that will be the volume when turn on the TV next time Parental Lock Press 56button to select parental lock Press 34 button to select OFF or 4 18 to limit the age of children who will watch TV Clear Lock Press 56button to select Unlock mode Press 34 button to unlock all set mode...

Page 23: ... in the DTV mode Eliminate Sound When you need to pay attention to surrounded sounds or there is a telephone calling you or there are some guests visiting you the sound elimination mute function is very convenient Press the A MUTE button on the remote control and Mute type face will display on the lower part of the screen At this Time the sound of the TV set is turned off If you want to recover th...

Page 24: ...owse next or previous page Page number entering To select a Teletext page enter the page number using the numeric key pad on the remote control or use the P or P buttons or the coloured Fast text buttons Mix mode To view the TV picture while in Text mode press the button this will superimpose the Teletext data on top of the TV picture Press this button again to return to Full text INDEX Press the ...

Page 25: ...g C The file code rate should be lower than 300KB S Due to the limitation of USB signal transmission distance it is recommended not to use USB patch cord in case of using the cord make sure that its length is not over 1m Use high speed USB equipment in conformity with USB2 0 full speed Interface Standard If USB equipment in conformity with USB1 1 full speed Interface Standard is used the playing m...

Page 26: ...he picture file list Press C 5 6 to select the picture you want to play press OK to confirm and then press PLAY PAUSE button to play the pictures If you want to pause the picture which is being D palyed press the PALY PAUSE button again Press ZOOM to magnify the picture When the picture is enlarged press 3 4 and to move the picture Press PREV NEXT to select the last or next picture Press 5 6 to ro...

Page 27: ... OK button to select the text you want to play and then press PLAY PAUSE button to play the text Press PREV NEXT to select the last or next text Toexit the Text D mode just press BACK repeatedly Note You can enjoy the music and the text at the same time Using External USB Disk For Recording Insert the USB device with FAT32 format into the A USB1 connector Then press MENU button Note Only USB1 is a...

Page 28: ...t a time Bit rate Device bit rate 4 5MB s REC is safe at HD stream Device bit rate 1 5MB s REC is safe at SD stream Device bit rate 600KB s REC is bad for REC The system can not work normally if the USB device have the listing problem below The device has bug The device has error block The device reports the unfaithful size IMPORTANT USB device should be format as FAT32 format by your PC before in...

Page 29: ...igate around the DVD menu to highlight the play option and then press PLAY PAUSE PAUSING A DVD Press A PLAY PAUSE to pause playback The sound will also be muted Press B PLAY PAUSE to resume normal playback STOPPING A DVD Press the A button to stop playback of a DVD The TV screen will show the DVD start up logo Some discs will remember the moment at which B the DVD was stopped so press PLAY PAUSE t...

Page 30: ...ess SEARCH and use the numerical keys to enter the chapter number you wish to go to and press PLAY PAUSE PROGRAM During playback press PROGRAM to move directly to a section or programme on the DVD Press the digit buttons to select the programme number that you want When finished move the cursor to select START The DVD will jump directly to that section and begin to play If you want to cancel this ...

Page 31: ...nput Restart the television if power supply is interrupted No sound Press MUTE button and verify if Mute mode is set Switch to other channel and verify if the same problem happens Press VOL button to see if the problem can be solved Poor sound Verify if sound system is correct Refer to user s manual for adjustment No picture in some channel Verify if correct channel is selected Adjust the antenna ...

Page 32: ...on Instruction Manual EN 32 40 Remote control AAA battery 2 Instruction Manual Warranty TV Stand 5XScrews for TV stand only for 40 model Component adapter Component audio adapter SCART adapter only for 40 model Cover button only for 40 model ...

Page 33: ...01 0090504932P ...

Page 34: ...ng the unit and keep it for future ref erence DIGITAL LCD TELEVISION TELEVISION NUMERIQUE ECRAN LCD INSTRUCTION MAN UAL MANUELD UTILISATION Lire attentivement ce manuel avant d utiliser la télévision L e conser ver en vue d une utilisation ultérieure ...

Reviews: