background image

Operation

04  OPERATION

Power supply to switch on/off this Unit. Before switch on, 
ensure that all connections will be proper and correct.
Press Power on/off (at the botton of the rear panel of this 
Unit) to turn on/off this Unit. When the power indicator turns 
red, this Unit accesses the power on and standby state.

Basic Operation

Press 


key to start this Unit.The power indicator turns 


Press


 key once again to switch off this Unit

.

If there is no signal for the current signal source, this unit will 
automatically set to the standby state 10 minutes later.
If not to use the main Unit for a long time, unplug the AC 
power cord from the AC outlet.

off

.

Select input signal sources

After turn on the main unit, press source to select proper 
input source. Press

▼▲

 buttons to select the main signal 

source. Press OK button to confirm.

Setting the OSD Menu

Press MENU button, and the main menu appears. the main 
menu display in turn as below:
Picture

Audio

Wide Mode

Channel

Time

Setup

When display of some menu option is gray, it indicates that 
such options are not available under the current mode.
General Step for Menu Setup:

For each main menu, first press

▼ 

to enter the submenu.

Press 

▶ 

to select the desired adjustable option.

Press 

▶ 

to adjust to suitable value.(There is 

▶ 

option 

only following such menu, then press 

▶ 

key only)

After the selection of option is completed, press Menu to 

be able to quit the menu.

Installation Guide

The installation guide only appear when the TV first time


turn on or reset to factory set.

1). Press the 

▲▼ 

buttons to navigate the menu and change 

the settings. Press the OK button to confirm.         
Select your desired language to be displayed on the menu. 
Input your password and press confirm to complete.

Note

: The default password is 0000.

Home And Shop modes

2). When the unit is turn on for the very first time, it will show 
Initialization set-up menu. After the OSD language is set, the     
user can choose between "shop mode” and "home mode".
When the screen shows the following setting menu and the 
cursor stays on the "home mode" choice, press 

◀▶ 

to adjust, 

and "OK" to enter the menu.

If "Home mode" is choosen, the following menu will displayed.

Choose “Cancel” to go back to the Initialization set-up menu.
Choose “OK”to enter the Network menu.
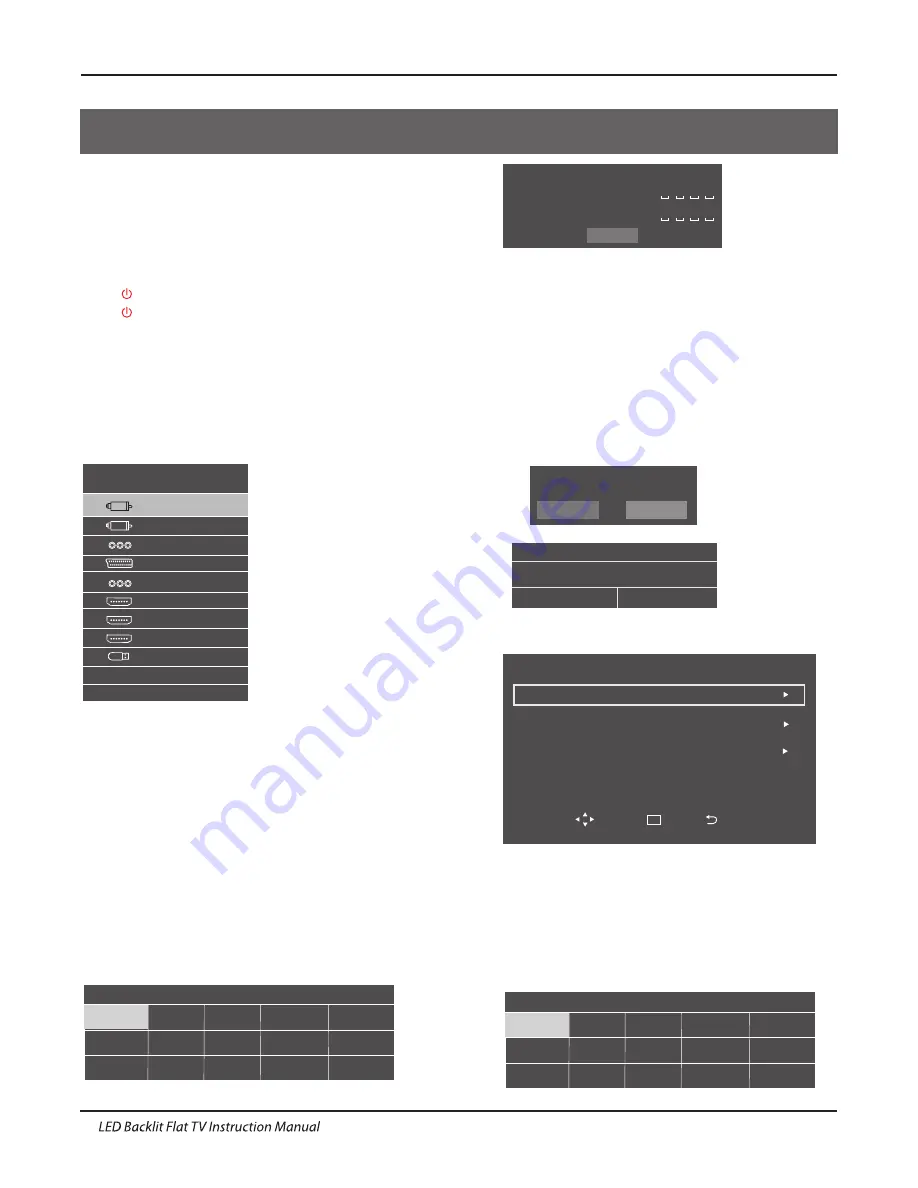
 

Source

DTV

ATV
AV
SCART

Component
HDMI1

HDMI2
HDMI3
Media

Please


select


an


OSD


language

Dutch

Russian

Greek

French

Italian

Spanish

German

Romanian

Czech

Polish

Portuguese

Hungarian

English


Arabic

Thai

Password

Please


enter


new


password

Confirm


new


password

Confirm


Shop


Mode

Home


Mode

Select


the


usage


mode

?

Shop


mode


is


for


shop


usage


only

.

Confirm

Are


you


sure


to


change


to


Home


mode

?

Cancel

OK

Network


Network

Wired

WI-FI

Confirm

Move

Enter

Back

OK

Not Connected

Not Connected

Not Connected

Network

Network

Press the 

▲▼

buttons to select network type,then press the 

OK button to enter the submenu.   After the Network is set , 
press the


▲▼

buttons to select “Confirm” and then press the 

OK button to confirm .

DVB


Tuning


Type

ATV

DTV

 3)

.

The following menu will display.Press the 

◀ ▶ 

buttons to

 select DTV/ATV


and then press the 

OK button to confirm. 

13

Summary of Contents for LE42K5000A

Page 1: ...LED LCD TV OWNER S MANUAL Please READ this manual carefully before operating your TV and retain it for future reference LE55K5000A LE42K5000A ...

Page 2: ... Common Interface 9 11 Remote Control 03 Remote Control 12 04 Operation Trouble shooting 05 Trouble shooting 21 Specification 24 06 Specification Basic Operation 13 Picture MENU 14 Audio MENU 14 Wide Mode MENU 14 Channel MENU 15 Auto Tune 15 Manual Tune 15 Program Edit 15 CI Information 16 Antenna Type 15 Signal Information 16 Time MENU 16 Setup MENU 16 HDMI_CEC 16 System Lock 16 Advance 17 Androi...

Page 3: ... BEEN INCLUDED WITH THIS PRODUCT CAUTION TO REDUCE THE RISK OF ELECTRIC SHOCK AND FIRE DO NOT PUT THE TV SET NEAR SOURCES OF HUMIDITY DO NOT USE ANY ABRASIVE CLEANERS WHICH MAY SCRATCH OR DAMAGE THE LCD SCREEN AVOID CONTACT WITH OBJECTS THAT MAY SCRATCH THE LCD SCREEN NOTE SERVICING THE UNIT YOURSELF IS UNAUTHORISED AND COULD LEAD TO INJURY OR PRODUCT DAMAGE REFER ALL SERVICING TO THE CUSTOMER HEL...

Page 4: ...ny injury caused by lean of the product please always ensure the whole product was placed within the table surface in horizontal CAUTION When the apparatus was in electrostatic circumstance it maybe malfunction and need to reset by user ...

Page 5: ...tion Do not trap the power supply cord under the television receiver Caution Never stand on lean on or suddenly push the television or its stand You should pay special attention to children Serious injury may result if it should fall Caution Do not place your television on an unstable cart stand shelf or table Serious injury to an individual and damage to the television may result if it should fal...

Page 6: ...y water drops off the SCREEN or CABINET or around any of the buttons or connectors the power cabled should be removed from the power socket Wipe the TV with a soft dry dust free cloth During thunderstorms unplug the power cable and aerial antenna cable to prevent damage to your TV and any other devices connected to it All repairs to this TV should only be performed by qualified TV service personne...

Page 7: ...slightly jiggle the metal base stands around in their holes to allow the screws to be correctly seated prior to being tightened INSTALLATION NOTES Locate the TV in a room where light does not strike the screen directly Total darkness or a reflection on the screen can cause eyestrain Soft and indirect lighting is recommended for comfortable viewing Allow enough space between the TV and the wall to ...

Page 8: ...ESA standard holes on the back of the television Introduction This television can be wall mounted as follows 1 Place the LED LCD Television onto a solid surface Please place some soft material over the front of the screen to protect it from any damage 200mm 100mm M6X8MM M6X8MM M6X8MM M6X8MM 42 400mm 200mm M6X8MM M6X8MM M6X8MM M6X8MM 55 07 ...

Page 9: ...ected 5 Front control panel 3 2 30 30 1 8m SOURCE MENU V V CH CH Standby 1 2 3 4 5 Rear Side Sockets 1 AC Power Source 2 input 3 HDMI2 input 4 input 5 input 10 TF input 11 HEADPHONE input 12 LAN input 13 14 input OPTICAL 6 input YPbPr AV IN COMMON INTERFACE CI HDMI3 7 input output SCART 8 input ANT 9 input USB HDMI1 ARC output analogueaudiooutput AC INPUT 100 240V 50 60Hz SCART LAN HDMI1 ARC HDMI2...

Page 10: ...MI interfaces AC INPUT 100 240V 50 60Hz SCART LAN HDMI1 ARC HDMI2 OPTICAL YPbPr RF HDMI3 AV IN COMMON INTERFACE CI USB HEADPHONE TF USB USB CVBS DVD Player or other machine with CVBS S Video 1 WAN 2 3 4 Audio Receiver CVBS DVD Player or other machine with YPbPr YCbCr G R B G R B Y R W Y R W Connect USB receiver to USB slot of the TV 09 ...

Page 11: ... button Option 4 COMPONENT Green Blue Red White Red Make sure that both TV and the device are switched off before connecting TV Connect the cables not supplied from the COMPONENT IN sockets Y Pb Pr green blue red and L Audio R white red on the TV to the DVD player or games console etc To select the device connected with the COMPONENT cable press the SOURCE button on the remote and use the keys to ...

Page 12: ...out the modules and subscription Please noted that CA modules and smart cards are neither supplied nor optional accessories from us COMMON INTERFACE Signal CI Info Press the MENU button and press the buttons to select the then press to enter the submenu Press the buttons to select the CI information Channel MENU Channel Picture Audio Channel Time Wide Mode Setup Antenna Type Auto Tune Manual Tune ...

Page 13: ...urce list Press to enter into HOME PAGE P Press to change the channel Press to display the channel information In teletext mode press to revealthe hidden information Press to open the channel list In teletext mode press to switch the image to top bottom or full 3D WORLD These models do not support 3D feature Press to close the on screen menu In teletext mode press to exit the teletext mode Press t...

Page 14: ...e only appear when the TV first time turn on or reset to factory set 1 Press the buttons to navigate the menu and change the settings Press the OK button to confirm Select your desired language to be displayed on the menu Input your password and press confirm to complete Note The default password is 0000 Home And Shop modes 2 When the unit is turn on for the very first time it will show Initializa...

Page 15: ...press the button 2 Press the buttons to select submenu ECO Standard User Mild Vivid Mode User Mode Picture You can adjust picture effect here such as brightness color sharpness etc Picture Contrast 50 Brightness Color Sharpness Tint Back Light Image Noise Reduction Color Temperature 50 50 50 50 100 Weak Normal Move Enter Back OK 2 Audio MENU 1 Press the MENU button and then press the buttons to se...

Page 16: ...gramme Edit under the channel menu Auto Tune Search Type Full Scan Modulation Symbol Rate Network ID Auto Auto 0 Move Enter Back OK Confirm Modulation Symbol Rate Network ID Auto Tune Search 0 DTV 0 Radio 0 Data VHF CH0 Freq 0 MHZ 0 Start Search Enter Back OK 4 3 Manual Tune 1 Press the MENU button and then press the buttons to select the Channel MENU and then press the button 2 Press the buttons ...

Page 17: ...uto Standby 4hr Off On Move Enter Back OK Time 1970 1 1 02 01 AM Off Time Off Time Off Hour Minute 02 AM 01 Move Enter Back OK 6 Setup MENU 1 Press the MENU button and then press the buttons to select the Setup MENU and then press the button 2 Press the buttons to select submenu HDMI_CEC System Lock Advance 6 1 HDMI_CEC 1 Press the MENU button and then press the buttons to select the Setup MENU an...

Page 18: ...ngs to set the Android system Smart Share Manual If you are in the TV Mode you can press BACK buttons to go to Android Mode When you press the BACK button the following menu will displayed Also you can press button to goto Android Mode Smart Share is a function that allows to share the display of variou s consumerelectronic devices to a device suchas a N Smart com patible televisionwirelessly This...

Page 19: ...s the Apps button to view your install apps 1 6 Location You can check your local services such as google Location reporting 1 7 Security You can Make passwords visible view or deacticate device administrators and allow installation of apps from unknown sources 1 8 Language input You can reset your OSD language this functions are about language Keyboard etc and you can go to your habits 1 9 Backup...

Page 20: ...age device you can browse your pictures music video on TV N Smart Manual N Smart is a function that allows various consumerelectronic devices to share content with each other acrossa standard home network This would allow a device suchas aN Smart compatible television to play music or viewvideos or photos stored on a desktop computer or thecompatible device Press the OK buttons to enter theN Smart...

Page 21: ...s On then Tunging can not work 4 If OSD Lock is On then Menu can not work and prompt OSD Locak 5 If Stand by LED Power is On then LED can not work 7 If Source Lock is On then Source menu can appear but it does not work 8 If Max Volume is 100 then TV Max Volume is 100 if Max Volume is 60 then TV Max Volume is 60 9 If Default Volume is 30 then Power boot the TV Volume is 30 10 Clone function can clo...

Page 22: ...re Mute Power cord is not inserted Power switch is not opened Contrast and brightness volume setup Press standby key on the remote control for inspecting No colour Normal audio Colour control Picture breaking up Normal audio or weak retune channel No colour Noise TVsystem Normal audio antenna position direction or connection Trouble phenomenon Symptom Ghost Normal audio Change aspect to zoom There...

Page 23: ... at ATV and repeat the sequence below for all input sources ATV DTV SCART HDMI 1 and 2 as each input source is controlled separately Press TV Menu button Press Right Arrow to access Picture sub menu Press Down Arrow to select Aspect Ratio Select Auto Press Exit Repeat for all input sources I have just plugged in a DVD player or another item into my TV and it doesn t work This is applicable to any ...

Page 24: ...g should be very close or touching the body of the TV or component When plugging in any HDMI cables you may experience problems if the HDMI cables are plugged in when the TV or the other component is switched on Always switch off both the TV and the component you are plugging in If you have checked the plugs and sockets switch off the TV and whatever you have plugged in to the TV and then switch t...

Page 25: ...When current source is ATV scart output signal is ATV 2 When current source is AV scart output signal is AV scart output signal is DTV 4 Other source have no SCART output signal 3 When current source is DTV UHF VHF tuner Sleep timer Picture and text Parental Guidance Remote control batteries required 2 x AAA included VESA Mount Size 200x100 mm Package Size WxHxD 1030x137x635mm Set Size WxHxD with ...

Page 26: ...When current source is ATV scart output signal is ATV 2 When current source is AV scart output signal is AV scart output signal is DTV 4 Other source have no SCART output signal 3 When current source is DTV UHF VHF tuner Sleep timer Picture and text Parental Guidance Remote control batteries required 2 x AAA included VESA Mount Size 400x200 mm Package Size WxHxD 1367x150x850mm Set Size WxHxD with ...

Page 27: ......

Reviews: