background image

Basic Receiving and Playing Operations

EN-17    LED Backlit Flat TV Instruction Manual  

 Note

Some people may experience discomfort, such as 


dizziness, nausea and headaches, while viewing 

3D TV. If you experience any such symptom, stop 

watching 3D TV, remove the 3D glasses and have 

a rest.

Watching 3D images for an extended period of 


time may cause eye strain. If you feel that your 

eyes are becoming strained, stop watching 3D TV, 

remove your 3D glasses and have a rest.

Do not allow children under 6 years old to view 


3D images. A responsible adult should frequently 

check on children who are using the 3D function. 

If there are any reports of tired eyes, headaches, 

dizziness or nausea, stop the child from watching 

3D TV and have a rest.

Do not use the 3D glasses for other purposes 


(such as general spectacles, sunglasses, protective 

glasses etc.)

Do not use the 3D function or 3D glasses while 


walking or moving around. If you use the 3D 

function or 3D glasses while walking or moving 

around you may run into objects, trip and/or fall 

and injure yourself.

Do not drop, exert pressure on or step on the 3D 


glasses.

Do not use the 3D glasses if they are cracked or 


broken.  

If the TV is currently in 2D mode,

Press the 

3D switch key on the remote to display the 

prompt menu.

Press

34

button. You can then select a 

corresponding 3D mode.

If the TV is currently in 3D mode,

Press the 

3D  switch key on the remote to display 

the prompt menu.

Press

34

button to select 3D Mode off/2D>3D 

setup.

 Note

When you watch a 3D TV programme, please wear  


3D glasses.

The TV doesn’t store the 3D mode settings, so if 


you switch it off, it will return to 2D mode when 

turned back on again.

In USB mode, there are various modes of 3D video 


sources. With USB signals, the 3D switch key only 

functions when playing a film. The TV will exit 

3D mode when the film finished or when you 

manually exit 3D mode.
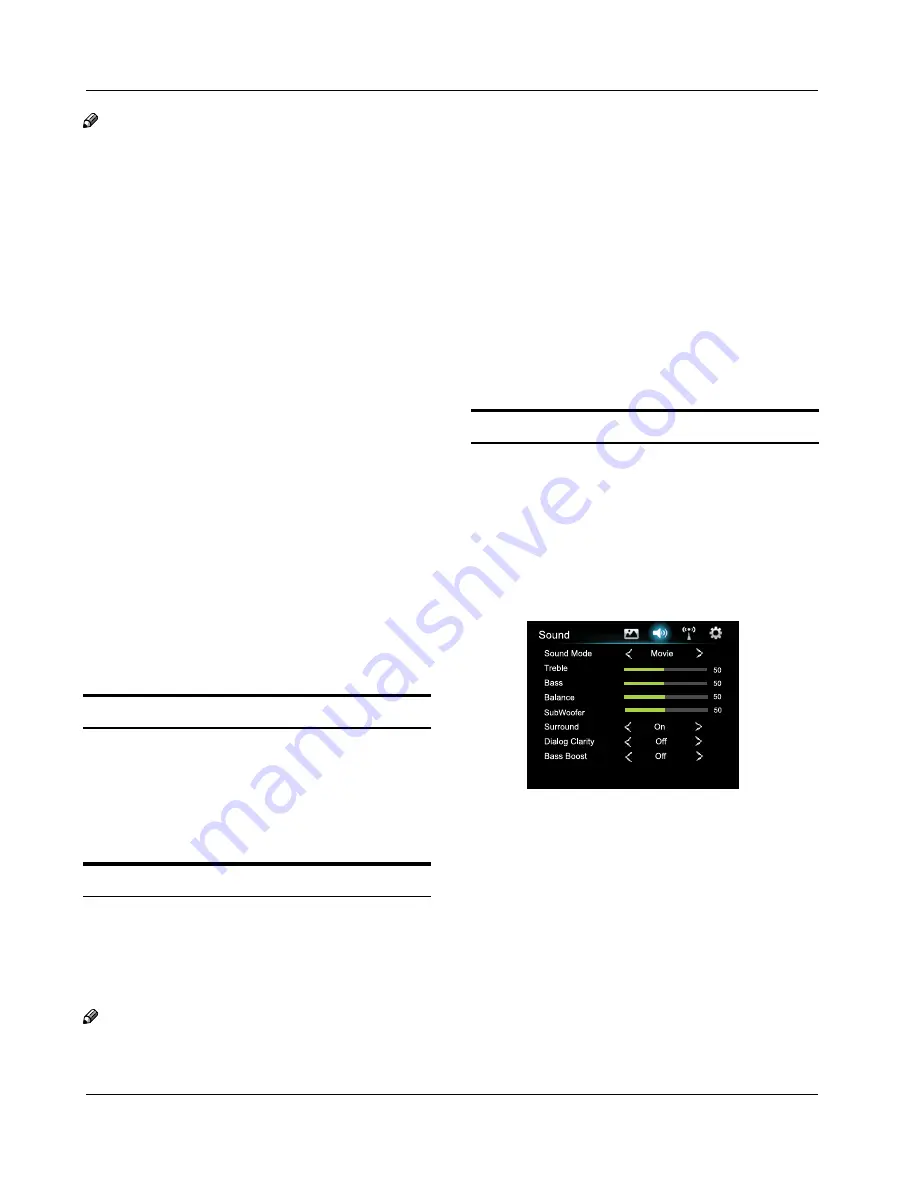
Adjusting Sound 
Setting

Changing the Sound Setting

Press 

MENU button.

Press

34

button to select Sound , press OK button 

to enter.

Press

6

button to select the item which require to 

be adjusted.

Press

34

button to adjust the selection item.

When you are satisfied with your choice, press the


EXIT button to return to normal viewing or press 
RETURN button to return to the previous menu.

Sound Mode


Y

This sound setting can be adjusted to suit your 

personal preference . Select Standard/Music/Movie/

News/User according to the program. 

Treble


Y

Adjust to increase or decrease higher-pitched sounds. 

Bass


Y

Adjust to increase or decrease lower-pitched sounds. 

Summary of Contents for LE42H5000

Page 1: ...Please READ this manual carefully before operating your TV and retain it for future reference LE42H5000 LE47H5000 LE55H5000 ...

Page 2: ... Basic Receiving and Playing Operations 14 Switching ON OFF the TV set 14 Choose the Input source 14 Tuning Your TV 14 Color System 14 Sound System 14 Channel Edit 15 Fine Tune 15 Manual Search 15 Auto Search 15 Using Your TV 16 How to Select the TV Program 16 How to Adjust Volume 16 Adjusting Picture Settings 16 Changing the Picture Setting 16 If the TV is currently in the 2D mode 17 If the TV is...

Page 3: ...e which shall remain readily operable Please read this manual carefully before using your television and keep this manual in a good place for future reference To achieve the best performance of your television read this User s Manual carefully and properly store it for future reference Information of screen displays and figures in the User s Manual may vary due to technical innovations Unauthorize...

Page 4: ...Important Safety Instructionss EN 3 LED Backlit Flat TV Instruction Manual Important Safety Instructions ...

Page 5: ...Important Safety Instructionss LED Backlit Flat TV Instruction Manual EN 4 En ...

Page 6: ... 4 screws M 4X8 as shown Step 2 Remove 4 EA screws on back ofTV as shown in picture Step 3 Put the stand base on the slot of display bottom Finally fix 4 screws M 4X12 in accessory to the right position as shown in picture Step 4 Stand assembly is finished 㾚ᴎ㚠䴶 hole screws About Your LED LCD TV Installing the Stand ...

Page 7: ... screw M6 55 model standard screw M6 Installing Wall Mount kit The wall mount kit Sold separately allow you to mount the TV on the wall For detailed information on installing the wall mount see the instructions provided with the wall mount Contact a techinical assistance when installing the wall mont bracket Haier Electronics is not responsible for any damage to the product or injury to yourself o...

Page 8: ... Panel SOURCE MENU VOL CH CH POWER VOL 1 SOURCE Press this key to open close signal source options menu 2 MENU Menu display Press to access the on screen menu display 3 VOL Press to increase and decrease the volume 4 CH TVchannelupand down 5 POWER Press to turn theTV on and off ...

Page 9: ...l EN 8 En 1 LAN input 2 ANT IN input 3 PCVideo IN input 4 PC Audio IN input 5 COMPONENT IN input 6 AV IN input 7 USB input 8 AV OUT output 9 DIGITAL AUDIO OUT OPTICAL output 0 HDMI 1 IN HDMI 2 IN input Back panel connections DIGITAL AUDIO USB HDMI 2 IN HDMI 1 IN ...

Page 10: ...Mode function 9 Displays the main on screen menu 0 No available A Turn previous B Selects the on screen menu items and changes the values on the menu C Turn next D Function button just reference the OSD E Play Pause button only for USB F Fast Reverse only for USB G Enter setting interface H Hotel Lock I Press to jump back and forth between two channels J Cut off the sound temporarily K Change Chan...

Page 11: ...ian replace the obsolete outlet If you cause a static discharge when touching the unit and the unit fails to function simply unplug the unit from the AC outlet and plug it back in The unit should return to normal operation Connecting to an Antenna or Cable Connection Over the air TV reception quality will depend on your antenna type antenna location and antenna positioning Cable Television Network...

Page 12: ...STB BD DVD player HD cable Sat box HDMI OUT DVI OUT HDMI IN PC AUDIO IN When using an HDMI DVI cable connection you must use the A HDMI IN jack for video A DVD player Blu ray player HD cable box HD satellite receiver STB cable box or STB satellite receiver may require a DVI HDMI DVI to HDMI cable or DVI HDMI DVI to HDMI adapter You must use the PC DVI AUDIO IN jack for audio The picture may not di...

Page 13: ...satellite receiver VCR Note For better picture quality the Component connection is recommended over the A V connection AV OUT Connects to the audio input jacks on your amplifier home theater When connecting use the appropriate connector included with your TV A When you B connecte an audio amplifier to the AV OUT jacks Decrease the volume of the TV and adjust the volume level with the Amplifier s v...

Page 14: ...r Audio Analog Cable Connection Available devices Digital Audio System Amplifier Home Theater When you connect a Digital Audio Syetem to the DIGITAL AUDIO OUT OPTICAL jack Decrease the volume of both TV and the system DIGITAL AUDIO OUT OPTICAL Connecting to a PC Using an HDMI cable or HDMI to DVI Cable a D Sub Cable DVI OUT HDMI OUT ...

Page 15: ...rce such as a DVD player Blu ray player cable box STB satellite receiver Press A SOURCE button to enter the Input Source menu and then use 6 button to select the desired external input source TV AV YPBPR PC HDMI1 HDMI2 Press B OK button to confirm Tuning Your TV Display Tuning menu by pressing SOURCE button then use 6 button to select the source of TV Press A MENU button and then use 34button to s...

Page 16: ... select Fine Tune Press OK button on the remote to enter its submenu Press C 34 button to select your desired Frequency Press D EXIT button to exit menu screen Manual Search Press A MENU button and then use34button to select Tuning menu press OK to enter its submenu Press B 6 button to select Manual Search press OK to enter its submenu Press C 34button to adjust the Frequency Press D MENU button t...

Page 17: ...ing to the program Brightness Y Y This will adjust the light output of the complete picture which will mainly affect the darker areas of the picture Contrast Y Y This will adjust the intensity of bright parts in the picture but keep the dark parts unchanged Color Y Y This will adjust the saturation level of the colors to suit your personal preference Sharpness Y Y This will adjust the sharpness of...

Page 18: ...he TV is currently in 2D mode Press the A 3D switch key on the remote to display the prompt menu Press B 34button You can then select a corresponding 3D mode If the TV is currently in 3D mode Press the A 3D switch key on the remote to display the prompt menu Press B 34button to select 3D Mode off 2D 3D setup Note When you watch a 3D TV programme please wear 3D glasses The TV doesn t store the 3D m...

Page 19: ... choice press the E EXIT button to return to normal viewing or press RETURN button to return to the previous menu Menu Time Y Y Press34button to select the number of minutes To select 5s 10s 15s 30s 60s Startup Select Y Y Press button to select the Startup Select Press34button to select Last Viewed Navigator Select Source Press button to select Select Port press 34to select TV AV YPbPr PC HDMI1 HD...

Page 20: ...ocal FileBrowser Press OK to enter Press C button to select the USB STORAGE SANDISK Press the corresponding key on the remote control to call out the prompt menu See Picture below Photo jpg png etc Music Mp3 8 320kbps WMA 32 192kbps AAC 16 576kbps etc Movie MPEG4 avi files in accordance with Div 4 x 5 x Protocol MPEG2 some mpeg files MPEG1 dat and some mpeg files RealVideo ect Text Txt When you ar...

Page 21: ...O UIF 8BMM YUFSOBM PEFN 4 7 4 BCMF BCMF OPU TVQQMJFE BCMF OPU TVQQMJFE PEFN BCMF OPU TVQQMJFE BDL PG 57 3PVUFS Depending on how your network is configured you may be able to attach your TV to your LAN by connecting the LAN port on the back of your TV directly to a network wall outlet using a Cat 5 cable See the diagram below Note that the wall outlet is attached to a modem or router elsewhere in y...

Page 22: ...ications may fail This series include build in Wi Fi dongle but Haier reserves the right to make changes without further notice to any products herein to improve reliability function or design DEVICE Y Y Press button to select Storage or Apps When select Storage Press OK to enter It s will display informations of USB When you select Apps press OK to enter and press 4button then press button to sel...

Page 23: ...ord before you begin any cleaning Cleaning the Screen Here s a great way to keep the dust off your screen A for a while Wet a soft cloth in a mixture of lukewarm water and a little fabric softener or dish washing detergent Wring the cloth until it s almost dry and then use it to wipe the screen Make sure the excess water is off the screen and B then let it air dry before you turn on your TV Cleani...

Page 24: ... maybe affected and a muffled sound might be produced These phenomena might happen in the area 1 500 meters above the sea level This is resulted from difference between air pressures inside and outside the display This is not a defect covered by the limited warranty Specification Basic specification and parameter Power 100 240V 50 60Hz Color System PAL NTSC SECAM AUTO Video Input USB AV Component ...

Page 25: ...uency Hz 1 640 480 60Hz 31 5 60 2 800 600 60Hz 37 88 60 3 1024 768 60Hz Recommendatory 48 36 60 Recommendation DVI connection input format Sequence Number Resolution Refresh Frequency Hz 1 640 480 60 2 800 600 60 3 1024 768 60 Recommendation HDMI connection input format Sequence Number Format Refresh Frequency Hz 1 480i 480p 60 2 576i 576p 50 3 720p 50 60 4 1080i 1080p 50 60 ...

Reviews: