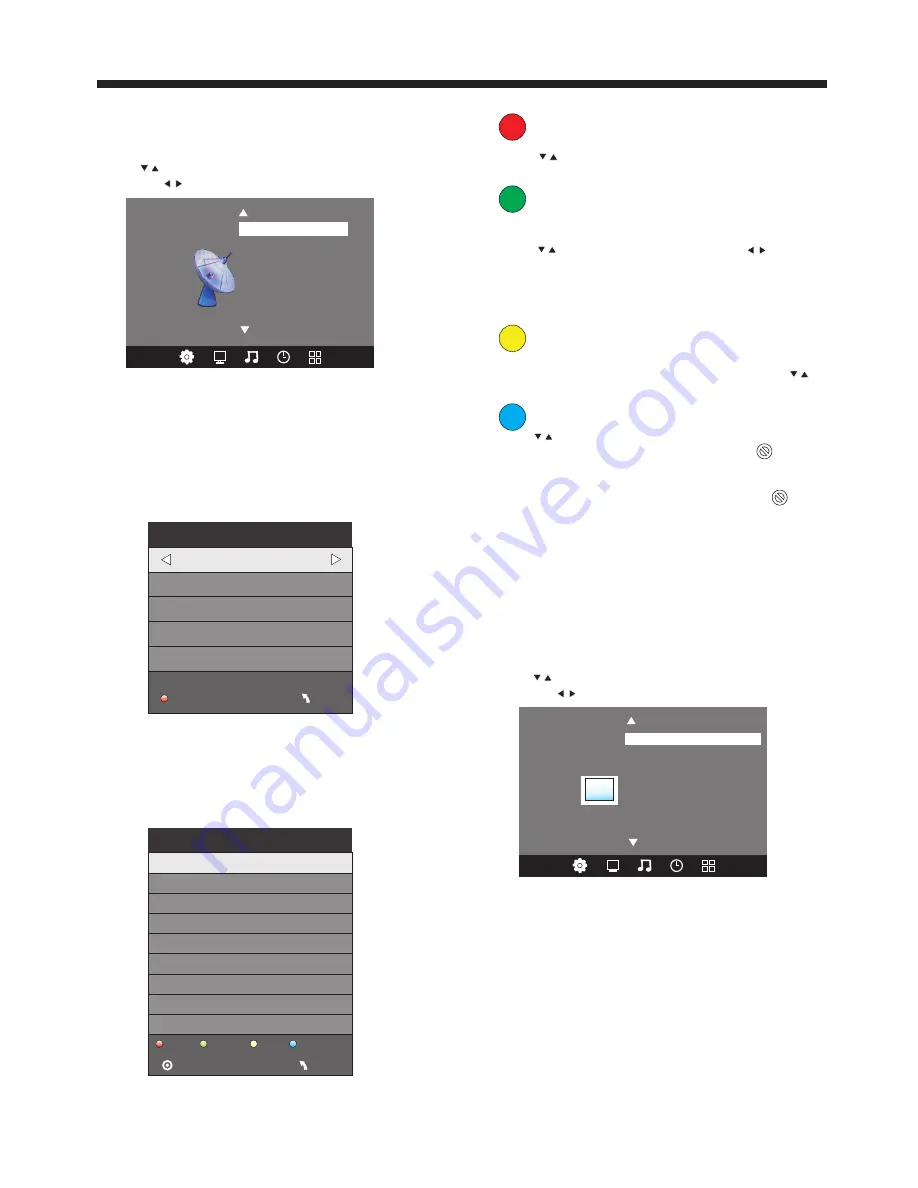
background image

-10-

 TV OPERATION

1. CHANNEL MENU

The first item of the MENU is channel menu ( for
TV source only).
You can search channels and edit programs here.
Press         to move, press OK button to confirm, 
and press         to adjust.

1).Auto tuning:

Search all the TV channels automatically.

2). Sound System

You can change the sound system.

3). Manual tuning:

You can search the TV channels and fine tune the 
channels, then storage the channels you selected.

 
           Delete

Press           to choose the program.
Press red button, the program will delete.


Rename

Move the cursor to the program, press
green button to rename the program.
Press          to choose the character. Press        to
move the cursor.
Press MENU button to exit edit, Press EXIT to exit 
the menu.
Note: The TV programs name only can be 5 characters.


Move

Move the cursor to the program, press 
yellow button, it will show yellow cursor, Press
to move the program.


Skip

Press        to choose the program, press 

Delete

Rename


Move

Skip

blue button to skip this program, The icon       will
show on the right side of the program.
Choose the skipped program, press the blue button
again, you can cancel the skip, Then the icon       will
disappear.

5). Software update(USB):

Update the TV set' s software by USB.

2. PICTURE MENU

The second item of the MENU is PICTURE MENU.
You can adjust picture effect here, such as contrast, 
brightness, etc.
Press        to move, press OK button to confirm, 
and press        to adjust.

NOTE:

1).Tint is available in NTSC system only.
2).There are four color temperature modes
can be selected, such as medium, warm, cool, and user.
3).Screen is available in PC mode only, which 
can adjust horizontal position, vertical position, 
size and phase.

<                                                >

Color Temperature
Aspect Ratio
Noise Reduction
Screen

Picture Mode       Standard

PICTURE

Sound System
Manual Tuning
Programme Edit
Software Update(USB)

<                                                >

CHANNEL

Auto Tuning

_

+

 Manual  Tuning

Storage To 2

Current CH 2

Search

Fine-Tune

Frequency  874.37  MHz

Save                                                MENU

NOTE:

Press red button to storage to channels
after manual tuning .

4). Program Edit:

You can Delete, Rename, Move, or Skip any programs.

Programme Edit

1

2

3

Delete

Rename

Move 

Skip

MENU

OK                                         

Summary of Contents for LE32B50

Page 1: ...LED LCD TV OWNER S MANUAL MODEL LE32B50 Please READ this manual carefully before operating your TV and retain it for future reference ...

Page 2: ...Contents 1 1 Safety and warnings 2 3 2 Introduction 4 3 Installation 5 8 4 Remote Controller 9 5 TV Operation 10 13 6 Trouble shooting 14 ...

Page 3: ...sonnel Servicing is required when the apparatus has been damaged in any way such as power supply cord or plug is damaged liquid has been spilled or objects have fallen into the apparatus the apparatus has been exposed to rain or moisture does not operate normally or has been dropped 14 Mains plug is used as the disconnect device the disconnect device shall remain readily operable 15 The ventilatio...

Page 4: ... should pay special attention to children Serious injury may result if it falls Do not place your television on an unstable cart stand shelf or table Serious injury to an individual and damage to the television may result if it falls When the television receiver is not used for an extended period of time it is advisable to disconnect the AC power cord from the AC outlet Avoid exposing the televisi...

Page 5: ...lution Aspect Ratio TV System Receiving Channel Power consumption Signal Input Output Horizon Video Signal System Input Power Voltage Audio Output Power 1366x768 16 9 PAL BG PAL I PAL DK SECAM BG SECAM DK PAL NTSC SECAM 1 200 THD 7 2x8W Analog RGB VGA x 1 High Definition Multimedia Interface HDMI x 2 Composite Video Input x 1 Audio Input x 2 YCb Pb Cr PR x 1 tal definition TV line Composite Video ...

Page 6: ...Adjust sound level In MENU mode press VOL or VOL to adjust the item that you selected 5 STANDBY Press this button to turn the unit ON from STANDBY mode Press it again to turn the set back to STANDBY 30 30 1 2 3 SOURCE 1 MENU CH CH VOL STANDBY VOL 2 3 4 5 All the terminals are from left to right USB HDMI2 HDMI1 YPbPr INPUT HEADPHONE PC AUDIO VGA RF Note When HDMI port get DVI signal the audio signa...

Page 7: ...wer off 1 Connect VGA and audio cable 2 Connect the power cord 3 Power on the TV switch to PC mode 4 Power on the PC This sequence is very important Note Aerial connections IEC female Input impendance 75 unbalanced ANTENNA Y Pb Pr USB HDMI2 PC AUDIO VGA RF HEADPHONE HDMI1 ...

Page 8: ...024 768 60 60 37 88 48 36 RESOLUTION V Freq Hz H Freq KHz 1360 768 60 47 7 PRESET MODE HDMI 1 2 3 800 600 1024 768 60 60 37 88 48 36 RESOLUTION V Freq Hz H Freq KHz 1360 768 60 47 7 4 1280 768 60 47 3 5 1920 1080 60 67 5 AV INPUT AC INPUT VIDEO L R AV OUTPUT VIDEO L R 100 240V 50 60Hz ...

Page 9: ...r as follows AV EQUIPMENT 8 1 AV and YPbPr share one audio channel 2 When HDMI port get DVI signal the PC Audio channel is changed to receive the audio for HDMI port 3 Sometimes it will not support in different device because the device supplys nonstandard signal 4 When current source is TV AV OUT signal is TV when current source is AV AV OUT signal is AV other sources have no AV OUT signal Note W...

Page 10: ...L or VOL to increase or decrease the volume 9 Open the channel list in TV mode 7 Press to display the TV status information on the bottom 11 Play Pause Stop Previous Next 12 Be used in programme edit Red Delete Green Rename Yellow Move Blue Skip 13 Press to display the sleep timer option 14 To change the picture aspect ratio Auto 4 3 16 9 Zoom Zoom2 8 Press to open the on screen menu 18 To move wi...

Page 11: ... button to skip this program The icon will show on the right side of the program Choose the skipped program press the blue button again you can cancel the skip Then the icon will disappear 5 Software update USB Update the TV set s software by USB 2 PICTURE MENU The second item of the MENU is PICTURE MENU You can adjust picture effect here such as contrast brightness etc Press to move press OK butt...

Page 12: ... will clear all the programs and Reset all the settings to default value 6 USB FUNCTION You must enter the Source menu first then choice the USB and press OK button the USB menu will appear Off Time On Time Sleep Timer Auto Sleep Clock TIME Balance Auto Volume Surround Sound Sound Mode Standard SOUND Restore Factory Default Blue Screen OSD Blend OSD Language English OPTION Please make sure that th...

Page 13: ...ht disk and press OK to display media files and folder list or choose Return to back to the media type selection menu Select the media file by pressing or then the preview frame will pop up Press the button to play the media file in full screen When the media file photo music Movie or text type is playing press the OK or Info button can display the control bar Music function need to put music and ...

Page 14: ... Start Source Choose source the options as follow TV YPBPR PC HDMI1 HDMI2 AV USB press the or button to select the desired source Start Channel In TV mode you can select a channel number to be set as the TV present channel Press the or button to select the desired channel number Setup Menu display Main menu lock main menu will not display when set to No Input source change Source lock you can t ch...

Page 15: ...t or not No picture Mute Power cord is not inserted Power switch is not opened Contrast and brightness volume setup Press standby key on the remote control for inspecting No color Normal audio color control Scramble Normal audio or weak retune channel No color Noise Audio system Special Explanation The accessories such as remote control is not belongs to the guarantee Normal audio antenna position...

Page 16: ......

Reviews: