background image

17

TO USE THE MENUS

1.  Press the 

Menu

 button to display 

or close the main menu.

2.  Use the 

Navigation Ring

 to move 

around to select, adjust or confirm 
an item in the OSD (On Screen 
Display) menu.

Press the 

Menu

 button to enter the 

main OSD. Adjust the items including 

Video menu

Audio menu

Feature 

menu

Channel menu

, and 

VGA 

menu

. However, some options in the 

menus may be unavailable in certain 
source modes.

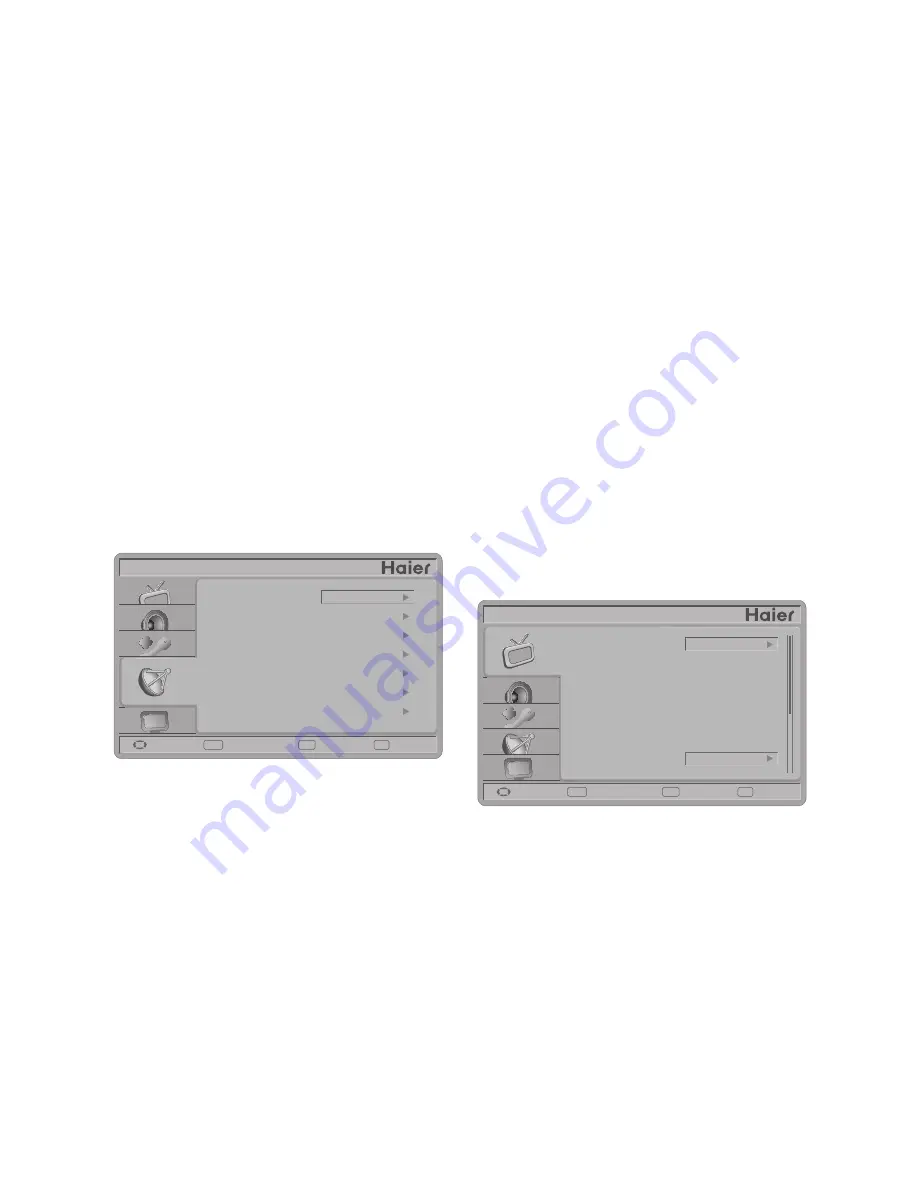
CHANNEL MENU

The Channel menu in TV mode is 
shown below.

ENTER

Exit

Menu

CHANNEL

Move

Select

Return

Exit

Channel Strength
Auto CH Search

Channels List

Add on CH Search

Channel Labels
FAV Channel Setting

Air

Tuning Band

1. 

Tuning Band:

 Select TV source 

signal from the Air (antenna) or 
Cable (CATV).

2. 

Channel Strength:

 Show the 

intensity of the received DTV signal.

3. 

Auto CH Search:

 Automatically 

scan all NTSC / ATSC TV channels 
and then store in the channel table. 
In channel scan process, the OSD 
can display the number of channels 
which had been found.

4. 

Add on CH Search:

 Add channels 

which are newly found.

5.  Channels List:

 Show the Channel 

List. You can select which channels 
are viewable.

6. 

Channel Labels:

 Shows the 

NTSC / ATSC TV Channel Labels. 
You can edit the labels.

7. 

FAV Channel Setting:

 Show the 

Favorite Channel List. You can add/
remove channels from the favorites 
list.

VIDEO MENU

The Video menu in most source 
modes is shown below. It provides 
several video adjustment items for fine 
tuning the video display. Only in VGA 
source mode, the Picture menu simply 
provides 

Picture Mode, Brightness, 

Contrast, Color Temp, Noise 

Reduction, Backlight, Aspect Ratio, 

and 

Preset

 items.

ENTER

Exit

Menu

VIDEO

Move

Select

Return

Exit

Brightness
Contrast

Color

Sharpness

Tint
Color Temp

Eco

65

65

47

47

0

Cool

Picture Mode

1. 

Picture Mode:

 Select the picture 

mode: Vivid, Standard, Eco, Movie, 
or Personal(In VGA mode only 
support Standard and Personal).

2. 

Brightness:

 Video brightness 

adjustment, the tuning range is 0 ~ 
100.

3. 

Contrast:

 Video contrast 

adjustment, the tuning range is 0 ~ 
100.

4. 

Sharpness:

 Video sharpness 

Summary of Contents for LE22C1380

Page 1: ...R LED TV OWNER S MANUAL Please READ this manual carefully before operating your TV and retain it for future reference MODELS LE19C1320 LE22C1380 LE24C1380 ...

Page 2: ......

Page 3: ... at 1 888 DTV 2009 AVISO RELATIVO A LATRANSICIÓN ATELEVISIÓN DIGITAL Este equipo incorpora un sintonizador de televisión digital lo que le permitirá recibir una programación digital televisada por aire con una antena adecuada cuando se terminará la transmisión de alta potencia de la televisión analógica en los Estados Unidos el 12 de Junio de 2009 Ciertos receptores de televisión antiguos si depen...

Page 4: ...e of important operating and maintenance servicing instruction in the literature accompanying the appliance Apparatus shall not be exposed to dripping or splashing and no objects filled with liquids such as vases shall be placed on the apparatus CAUTION Danger of explosion if battery is incorrectly replaced Replace only with the same or equivalent type Batteries installed warning CAUTION Danger of...

Page 5: ...ion This equipment generates uses and can radiate radio frequency energy and if not installed and used in accordance with the instructions may cause harmful interference to radio communications However there is no guarantee that interference will not occur in a particular installation If this equipment does cause harmful interference to radio or television reception which can be determined by turn...

Page 6: ... outlet before cleaning Do not use liquid cleaners or aerosol cleaners to clean the display Make sure to unplug the unit when not in use for a long period of time days Do not cover or block any vents and openings Inadequate ventilation may shorten the life of the display unit and cause overheating Avoid direct sunlight dusty high humidity and smoky areas Call service personnel to clean the interna...

Page 7: ... where they exit from the apparatus 11 Only use attachments accessories specified by the manufacturer 12 Use only with the cart stand tripod bracket or table specified by the manufacturer or sold with the apparatus When a cart is used use caution when moving the cart apparatus combination to avoid injury from tip over 13 Unplug this apparatus during lightning storms or when unused for long periods...

Page 8: ... players and similar products For more information about the DTV transition is available from http www DTV gov or 1 888 CALL FCC and from http www dtv2009 gov or 1 888 DTV 2009 for information about subsidized coupons for digital to analog converter boxed 21 Tilt Stability All televisions must comply with recommended international global safety standards for tilt and stability properties of its ca...

Page 9: ...ystem of the building as close to the point of cable entry as practical Please make sure to connect the power plug to the wall outlet socket after connecting the TV to the adapter 25 Apparatus shall not be exposed to dripping or splashing and no objects filled with liquids such as vases shall be placed on the apparatus 26 Warning statement indicating that Class I apparatus shall be connected to a ...

Page 10: ...n Agency and the U S Department of Energy promoting energy efficiency SAVE THESE INSTRUCTIONS Thank you for purchasing the Haier product This easy to use manual will guide you in getting the best use of your product Remember to record the model and serial number They are on the label on the back of the unit Model number Serial number Date of purchase Staple your receipt to your manual You will nee...

Page 11: ...ATTACHING THE BASE 10 PREPARINGYOUR LCD HDTV FOR WALL MOUNTING 10 PERIPHERAL CONNECTION GUIDE 12 OPERATING INSTRUCTIONS 14 TO USE THE BACK PANEL CONTROL 14 TO USE THE REMOTE CONTROL 15 TO USE THE MENUS 17 CHANNEL MENU 17 VIDEO MENU 17 AUDIO MENU 18 FEATURE MENU 19 VGA MENU 24 TIPS 24 PRODUCT SPECIFICATIONS 26 TROUBLESHOOTING 28 GLOSSARY 29 WARRANTY 30 ...

Page 12: ...til the locking mechanism locks into place PREPARINGYOUR LCD HDTV FOR WALL MOUNTING We suggest that you keep your TV at least 2 36 inches 60 mm from the wall to prevent cable interference Before mounting your TV on the wall you need to remove the base For your safety please use only with UL listed wall mount bracket with minimum weight of the TV without stand Please see page 27 To attach a wall mo...

Page 13: ...e wall outlet socket after connecting the TV to the power cord 1 Install the base stand place the TV on a solid surface Min 1 m Ensure that the TV is placed in a position to allow free flow of air Do not cover the ventilation openings on the back cover To prevent any unsafe situations no naked flame sources such as lighted candles should be placed on or in the vicinity Avoid heat direct sunlight a...

Page 14: ...12 PERIPHERAL CONNECTION GUIDE USB HDMI 2 ...

Page 15: ...nputs 5 ANTENNA CABLE DIGITAL ANALOG Connect to an antenna or digital cable out of the wall not from Cable Box for Digital TV 6 SPDIF Optical Digital Audio Out When a digital audio signal is associated with the input selected for viewing the digital audio will be available on this SPDIF connection to your home theater system 7 USB PORT Insert USB storage device to the USB port to view JPEG photos ...

Page 16: ... Press to turn on off standby the TV set 2 VOL Press to increase the volume 3 VOL Press to decrease the volume 4 CH Press to increase the channel number 5 CH Press to decrease the channel number 6 MENU Press to open or exit the OSD on screen display menu 7 INPUT Press to select the input source ...

Page 17: ...ower Press to power ON OFF standby TV Note The TV is never completely powered off unless physically unplugged PICTURE Press to change the picture mode Vivid Standard Eco Movie or Personal AUDIO Press to change the audio mode Personal Music or Speech ARC Press to change the aspect ratio Normal Zoom1 Wide Zoom2 or HDMI PC mode Only for HDMI Video Source CCD Press repeatedly to change the closed capt...

Page 18: ...REPEAT Press to toggle Repeat On Off mode in MP3 MusicBox REV S Press to go to the Previous folder photo in JPEGViewer FWD V Press to go to the Next folder photo in JPEGViewer PREV K Press to go to the First folder photo in JPEGViewer Press to skip current file playing and play the previous file during playing state in MP3 MusicBox NEXT L Press to go to the Final folder photo in JPEGViewer Press t...

Page 19: ...D can display the number of channels which had been found 4 Add on CH Search Add channels which are newly found 5 Channels List Show the Channel List You can select which channels are viewable 6 Channel Labels Shows the NTSC ATSC TV Channel Labels You can edit the labels 7 FAV Channel Setting Show the Favorite Channel List You can add remove channels from the favorites list VIDEO MENU TheVideo men...

Page 20: ...s will not be turned off even though the TV speaker is off The default setting is On 9 AVL Choose On or Off to adjust volume to be consistent adjustment the tuning range is 0 100 5 Color Video color chroma adjustment the tuning range is 0 100 6 Tint Video tint adjustment the tuning range is R50 G50 7 ColorTemp Three color temperature modes Cool Normal Warm 8 Noise Reduction Select the noise reduct...

Page 21: ...This item is available when Time Mode is set to Auto Daylight Savings Set to On or Off This item is available when Time Mode is set to Auto ENTER Exit Menu FEATURE Time Time Mode Time Zone Daylight Savings Month Day Time Year Auto HST On 2010 Jan 1 12 02 AM Move Select Return Exit 3 Password Setting Change the 4 numeral parental control password Three steps are required for changing the password E...

Page 22: ...Text Opacity Automatic Solid Flashing Transparent Translucent Background Color Automatic Black White Red Green Blue Yellow Magenta Cyan password Note This feature is only available in TV Composite and S Video source modes The default password is 0 0 0 0 Enter Password ENTER Exit Menu FEATURE Parental Control Move Select Return Exit Button Lock Block Unrated TV USA Parental Locks Open V Chip Canadi...

Page 23: ...MP3 MusicBox interface After plugging a USB storage device into the USB port the Multimedia List menu will be displayed Multimedia List 1 JPEG Viewer 2 MP3 MusicBox Exit Select MultiMedia Menu in the Feature Menu to choose JPEG Viewer or MP3 MusicBox These two items are activated only if the USB storage device is plugged into the USB port Once USB storage device is connected Press the USB key to s...

Page 24: ... any key except POWER and the TV backlight will turn on again Preset Resets all MP3 settings to the default values Exit Exit MP3MusicBox interface Time Shift The feature allows the viewer to pause and record the currently watched digital program ATSC or QAM and resume to the point where it was paused Insert the USB storage device to activate the Time Shift function in the Feature menu Note Formatt...

Page 25: ... will abort once the signal is lost 4 Do Not remove the signal source during Time Shift operations 5 Do Not quickly and repeatedly change operations between PLAY PAUSE FWD REV 6 Sleep timer will be terminated if it had been set before Time Shift 7 The USB storage size needs to be 4GB 8GB or 16GB 8 Video may become pixelated whenVideo bit rate is too low 9 Close Caption setting is not available dur...

Page 26: ...t with a soft clean cloth If the screen requires additional cleaning use a clean damp cloth Do not use liquid cleaners or aerosol cleaners Mobile telephone warning To avoid disturbances in picture and sound malfunctioning of your TV or even damage to the TV keep your mobile telephone away from the TV End of life directives Your new TV contains materials which can be recycled and reused At the end ...

Page 27: ... the interference by one or more of the following measures Reorient or relocate the receiving antenna Increase the separation between the equipment and the TV Connect the equipment into wall power outlet on a circuit different from that to which the receiver is connected Consult the dealer or an experienced radio or television technician for help Modifications The FCC requires the user to be notif...

Page 28: ...S Rear Connectors Tuner input 75Ω AV IN AV S Video and L R audio input PC IN D SUB and PC Audio Headphone mini jack Supported scan rate 640x480 60 72 75Hz 720x400 70Hz 800x600 56 60 72 75Hz 1024x768 60 70 75Hz 1280x720 60Hz 1280x768 60Hz Note 1360x768 60Hz For LE19C1320 only 1280x1024 60Hz 1440x900 60Hz 1680x1050 60Hz 1920x1080 60Hz For LE22C1380 LE24C1380 only Recommended For LE19C1320 1360x768 6...

Page 29: ...4 84x1 63 Weight with Stand 6 82 lbs 8 58 lbs 9 61 lbs Weight without Stand and Base 6 27 lbs 7 99 lbs 9 00 lbs WALL MOUNTING VESA compatible wall bracket W x H 100 x 100 mm 100 x 100 mm 100 x 100 mm Screw type Metric 4 x 10 mm Metric 4 x 10 mm Metric 4 x 10 mm POWER Power Consumption 33W 50W 50W Standby 1W Mains Power 120V 60Hz Audio Power 3W 3W 3W 3W 3W 3W Ambient Temperature 41 F 95 F PACKAGE C...

Page 30: ...the contrast and brightness settings Check the Closed Captions control Some TEXT modes could block the screen Good picture but no sound Increase theVOLUME Check if the TV is muted press the MUTE button on the remote control Good sound but poor color Adjust the contrast color and brightness settings Poor picture Poor picture quality may occur when an activated S VHS camera or camcorder is connected...

Page 31: ...ultichannelTelevision Sound MTS The broadcasting standard which allows stereo sounds to be transmitted with the TV picture RF Radio Frequency or modulated signal design used as the carrier for television broadcasts Second Audio Program SAP Another or additional audio channel provided for in the Multichannel Television Sound MTS broadcast standard A monaural sound track included within the recorded...

Page 32: ...o extend the duration of any warranties beyond the time period described herein on behalf of Haier The warranties described herein shall be the sole and exclusive warranties granted by Haier and shall be the sole and exclusive remedy available to the purchaser Correction of defects in the manner and for the period of time described herein shall constitute complete fulfillment of all abilities and ...

Page 33: ......

Page 34: ...R 01 0090506421A ...

Reviews: