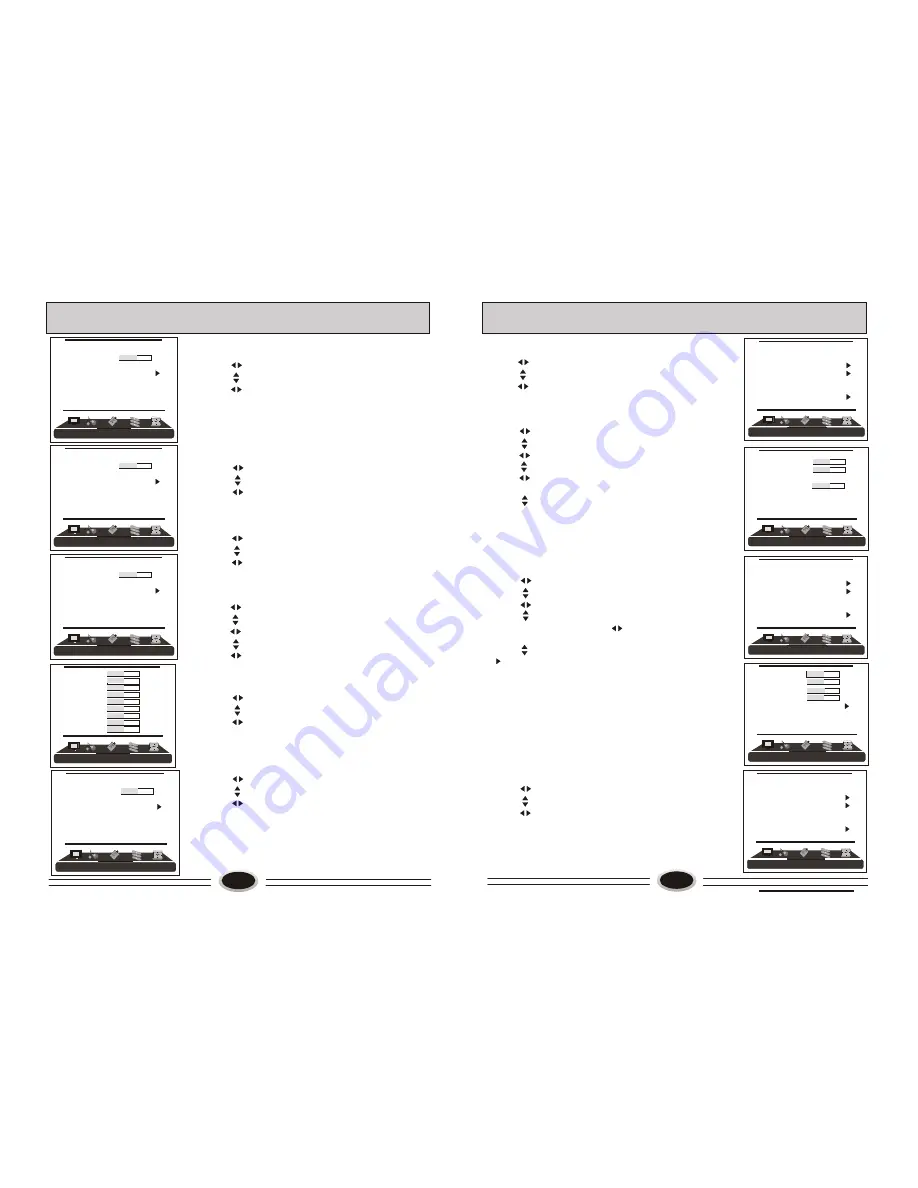
background image

12

SOUND CONTROL

SOUND MODE
1.Press MENU button to make the main menu display.
2.Press          button to select SOUND menu.
3.Press          button to select SOUND item.
4.Press          button to select STANDARD, NEWS,
    USER or MUSIC.
Note: You can also press S.MODE button on the remote
          control to select the sound modes.

BALANCE
1.Press MENU button to make the main menu display.
2.Press           button to select SOUND menu.
3.Press           button to select BALANCE item.
4.Press           button to adjust the value.

AUTOMATIC VOLUME CONTROL
1.Press MENU button to make the main menu display.
2.Press           button to select SOUND menu.
3.Press           button to select AVC item.
4.Press           button to select ON or OFF.

EQUALIZER
1.Press MENU button to make the main menu display.
2.Press          button to select SOUND menu.
3.Press          button to select EQUALIZER item.
4.Press          button to enter.
5.Press          button to select different frequency.
6.Press          button to adjust.

SURROUND
1.Press MENU button to make the main menu display.
2.Press          button to select SOUND menu.
3.Press          button to select SURROUND item.
4.Press          button to select ROOM, VALLEY, OFF
    or THEATER .

DIGITAL BASS
1.Press MENU button to make the main menu display.
2.Press          button to select SOUND menu.
3.Press          button to select DIGITAL BASS item.
4.Press          button to select ON or OFF.

13

FUNCTION SETTING

BLUE SCREEN
1.Press MENU button to make the main menu display.
2.Press        button to select FUNCTION menu.
3.Press        button to select BLUE SCREEN item,
   press        button to select OFF or ON.

OSD SETTING
1.Press MENU button to make the main menu display.
2.Press         button to select FUNCTION menu.
3.Press         button to select OSD SETTING item,
   press         button to enter the sub-menu.
4.Press         button to select DURATION. item,
5.Press         button to adjust the duration time of OSD, 
   and you can adjust the time from 5s to 60s.
6.Press         button to select the HALF TONE
   item, the larger  the value , the higher  the 
   half tone will be.
7.Press MENU button to save and exit.

IMAGE POSITION
1.Press MENU button to make the main menu display.
2.Press        button to select FUNCTION menu.
3.Press        button to select IMAGE POSITION item,
   press        button to enter the sub-menu.
4.Press        button to select H-POSITION or 
    V-POSITION item, press         button to adjust the 
    image position in horizontal or vertical direction.
5.Press       button to select AUTO item, pressing
        button can adjust the image position 
   automatically. If the arrow changes from green to 
   yellow, it shows that the automatic adjustment finishes.
6.In VGA mode, if you don’t get a satisfactory automatic
   adjustment effect, you can select PHASE, CLOCK to 
   adjust the image properly. 

DNR
Use digital mode to restrain the image noise, in 
order to reduce the interference. 
1.Press MENU button to make the main menu display.
2.Press        button to select FUNCTION menu.
3.Press        button to select DNR item,
   press        button to select OFF, WEAK, MEDIUM
    or STRONG.

     50Hz


50


75Hz


50

  100Hz


50


300Hz


50


1KHz                                        50

  3KHz                                        50
  5KHz                                        50
10KHz                                        50
15KHz                                        50        

SOUND

FUNCTION

H-POSITION         


         50

V-POSITION          


50

DURATION             


15S

HALF TONE                      50

FUNCTION

H-POSITION                      50
V-POSITION                      50
PHASE                             100
CLOCK                              55
AUTO ADJUST

FUNCTION

LANGUAGE           ENGLISH
BLUE SCREEN                OFF
OSD SETTING
IMAGE POSITION 
DNR                        MEDIUM        
CLOSED CAPTION        OFF
PARENT CONTROL

FUNCTION

LANGUAGE           ENGLISH
BLUE SCREEN                OFF
OSD SETTING
IMAGE POSITION 
DNR                        MEDIUM        
CLOSED CAPTION        OFF
PARENT CONTROL

FUNCTION

LANGUAGE           ENGLISH
BLUE SCREEN                OFF
OSD SETTING
IMAGE POSITION 
DNR                        MEDIUM        
CLOSED CAPTION        OFF
PARENT CONTROL

SOUND

SOUND


STANDARD

BALANCE                            50
AVC                                    OFF
EQUALIZER
SURROUND                      OFF
DIGITAL BASS                 OFF

SOUND

SOUND


STANDARD

BALANCE                            50
AVC                                    OFF
EQUALIZER
SURROUND                      OFF
DIGITAL BASS                 OFF

SOUND

SOUND


STANDARD

BALANCE                            50
AVC                                    OFF
EQUALIZER
SURROUND                      OFF
DIGITAL BASS                 OFF

SOUND

SOUND


STANDARD

BALANCE                            50
AVC                                    OFF
EQUALIZER
SURROUND                      OFF
DIGITAL BASS                 OFF

Summary of Contents for LC-4287P

Page 1: ...LC 4287P LC 4287P LCD COLOR TELEVISION OPERATING INSTRUCTIONS Wide view angle display high contrast MTS HDMI 01 0090504171 ...

Page 2: ......

Page 3: ...M REFER SERVICING TO QUALIFIED SERVICE PERSONNEL THERE IS A LIGHTNING ARROW SYMBOL IN THE TRIANGLE THIS SYMBOL INDICATES HIGH VOLTAGE IS PRESENT INSIDE IT IS DANGEROUS TO MAKE ANY KIND OF CONTACT WITH ANY INSIDE PART OF THIS PRODUCT THERE IS A EXCLAMATION MARK IN THE TRIANGLE THIS SYMBOL ALERTS YOU THAT IMPORTANT LITERATURE CONCERNING OPERATION AND MAINTENANCE HAS BEEN INCLUDED WITH THIS PRODUCT C...

Page 4: ...orized service provider 2 Do not place the set near a heat source or in direct sunlight WARNING AND CAUTION 3 To prevent fire do not use or store any flammable materials near the unit To prevent fire do not place the unit near a damp wall To prevent electric shock ensure that any external antenna connected to the set is clear of contact with any power lines Do not plug unplug the unit while your h...

Page 5: ... the manufacturer or sold with the apparatus When a cart is used use caution when moving the cart apparatus combination to avoid injury from tip over 13 Unplug this apparatus during lightning storms or when unused for long periods of time 14 Refer all servcing to qualified service personnel Servicing is required when the apparatus has been damaged in any way such as power supply cord or plug is da...

Page 6: ...tton Select button press SELECT button repeatedly to select TV DVD mode Channel list button Favorite channel list button Parent control button TV button DVD button Zoom button in DVD mode DVD functions Closed caption decode button Picture mode button Sound mode button Freeze button Brings up the main menu to the screen Time button Shows the input source mode Display button Up Down Left Right OK bu...

Page 7: ...SOUND STANDARD BALANCE 50 AVC OFF EQUALIZER SURROUND OFF DIGITAL BASS OFF 9 SCREEN DISPLAY For your convenient operation and in order to know the TV set we offer the below menus Picture setting menu Sound setting menu Timer setting menu Function setting menu Tuner setting menu Operation instructions The real display may be different from the above menus If you need adjust please do as follows 1 Pr...

Page 8: ...the item that needs adjust 4 Press button to adjust the selected item the detailed adjustment is as following table The table of picture item adjustment effect SET YOUR FAVOURITE PICTURE MODE IMAGE CONTROL PICTURE MODE 1 Press MENU button to make the main menu display 2 Press button to select PICTURE menu 3 Press button to select PICTURE item 4 Press button to select STANDARD BRIGHT SOFT or USER S...

Page 9: ...ime from 5s to 60s 6 Press button to select the HALF TONE item the larger the value the higher the half tone will be 7 Press MENU button to save and exit IMAGE POSITION 1 Press MENU button to make the main menu display 2 Press button to select FUNCTION menu 3 Press button to select IMAGE POSITION item press button to enter the sub menu 4 Press button to select H POSITION or V POSITION item press b...

Page 10: ...y 2 Press button to select FUNCTION menu 3 Press button to select PARENT CONTROL item 4 Pressing button to enter the TV set will remind you input password the default password is 0000 It will enter parent control menu CHANGE PASSWORD 1 Press button to select CHANGE PASSWORD item 2 Press button to enter it will remind you input new password Later you will input new password again to confirm 3 After...

Page 11: ...F TIME ON BOOK CHAN OFF TIMER SLEEP TIMER OFF CLOCK TIME OFF TIME ON BOOK CHAN OFF Press one digit selection button to set After setting press MENU button to save and exit Press one digit selection button to set After setting press MENU button to save and exit Press one digit selection button to set After setting press MENU button to save and exit 16 17 ...

Page 12: ... the DVD Player or Set Top Box s output resolution to 1280x720p and the PC graphics card s output resolution to 1024x768 60Hz If the source device has an HDMI output no other audio connection is necessary because HDMI to HDMI connecting includes both video and audio How To Connect 1 Connect the source device to HDMI port of this TV with an HDMI cable not supplied with this product 2 No separated a...

Page 13: ... button on the external device to start watching HDMI input 1 Connect HDMI signal source output to the HDMI input in this TV set 2 Press INPUT button to select HDMI1 or HDMI2 mode 3 Press PLAY button on the external device to start watching EXTERNAL AUDIO AND VIDEO EQUIPMENT CONNECTION 21 HDMI1 DVD HDMI2 USING YOUR TV AS A COMPUTER DISPLAY VGA AUDIO IN VGA VGA input 1 Connect the VGA output port i...

Page 14: ...set can be heard occasionally This is normal and is caused by temperature changes of the operating environment and does not affect the operation of the set TROUBLESHOOTING GUIDE BREAKDOWN PHENOMENON PICTURE SOUND CHECK FOR The direction and connection of the antenna Direction station and connection of the antenna Interference from electric appliance Automobile Motor Vehicle Fluorescence lamp etc V...

Page 15: ......

Reviews: