background image

17

PIP SETTING
This TV set support PIP function,  it can display 
picture of two sources at the same time.
1.Press MENU button to select SOURCE menu.
2.Select PIP mode, use VOL+/- button to select 
   P1S1, P1S2, P2S1, P2S2, P3S1, P3S2, P4S1or 
   P4S2 mode, open PIP function.
3.Select PICTURE SOURCE, use VOL+/- 
   button to change the input source of main picture, 
   such as TV, AV1, AV2 and so on.
4.Select SUB PICTURE source, use VOL+/- button to 
   change the input source of sub picture, such as 
   VGA, YPBPR and so on.
Note:
1. After switching the main picture source, it will 
    shut off the PIP function, if need, you can open 
    this function again.
2. The following two suit 
    can use PIP function, 
    the same suit


source 

    can not use PIP 
    function, source1 
    and source2 can switch.
3.You can press PIP button on the remote control
    to turn on or turn off the PIP function.
4.You can press MAIN/SUB button on the remote 
    control to switch the main picture and sub picture.

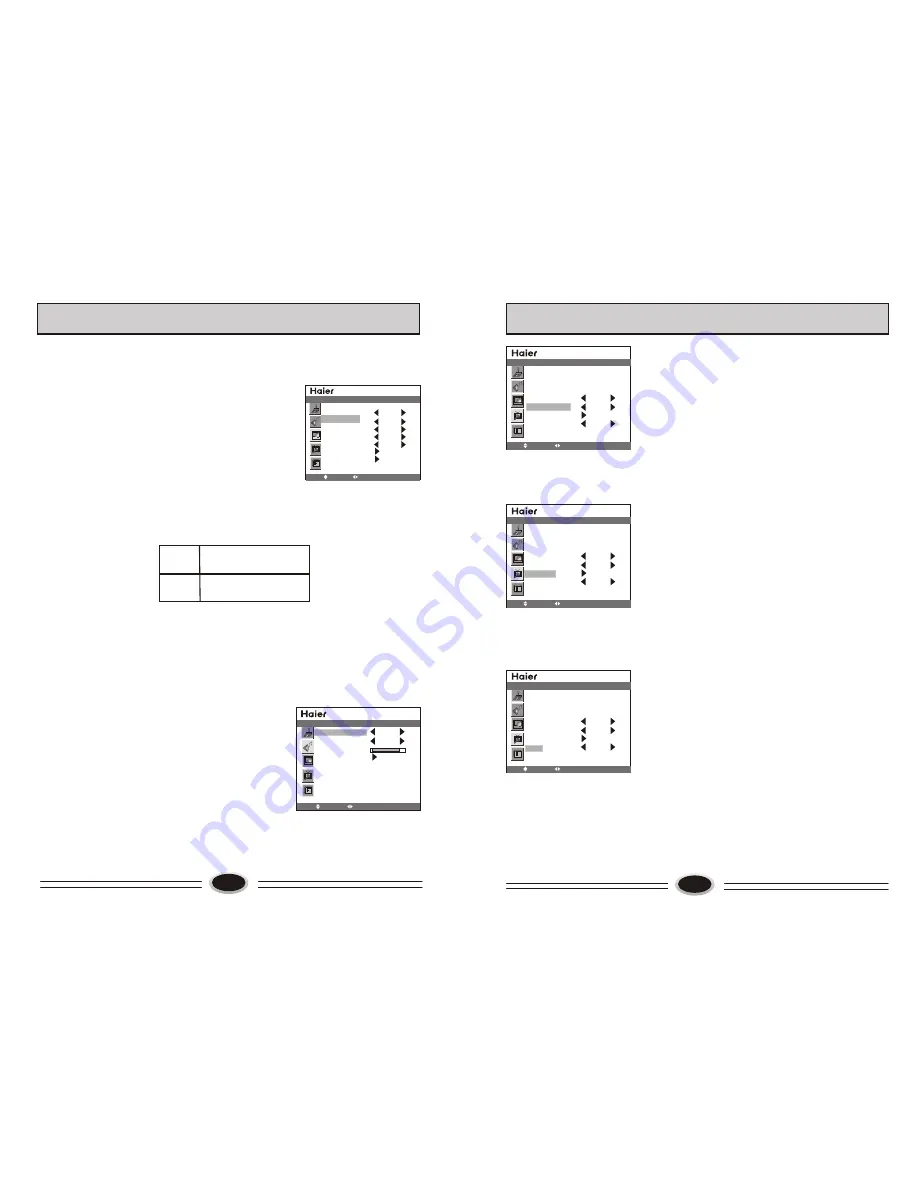
PICTURE SOURCE        TV
PIP MODE                       OFF
SUB PICTURE                VGA
COLOR SYSTEM          AUTO
SOUND SYSTEM
AUTO SEARCH
MANUAL SEARCH

BG

SOURCE

MOVE

SELECT   MENU   EXIT

SOURCE1

SOURCE2

TV, AV1, AV2, S-VIDEO

VGA, YPBPR

SOUND SOURCE SETTING

After the PIP function is open, this item is activated, 
you can select the main picture sound or sub picture 
sound of current broadcasting sound.
1.Press MENU button to select SOUND menu.
2.Press CH+/- button to select SOUND SOURCE.
3.Press VOL+/- button to change the current sound to 
   main picture sound or sub picture sound.
Note:
1.You can also press SOUND button on the remote 
    control to switch the main picture sound or sub 
    picture sound.
2.After switching the sound to sub picture sound, you 
   can switch the source in sub picture.

OTHER SETTING FUNCTION

MOVE

SELECT   MENU   EXIT

SOUND

SOUND SOURCE        MAIN
SOUND MODE            NEWS
BALANCE 
EQUALIZER

18

CLOCK                         00:12
TIME ON                       --:--
TIME OFF                     --:--
SLEEP TIMER              OFF
COLOR TEMP              USER
D FILTER
AAA                               ON

MOVE

SELECT   MENU   EXIT

FUNCTION

CLOCK                         00:12
TIME ON                       --:--
TIME OFF                     --:--
SLEEP TIMER              OFF
COLOR TEMP              USER
D FILTER
AAA                               ON

MOVE

SELECT   MENU   EXIT

FUNCTION

CLOCK                         00:12
TIME ON                       --:--
TIME OFF                     --:--
SLEEP TIMER              OFF
COLOR TEMP              USER
D FILTER
AAA                               ON

MOVE

SELECT   MENU   EXIT

FUNCTION

1.Press MENU button to select FUNCTION menu.
2.Press CH+/- button to select COLOR TEMP.
3.Press VOL+/- button to select DEFAULT

 6500K


7300K

8500K

9300K

USER

Note: PERSONAL is the color temperature of picture
           you set through D FILTER.

DIGITAL FILTER SETTING

Use D FILTER can adjust the color temperature 
exactly.
1.Press MENU button to select FUNCTION menu.
2.Press CH+/- button to select D FILTER.
3.Press VOL+/- button to select the COLOR TEMP, 
   use CH+/- button to adjust.

AAA SETTING

AAA function can improve the quality of picture and 
make the picture best.

1.Press MENU button to select FUNCTION menu.
2.Press CH+/- button to select AAA.
3.Press VOL+/- button to select ON, OFF, DEMO or
   SPLIT.
4.Press AAA button on the remote control to start 
   and select AAA mode.
DEMO: Use one moved sub picture in the picture to 
start AAA function.
SPLIT: Separate the picture from left and right, start 
AAA function in left picture.
Note: It can not use the DEMO, SPLIT function with 
           no signal and in PIP mode.

COLOR TEMPERATURE

OTHER SETTING FUNCTION

Summary of Contents for L32A6A

Page 1: ...01 0090508581 LCD COLOR TELEVISION OPERATING INSTRUCTIONS Wide view angle display high contrast PIP function AAA function L32A6A L32A6A ...

Page 2: ...g 18 External audio and video equipment connection 19 Using your TV as a computer display 20 Specifications 21 Trouble shooting guide 22 2 WARNING AND CAUTION CAUTION TO REDUCE THE RISK OF ELECTRIC SHOCK DO NOT REMOVE COVER OR BACK NO USER SERVICEABLE PARTS INSIDE FOR ANY PROBLEM REFER SERVICING TO QUALIFIED SERVICE PERSONNEL THERE IS A LIGHTNING ARROW SYMBOL IN THE TRIANGLE THIS SYMBOL INDICATES ...

Page 3: ......

Page 4: ...1 Power switch 1 2 4 5 7 9 10 8 6 3 1 AC 11 6 BASE INSTALLATION INSTRUCTIONS 1 LCD TV base accessory LCD TV TV base M4 8 screw Name Qty LCD TV LCD TV base M4 8 screw black 2 LCD TV base installation procedure 1 Take out the LCD TV and TV base from packing box lie the LCD TV on the clean blanket with face down in order to prevent the hard object from scratching the LCD screen as figure 1 2 Take nin...

Page 5: ...pes Install the batteries as the correct polarities Do not use the rechargeable batteries SOUND BOX INSTALLATION INSTRUCTIONS 1 Place the LCD TV with installed base well take out the sound box from packing box take out two connecting blocks of sound box eight screws and two connecting wires of sound box from accessory bag as figure 1 2 Refer to figure 2 display LCD back view figure fix the two con...

Page 6: ...S STD CH CH VOL VOL MENU C SYS S SYS STILL SCAN BACK ZOOM SLEEP SIZE 27 26 I II 10 BASIC OPERATION 1 If the TV set is in standby status pressing power switch on the remote control or TV set can cancel the standby status then enter the power on status 2 Pressing power switch on the remote control or the TV set again the TV set will enter standby status Standby set first connect the power supply wir...

Page 7: ...ND SYSTEM AUTO SEARCH MANUAL SEARCH BG SOURCE MOVE SELECT MENU EXIT AUTO SEARCH Using AUTO SEARCH can search all receiving programs We recommend using auto search to search the program when you use this TV set for the first time before auto search please confirm the sound system is BG 1 Press MENU button to select SOURCE menu 2 Press CH button to select AUTO SEARCH 3 Press VOL button to start sear...

Page 8: ...tton to select OFF FINE TUNE 14 CURRENT CHANNEL 15 SKIP OFF TARGET CHANNEL 28 EXCHANGE AFC OFF FINE TUNE SEARCH NEXT 471 2MHZ SOURCE MOVE SELECT MENU EXIT 1 Press MENU button to select SOURCE menu 2 Press CH button to select MANUAL SEARCH press VOL button to enter the next menu 3 Press CH button to select TARGET CHANNEL press VOL button to select the channel you need exchange 4 Press CH button to ...

Page 9: ...NCTION There is different signal source mode in this TV set you can select according to your require TV AV1 AV2 S VIDEO YPBPR VGA 1 Press MENU button to select SOURCE menu 2 Press CH button to select PICTURE SOURCE 3 Press VOL button to select the signal source mode you need 4 You can press TV AV button on the remote control to select directly SCREEN DISPLAY PICTURE ZOOM SETTING There is different...

Page 10: ...e 1 You can also press SOUND button on the remote control to switch the main picture sound or sub picture sound 2 After switching the sound to sub picture sound you can switch the source in sub picture OTHER SETTING FUNCTION MOVE SELECT MENU EXIT SOUND SOUND SOURCE MAIN SOUND MODE NEWS BALANCE EQUALIZER 18 CLOCK 00 12 TIME ON TIME OFF SLEEP TIMER OFF COLOR TEMP USER D FILTER AAA ON MOVE SELECT MEN...

Page 11: ...of picture output device such as DVD HDTV TUNER and so on the sound is input from AUDIO IN 2 Press TV AV button to select HDTV mode 3 Press PLAY button on the external device to start watching ANT VCR AUDIO IN L L R R S VIDEO IN VIDEO IN VCD AUDIO IN L R S VIDEO IN VIDEO IN DVD DVD L L R R AUDIO IN Y Cb Pb Cr Pr 20 USING YOUR TV AS A COMPUTER DISPLAY VGA AUDIO IN VGA VGA input 1 Connect the VGA ou...

Page 12: ... the cabinet of the TV set can be heard occasionally This is normal and is caused by temperature changes of the operating environment and does not affect the operation of the set TROUBLE SHOOTING GUIDE BREAKDOWN PHENOMENON PICTURE SOUND CHECK FOR The direction and connection of the antenna Direction station and connection of the antenna Interference from electric appliance Automobile Motor Vehicle...

Reviews: