background image

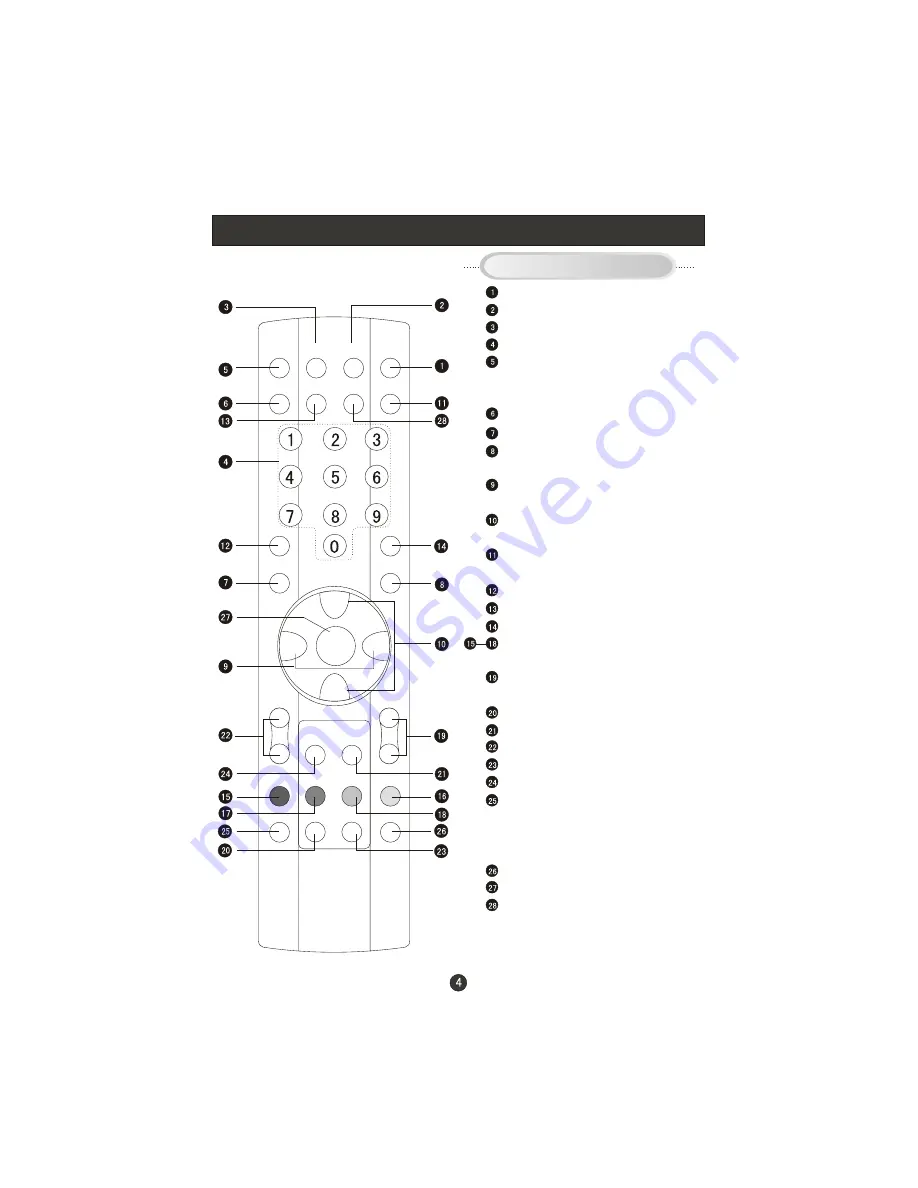
Remote Control Key Functions

When using the remote control, aim it 
towards the remote sensor on the TV

Stand By

MUTE

Display current input signal information

TV channel number select

Set time to change the TV into the 

standby status after a period of preset 

time.

NICAM/A2 Stereo select

EXIT

Quick TV channel switch(return to the 

last channel)

Volume down/up  Left/right orientation to 

adjust the item in the OSD

TV channel up/down or select the item 

of the menu

Select  TV/AV/S-VIDEO/PC/

COMPONENT

Select picture mode

PC system select

Select sound mode

Correspond to the differently colored 

subjects

Switch to the Teletext with text mode/turn 

off Teletext and switch to TV mode

 Hold on or off for current page display

Switch to the Teletext with mix mode

Request index page

Change display size

Sub coded page access

While in normal TV mode only, pressing 

the button 

TIME

 will display the teletext 

time in the top right corner for a few 

seconds.(only available in teletext mode)

Reveal or hidden the hidden words

Press to select the main menu

Auto adjust (PC mode)

Buttons on the remote control

P+

P-

V-

V+

SLEEP

DISPLAY MUTE POWER

NICAM

PC

AUTO AD TV/AV

PSM

OK

Q.VIEW

MENU

INDEX

TEXT

TIME

HOLD

SIZE

REVEAL

SUBCODE MIX

SSM

Summary of Contents for L22T1W

Page 1: ...USER S MANUAL LCD TV RECEIVER Please read this manual carefully before using your television and keep this manual In a good place for future reference MODEL WL19T1 WL22T1 ...

Page 2: ...onnection VGA Input YPbPr Input S VIDEO Input Cable TV Input External AV Source Input Basic Operating Instructions Turn on the LCD TV Audio Control Mute Select the TV Channel You Want Picture Mode Menu Operations Picture Menu Options Picture Menu Options Continued Audio Menu Options Audio Menu Options Continued Function Menu Options Adjust Menu Options Tuning Menu Options Tuning Menu Options Conti...

Page 3: ...n this book strictly Please comply with the instructions provided Please do not use additional devices that are not recommended by manufacturer Before operation please make sure that the operating voltage of your unit is normal Do not place the unit on unstable dusty and humid places Never put the unit in direct sunlight or near heat sources Allow enough space for proper ventilation Please keep wa...

Page 4: ...rientation to adjust the item in the OSD VOL Volume up Right orientation to adjust the item Press to enter 5 CH TV channel down to select the item in the menu CH TV channel up to select the item in the menu 6 Power indicator Illuminates red in standby mode illuminates green when the display is turned on 7 Remote Sensor Receiving remote control sends the infrared remote signal T1 SOURCE ...

Page 5: ...ideo Input Connect S Video out from an S Video device to the jacks Antenna Input Earphone port PC Audio Input Connect the PC output connector from a PC to the audio input port COMPONENTInput Connect a component video audio device to these jacks ANT IN S VIDEO VGA IN PC AUDIO IN AUDIO IN R L VIDEO IN V Pb Pr Y COMPONENT IN Video Input Connect video output from an external device to this jack ANT IN...

Page 6: ...ture mode PC system select Select sound mode Correspond to the differently colored subjects Switch to the Teletext with text mode turn off Teletext and switch to TV mode Hold on or off for current page display Switch to the Teletext with mix mode Request index page Change display size Sub coded page access While in normal TV mode only pressing the button TIME will display the teletext time in the ...

Page 7: ...o obstacle between the remote controller and television set As strong light may interfere the signals change your position to operate the remote controller if the television cannot be turned on or off as you expect Keep the remote controller away from heat source or humid area to ensure effective performance of the remote controller Make sure that two 5 1 5V alkaline batteries are loaded The batte...

Page 8: ...ity adjust antenna direction if needed Multi family Dwellings Apartments Connect to wall antenna socket wall antenna socket VHF antenna UHF antenna outdoor antenna Single family Dwellings Houses Connect to wall jack for outdoor antenna Be careful not to bend the bronze wire when connecting the antenna To improve picture quality in a poor signal area purchase and install a signal amplifier If the a...

Page 9: ...sociated with the resolution vertical pattern contrast or brightness in PC mode If noise is present change the PC mode to another resolution change the refresh rate to another rate or adjust the brightness and contrast on the menu until the picture is clear If the refresh rate of the PC graphic card can not be changed change the PC graphic card or consult the manufacturer of the PC graphic card Fr...

Page 10: ...h to 3 or 4 and then tune TV to the same channel number Connection Option 2 1 Connect the audio and Svideo cables from the VCR s output jacks to the TV input jacks as shown in the figure 2 Insert a video tape into the VCR and press PLAY on the VCR Refer to the VCR owner s manual 3 To avoid picture noise interference leave an adequate distance between the VCR and TV COMPONENT If connected to SVIDEO...

Page 11: ...video cables from the Cable Box s output jacks to the TV input jacks as shown in the figure When connecting the TV to a Cable Box match the jack colors Video yellow Audio Left white and Audio Right red 2 Select the input source by using the TV AV button on the remote control 3 Select your desired channel with the remote control for cable box External AV Source Input How to connect Connect the audi...

Page 12: ...s the V button to increase the volume A number will appear on screen indicating the volume level 2 Press the V button to decrease the volume A number will appear on screen indicating the volume level Mute 1 Press the MUTE button to mute the sound temporarily A mute icon appears on the screen 2 Press the MUTE button again or V V to restore the sound The mute icon disappears P P V V SLEEP DISPLAY MU...

Page 13: ... for menu display For desired mode as follows PERSONAL STANDARD MILD FRESH 1 Press the relevant key on the remote control if you want to choose any channel from 0 to 9 for example if you want to choose channel 8 just press the key number 0 and 8 Note You must press 0 first and then the other numbers from 0 to 9 if you want To choose channels from 0 to 9 2 If you want to choose a channel bigger tha...

Page 14: ...ent Picture quality can be adjusted for any input separately The picture quality on the screen can be adjusted as follows 1 Press MENU button and V V until the following menu appears on the screen 2 Press P P button to enter the picture menu and to go up and down to select the desired option PC MENU TV AV S VIDEO MENU PICTURE BRIGHTNESS CONTRAST SHARPNESS COLOUR NOISE REDUCTION HUE PICTURE BRIGHTN...

Page 15: ...mage sharpness rises as the number increases By increasing the level it will show cleaner and clearer images and by decreasing the level it will make picture smoother COLOUR Press V V to adjust the colour NOISE REDUCTION Adjust the quality of the picture by selecting OFF LOW MID HIGH HUE Adjust the tone of the picture Appear and be adjusted only under NTSC mode COLOUR TEMP Press to select the colo...

Page 16: ...ume of your TV BALANCE Adjust the balance of the audio output from left to right When indication value of balance increases toward 100 sound of the left speaker becomes weaker When indication value of balance decreases toward 0 sound of the right speaker become weaker BASS Adjust the bass of the sound Can only be adjust under PERSONAL mode TREBLE Adjust the treble of the sound Can only be adjust u...

Page 17: ...EEN 6 BLUE SCREEN To set On the screen will be in blue screen after 3 seconds if there is no signal 7 RESET Press V to reset some settings to the factory default 8 CHILD LOCK Press V to enter it and input the password correctly the CHILD LOCK menu will appear on the screen PASSWORD The password can be changed Press P to select PASSWORD and V to enter The screen will display NEW PW then enter the n...

Page 18: ...tion to your preference 4 Repeat step 2 and step 3 until desired quality has been achieved Functions AUTO SYNC Is opted for adjustment of picture location frequency and phase parameters 50 50 50 50 PHASE Removes any horizontal distortion and clears or sharpness the displayed characters CLOCK Adjust the TFT LCD to match the PC input source H POSITION Picture horizontal adjust V POSITION Picture ver...

Page 19: ... TUNING PROGRAM Press V to enter it and the TUNING PROGRAM menu appears CHANNEL Press V V to change the TV channel EDIT NAME Press V to enter it then press V to select the position you want to edit and press P to input the emblem such as character and so on There are 8 position for you to edit totally COLOUR SYSTEM Select the TV color system from AUTO PAL SECAM SOUND SYSTEM Select the TV standard ...

Page 20: ... frequency channel 2 AUTO SEARCH Auto search and save the channel Press the V button to start to search the channel and the following menu will appears on the screen Press V to select YES or NO and menu to confirm You could press MENU to stop the search NOTE If you want to search the channels in L or L system you need to set the sound system to L in OSD FROM 1 TO 9 EXCHANGE EXCHANGE MANUAL SEARCH ...

Page 21: ...ENU and AUTO AD control functions are not available in TELETEXT mode If the TV is switched on by POWER after off in TELETEXT mode or press TV AV or PC button the TELETEXT mode will disappear automatically P P V V SLEEP DISPLAY MUTE POWER NICAM PC AUTO AD TV AV PSM SSM OK Q VIEW MENU INDEX TEXT TIME HOLD SIZE REVEAL SUBCODE MIX Teletext features may vary depending on the Broadcasting Companies and ...

Page 22: ...ed that the broadcaster has updated the page s contents there are no sub pages Press SUBCODE button page number will be displayed at the bottom right of the screen Enter desired sub page number before the page number disappears To select page 6 enter 0 0 0 and 6 TEXT Button Press TEXT to enter Teletext mode and only the text page can be visible MIX Button Press MIX button to enter Teletext mode an...

Page 23: ... and verify if Mute mode is set Switch to other channel and verify if the same problem happens Press VOL button to see if the problem can be solved Poor sound Verify if sound system is correct Refer to some chapter for adjust No picture in some channel Verify if correct channel is selected Adjust the antenna Make adjustments by FINE TUNE and MANUAL SEARCH No color for some channel program black an...

Page 24: ...ssories Picture sound system Audio output External input port Power requirements Temperature 1 5W 1 5W COMPONENT input PC input S VIDEO input Audio input Video input Antenna input 150 240V 50Hz PAL SECAM B G I D K L L Working 5 C 35 C Storage 15 C 45 C Power consumption 60W Model Remote control Batteries Owner s manual Warranty card WL19T1 Note Warranty card is only for the special countries and a...

Page 25: ......

Page 26: ......

Page 27: ...V0 1 0090508262I ...

Reviews: