Haier L1510B-A User Manual Download Page 29

Menu Operations

HDMI and S-Video Menu Options 

1. Press 

MENU

 button and

 CH+/CH- 

button to select Feature menu in HDMI or 

    S-Video mode.

2. Press

 VOL+

 button to enter the Feature  menu and 

CH+/CH-

 to go up and down 

    to select the desired option .

3.Press 

VOL+/ENTER 

button to confirm and 

VOL+/VOL-

 increase and decrease 

    the level to adjust the selected option to your preference .

4. Repeat step 2 and step 3 until desired quality has been achieved .
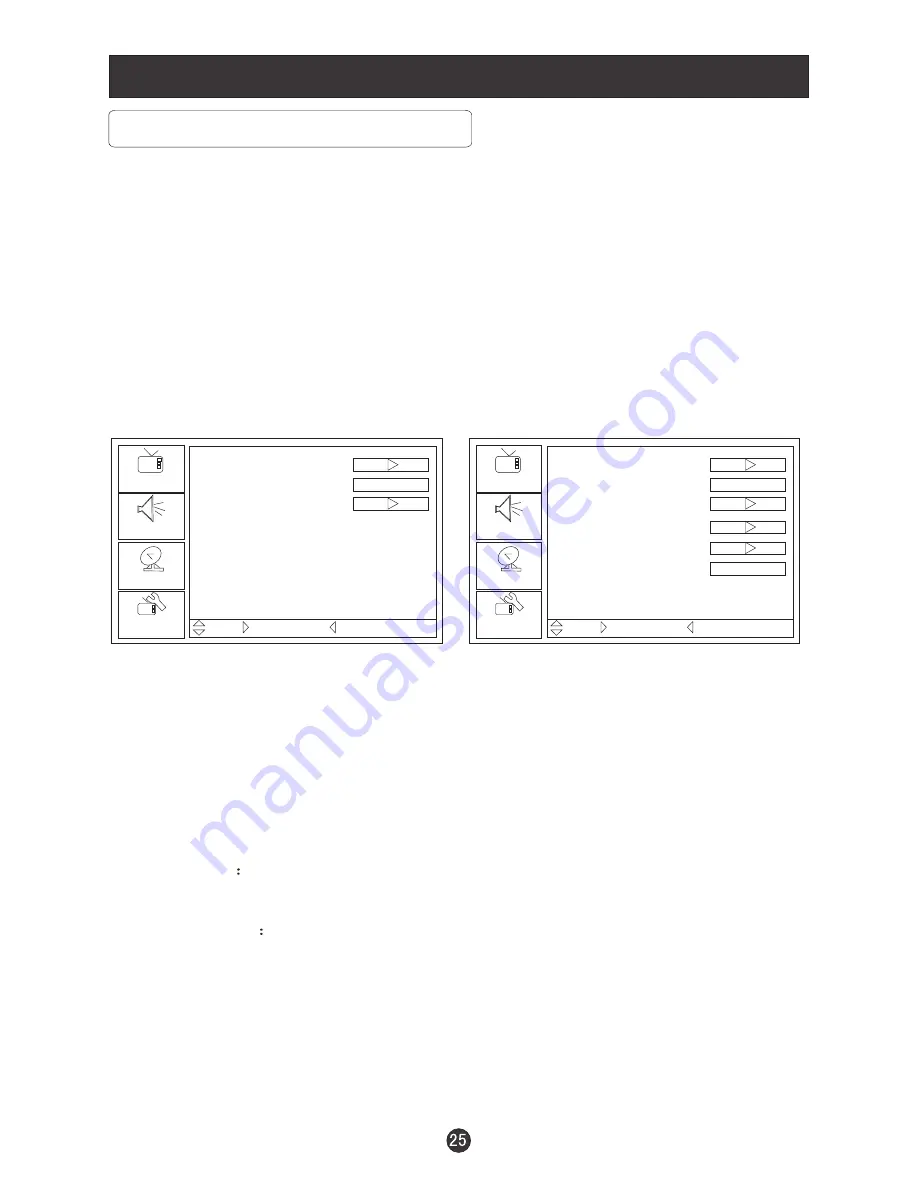
Picture

Audio

Setup

Feature

Time Set

Sleep Timer

Advanced Video Menu

Off

Move   /Enter  Select   /Exit/Menu Exit

Time Set: Press CH+/CH- button and then VOL+/ENTER button to enter the 
submenu that allows you to set the time the TV will display.

Sleep Timer: Press VOL+/ENTER button to select the amount of the time before
your TV turn off automatically.

Advanced Video Menu: Press VOL+/ENTER button to enter te advanced video
menu.

Password Set

Press CH+/CH- button and then VOL+/ENTER button to enter 

Password Set menu and input or change old password.

Parental Control

Press CH+/CH- button and then VOL+/ENTER button to enter 

Parental Control menu.

Digital TV Captions: Press CH+/CH- button and then VOL+/ENTER button to 
enter Digital TV Captions menu and select the Closed Caption options.

Picture

Audio

Setup

Feature

Time Set

Sleep Timer

Advanced Video Menu

Password Set

Parental Control

Digital TV Captions

Off

Move   /Enter  Select   /Exit/Menu Exit

HDMI

S-Video

CC1

Summary of Contents for L1510B-A

Page 1: ...Please read this manual carefully before using this TV set and keep it for future reference LCD TV DVD Player Combo USER MANUAL L1510B A L15A18 A L19A18 A L1912W A ...

Page 2: ...T THERE IS MARK IN THE TRIANGLE THIS SYMBOL ALERTS YOU THAT IMPORTANTLITERATURE AND MAINTENANCE HAS BEEN INCLUDED WITH THIS PRODUCT AN EXCLAMATION CONCERNING OPERATION CAUTION DO NOT OPEN DO NOT OPEN RISK OF ELECTRIC SHOCK RISK OF ELECTRIC SHOCK CAUTION TO REDUCE THE RISK OF ELECTRIC SHOCK AND FIRE DO NOT PUT THE TV SET NEAR SOURCES OF HUMIDITY DO NOT USE ANYABRASIVE CLEANSERS WHICH MAY SCRATCH OR...

Page 3: ...outlet 10 Protect the power cord from being walked on or pinched particularly at plugs convenience receptacles and the point where they exit from the apparatus 11 Only use the attachments accessories specified by the manufacturer 12 Use only with the cart stand tripod bracket or table specified by the manufacturer or sold with the apparatus When a cart is used use caution when moving the cart appa...

Page 4: ...nnel You Want Picture Mode Sound Mode Sleep INFO GUIDE button CH LIST button FAV LIST b utton ARC button Menu Operations Video Menu Options Video Menu Options Continued Audio Menu Options Audio Menu Options Continued Function Menu Options Function Menu Options Continued Adjust Menu Options Adjust Menu Options Continued Channel Menu Options Channel Menu Options Continued Lock Menu Options Lock Menu...

Page 5: ...ning this machine To your safety and extend the life span of LCD TV please read the following items carefully before using l Please read and understand all the instructions before operation l l l Please comply with the instructions provided l Please do not use additional devices that are not recommended by manufacturer l l Do not place the unit on unstable dusty and humid places l Never put the un...

Page 6: ...n Left orientation to adjust the item in the OSD VOL Volume up Right orientation to adjust the item in the OSD Press to enter 5 CH TV channel down to select the item in the menu CH TV channel up to select the item in the menu 6 Power indicator 7 Remote Sensor Selects the input signals Receives the signals from the remote control 1 6 7 DC POWER SWITCH L15A18 A L1510B A L19A18 A DC POWER SWITCH L191...

Page 7: ... the VGA 15PIN analog output connector of a PC graphics card to use set as a PC display Component Input Connect a component video device to these jacks A V S VIDEO COMPONENT Audio Input Connect audio output from an external device to these jacks Earphone port Antenna Input S Video Input Connect S Video out from an S Video device to the jacks ANT IN S VIDEO VGA IN PC AUDIO IN AUDIO IN R L VIDEO IN ...

Page 8: ...her or lower channel 8 Press to select the closed caption mode when your LCD TV is in TV A V or S Video mode 9 Press to set the sleep timer 10 Press to open the program guide when your LCD TV is in digital TV mode 11 Press to select the aspect ratio You can select Wide Zoom Cinema Full Screen or Normal 12 Press to open the favorite channel list when your LCD TV is in TV mode 13 Press to display th...

Page 9: ...roller and television set As strong light may interfere with the signals change your position to operate the remote control if the television cannot be turned on or off as expected Keep the remote control away from heat sources or humid areas to ensure effective performance of the remote Make sure that two AAA 1 5V alkaline batteries are loaded The batteries must be of the same type must be insert...

Page 10: ...direction if needed Multi family Dwellings Apartments Connect to wall antenna socket wall antenna socket VHF antenna UHF antenna outdoor antenna Single family Dwellings Houses Connect to wall jack for outdoor antenna Bronze Wire Be careful not to bend the bronze wire when connecting the antenna Bronze Wire Turn clockwise to tighten RF coaxial wire 75 ohm To improve picture quality in a poor signal...

Page 11: ...o set the video input mode of the LCD TV to PC 6 Check the image on your TV There may be noise associated with the resolution vertical pattern contrast or brightness in PC mode If noise is present change the PC mode to another resolution change the refresh rate to another rate or adjust the brightness and contrast on the menu until the picture is clear If the refresh rate of the PC graphic card ca...

Page 12: ...ut jacks as shown in the figure When connecting the TV to VCR match the jack colors Video yellow Audio Left white and Audio Right red If you connect an S VIDEO output from VCR to the S VIDEO input the picture quality is improved compared to conne cting a regular VCR to the Video input 2 Insert a video tape into the VCR and press PLAY on the VCR Refer to the VCR owner s manual 3 To avoid picture no...

Page 13: ...video cables from the Cable Box s output jacks to the TV input jacks as shown in the figure When connecting the TV to a Cable Box match the jack colors Video yellow Audio Left white and Audio Right red 2 Select the input source by using the INPUT button on the remote control 3 Select your desired channel with the remote control for cable box External AV Source Setup How to connect Connect the audi...

Page 14: ...ellow Each time you press the INPUT button TV Composite S Video VGA Component and HDMI will appear on the screen in order Audio Control 1 Press the VOL button to increase the volume A number will appear on screen indicating the volume level 2 Press the VOL button to decrease the volume A number will appear on screen indicating the volume level Mute 1 Press the MUTE button to mute the sound tempora...

Page 15: ...Fresh Sleep Press SLEEP button to set the time This feature allows you to turn off the television after a pre selected minutes Sleep 0 min Sleep 5 min Sleep 10 min Sleep 15 min Sleep 30 min Sleep 45 min Sleep 60 min Sleep 90 min Sleep 120 min Sleep 180 min Sleep 240min number of Display Press DISPLAY button to display the current information GUIDE only available in digital signal Press GUIDE butto...

Page 16: ...0 when you select analog channel If you just press the number eg 13 you will get digital channel CH LIST button Press to display the program list Press CH CH to select the item and ENTER button to select the channel you desired FAVORITE button only available in digital signal Press to display favorite list Press CH CH to select the item and VOL to select the channels and VOL to select NONE ZOOM bu...

Page 17: ...ed for any input separately The picture quality on the screen can be adjusted as follows 1 Press MENU button and CH CH until the following menu appears on the screen 2 Press VOL ENTER button to enter the Picture menu and CH CH to go up and down to select the desired option 3 Press VOL ENTER button to confirm and VOL VOL increase and decrease the level to adjust the selected option to your preferen...

Page 18: ...vel it will show cleaner and clearer images and by decreasing the level it will make the picture smoother Color Press CH CH button and VOL ENTER to confirm then press VOL VOL to adjust color saturation Tint Adjust the tone of the picture This will appear and can be adjusted only in NTSC mode Contrast Brightness Sharpness and Color can only be adjusted when Picture Mode in Personal mode Aspect Rati...

Page 19: ...to select the type of sound which best corresponds to your lightning requirements by selecting Audio Mode in Audio menu Audio Language Press VOL ENTER to display the default language Bass Treble mode Balance Press CH CH button and VOL ENTER to confirm then press VOL VOL to increase or decrease the level of the lower pitched sounds Press CH CH button and VOL ENTER to confirm then press VOL VOL to i...

Page 20: ...o Air Cable Cable HRC Cable IRC DTV Signal In DTV mode you can adjust the angle orientation of the antenna etc to improve the quality of the signal Auto Ch Search Press CH CH button to select the item Then press VOL ENTER button to enter your selection and scan All channels now available will be automatically preset in order After the search has finished This search automatically adds only the act...

Page 21: ...u to name the channel that is selected Press VOL ENTER to enter the selection and the menu displays as below Press VOL VOL to select the position and CH CH to input the characters Manual Language To select language of the OSD Reset Press VOL ENTER to return to the default set Manual Channel Set Menu Ch 42 1 ATSCdmo Viewable Ch 2 0 Viewable Ch 11 0 Viewable Move Enter Change Exit Menu Exit Channel ...

Page 22: ...enu Exit CC1 CS1 Function Time Set Press CH CH button and VOL ENTER to enter the time set menu as below that allows you to set the time the DTV will display Time Set Mode You can select one of auto and manual to set the time When Auto is selected the item of year date and time will be disabled and can not be adjusted When select Manual mode you can press CH CH to select the item and VOL ENTER to c...

Page 23: ...ss ENTER VOL to enter the Enter Old Password menu and then input the number of 0 9 as below and you can change the password when you input the new one twice The initial password is 0000 Parental Control Press ENTER VOL to enter the menu input the correct password with 0 9 buttons And the menu displays as below Press CH CH to select US Ratings and VOL ENTER button to confirm Then press CH CH to sel...

Page 24: ...pes of rated programs may contain sexual content strong language and more intense violence TV MA Mature audience only these types of rated programs may contain sexual violence explicit sexual content and profane language FANTASY VIOLENCE This type of rated programs contain Fantasy and cartoon violence DIALOGUE This type of rated programs contain dialogue with sexual content LANGUAGE This type of r...

Page 25: ...tioned not to have their children view 14 rated programs by pre teens and early teens 18 Adults Only these types of rated programs are only for adult viewers only Canadian French Rating Chart OFF NO controls G These types of rated programs are generally suitable for all audiences 8 Children 8 years and above French 13 13 years old and above French 16 16 years old and above French 18 Adults Only th...

Page 26: ...ct the text color or the opacity of the text box of caption display according to your own preference Select a color and one of the opacity options Text Opacity Press VOL VOL to specify the opacity for the text color Background Color Press VOL VOL to select a background color Background Opacity Press VOL VOL to select the opacity for the background color Edge Effect Press VOL VOL to select accordin...

Page 27: ... VOL to adjust the vertical position of the picture Phase Press CH CH and then press VOL VOL to adjust the phase of the picture Clock Press CH CH button and then press VOL VOL to adjust the clock of the picture Auto Adjust Press CH CH button an d then press VOL to auto adjust that automatically adjusts the available options for the best viewing configuration Setting Press ENTER to do preset that c...

Page 28: ...t and VOL ENTER to confirm the Component set menu as below H Position Press CH CH button and then press VOL VOL to adjust the horizontal position of the picture V Position Press CH CH button and then press VOL VOL to adjust the vertical position of the picture Phase Press CH CH and then press VOL VOL to adjust the phase of the picture Clock Press CH CH button and then press VOL VOL to adjust the c...

Page 29: ... button to enter the submenu that allows you to set the time the TV will display Sleep Timer Press VOL ENTER button to select the amount of the time before your TV turn off automatically Advanced Video Menu Press VOL ENTER button to enter te advanced video menu Password Set Press CH CH button and then VOL ENTER button to enter Password Set menu and input or change old password Parental Control Pre...

Page 30: ...ted No sound Press MUTE button and verify if Mute mode is on Switch to another channel and verify if the same problem happens Press VOL button to see if the problem can be solved Poor sound Verify if sound system is functional Refer to chapter on adjusting No picture in some channel Verify if correct channel is selected Adjust the antenna Make adjustments by FINE TUNE No color for some channel pro...

Page 31: ...ents Temperature 1 5W 1 5W AV input PC input S VIDEO input PC audio input Headphone output YPbPr input Antenna input 120V 60Hz NTSC ATSC Cliar QAM Working 5 35 Storage 15 45 Power consumption 80W Model L1510B A L15A18 A Remote control Batteries User manual NOTE Design and specifications are subject to change without notice Dimensions quoted in this manual are approximate L19A18 A L1912W A 60W Humi...

Page 32: ...V0 2 0090508051C ...

Reviews: