


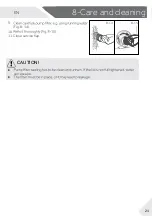

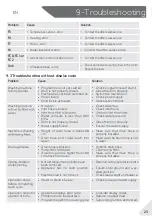


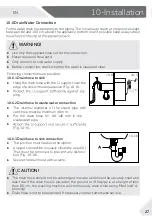


10.5 Aligning the appliance
Adjust all feet (Fig. 10-7) to achieve a complete level
position. This will minimize vibrations and thus noise
during use. It will also reduce wear and tear. We recom-
mend to use a spirit level for adjustment. Floor should
be as stable and
fl
at as possible.
1. Loose the locknut (1) by using a wrench.
2. Adjust the high by turning the foot (2).
3. Tighten lock ut (1) against the housing.
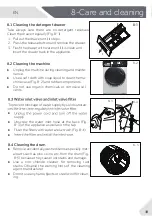
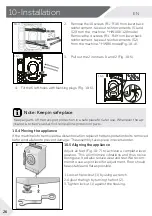
10.4 Moving the appliance
If the machine is to be moved to a distant location, replace the transportation bolts removed
before installation to prevent damage: The assembly takes place in reverse order.
Note: Keep in safe place
Keep all parts of the transport protection in a safe place for later use. Whenever the ap-
2. Remove the 10 screws (R1 - R10) from lower back
reinforcement. take out reinforcements (S1 and
S2) from the machine. *HW100/120 model
Remove the 4 screws (R1 - R4) from lower back
reinforcement. take out reinforcements (S2)
from the machine. *HW80
model(Fig. 10-4).
3. Pull out the 2 iron bars I1 and I2 (Fig. 10-5).
S2
R1-R4
S1
R5-R10
I1
I2
10-5
10-6
4. Fill the 6 left holes with blanking plugs (Fig. 10-6).
10-7
10-Installation
EN
26
10-4
Summary of Contents for I-Pro 7 Series
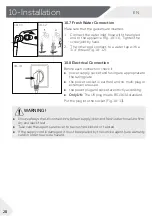
Page 21: ...CAUTION can escape 9 Fig 8 14 10 11 Close serviceflap 8 14 8 15 8 Care and cleaning EN 21 ...
Page 32: ...EN 32 ...
Page 33: ...EN 33 ...
Page 34: ......
Page 68: ...HW80 B14979 HW100 B14979 HW120 B14979_FR 0020508374AN ...