


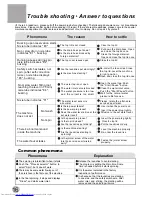


Trouble shooting Answer to questions
16
Common phenomena
Phenomena Explanation
(If there's breakdown, please pull off the power plug before checking) The following phenomena are not breakdowns
sometimes. Please confirm again before sending it to repair. If there are real breakdowns, please come to the special
maintenance department or after-sale service department of our company. Do not repair it by yourself.
It is the water remained in the factory
inspection of performance.
Balance the laundries to avoid slanting.
The program is setting the drain time. Some
time is needed before it starts spinning.
It is because that the laundries are slanting
to one side, and the safety switch acts. After
water inlet and stirring, the slanting will be
removed and the spinning will work.
The spinning is intermittent when it starts.
In the final spinning, it stops and displays
"Rinse", and starts water inlet.
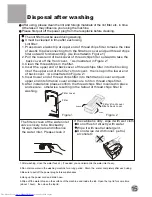
There may be some water flowing out of
the drain hose in the first use of the machine.
Push the "Process selector" button to
select "Spin", but it doesn't work.
Phenomena
The reason
How to settle
The top lid is not closed
Is the drain hose put down?
Is the drain hose blocked by
foreign material?
Are the laundries put slantingly?
Are the laundries slanting in
spinning?
Is the machine slanting?
Is the machine slanting?
The water inlet valve is blocked
The water pressure is too low
and the current is too small
Is there power failure?
Is the power plug loose?
Is the jointer screw of the water
inlet hose is loose or twisted
awry?
The water faucet leaks
There's abnormal sound
inside the machine
The machine
does not act
Close the top lid
Put down the drain hose. Open
and close the top lid once.
Clean the foreign material.
Open and close the top lid once.
Re-order the laundries. Close
the top lid.Level the machine
in right position.
Open and close the top lid once.
Open the water tap. Push
the "Start/Pause" button.
Clean the water inlet valve.
Push the "Start/Pause" button.
Wait for the normal water
pressure Before use.
Use it when the power is on.
Insert the power plug tightly.
Level the machine properly.
Re-order the laundries.
Fasten the jointer screw
properly.
Does the water level arrive at the
set water level?
Affusion to the set water level.
Is the power plug loose?
Insert the power plug tightly.
Is the top lid closed?
Close the top lid
Are the laundries put orderly?
Put the laundries orderly.
Not spin
Not wash
Buzzing upon reservation starts,
Nixie tube indicates "E0"
Safety switch actuates, not
spin, (after self-correction
twice), nixie tube displays
"E3", buzzing
No or slow water filling (not
reaching the level in 15 min),
nixie tube indicates "E4",
buzzing
No or slow drain, nixie tube
indicates "E1" , buzzing.
The water level sensor is
abnormal
Please relate the after-sale
service department.
Nixie tube indicates "F1"
The top cover leaves open
Close the top lid
Running pauses during spin,
nixie tube indicates "E2",
buzzing
The water tap is not open
Summary of Contents for HWM50-18 B
Page 20: ......