SERVICE MANUAL
Front Load Washing Machine
HW50-1002W
Page 1: ...dangers in attempting to service a product Products powered by electricity should be serviced or repaired only by experienced professional technicians Any attempt to service or repair the product or products dealt with in this service information by anyone else could result in serious injury or death MODEL HW50 1002W Front Load Washing Machine Order No FL0911008V1 1 2010 Front Load Washing Machine...
Page 2: ..._____________________ 8 3 1 Safety _______________________________________________________________8 3 2 During Use _________________________________________________________ 9 Chapter 4 Operational Guidance ____________________________________________ 10 Chapter 5 Program Introduction_____________________________________________ Chapter 6 Washing Mathods_____________________________________________...
Page 3: ... 1 Wiring circuit ________________________________________________________ 9 2 Self check __________________________________________________________ Chapter 10 Error Display and troubleshooting _________________________________ 10 1 Error Display_______________________________________________________ 10 2 Examination Troubleshooting ________________________________________ 10 2 1 Display nothing__...
Page 4: ...ed in order to service are put in the original positions or whether there are the portions which are deteriorated around the service places serviced or not And be sure safety of that 1 2 Caution and Warning symbols You will see them in Matters needing attention Any instructions in this service manual with this Warning sign must be followed strictly To prevent damage to the washing machine any inst...
Page 5: ... saving Scientific design for tub can reduce the use of water heavy during washing consequently upgrade the energy efficiency class to A also use scientific washing 3 Multi gear speed controller According to different costuming you can select corresponding spin speed from 0 to 1000 rpm 4 Unique gasket design featuring no residual water hidden inside By the unique gasket washing machine can left no...
Page 6: ...pacity dry laundry water kg l 5 42 Auto water level adjust depending on volume of filled in laundry AWL l Washing time max min 196 Washing temperatures program controlled C 30 40 60 90 Certification s CE CE Approvals VDE GS TÜV GS IMQ 2 per average 200 wash cycles EN50242 T COLD 3 Basics data 0 2 5 x 5 9 5 x 0 5 8 m m D x W x H s n o i s n e m i d t i n U Net weight kg 65 Voltage frequency V Hz 22...
Page 7: ...l function keys additional program settings ON OFF Start Pause Delay Extra Rinse Rinse Hold or Soak Eco Time Spin Select Temperature Select Baby Care h s a w d l o C Super Wash Pre wash 5 Easy ironing Packing dimensions loadability 0 6 5 x 0 5 6 x 0 9 8 m m D x W x H s n o i s n e m i d g n i k c a P Gross weight kg 68 6 40 Container load pcs 220 Logistic recicling information RS Packing weight kg...
Page 8: ... be used by childr en or persons with reduced physical sensory or mental capabilities or lack of experience and knowledge unless they have been given supervision or instruction Children should be supervised to ensure that they to not play with the appliance Do not use if the power lead is damaged It must be replaced by the manufactur er their approved service agent or similarly qualified person Do...
Page 9: ... machine MUST only be connected to a cold water supply Connect the water inlet hose the angled connection attaches to the water inlet on the back of the washing machine 7 The straight connection attaches to the water supply valve 8 Ensure all seals are in place before connecting Important Only tighten the hose connection nut by hand do not overtighten Important The height of the top of the curve i...
Page 10: ... knob By turning the knob clockwise counterclock wise the required program can be selected There are 9 programs available After a pro gram is selected the corresponding light will go on 4 Speed button Touch this button lightly to select the desired speed When a speed is set the indicator light will be light on 1 Detergent drawer 2 Power button light 3 4 Speed button 5 Intense button 6 Start pause ...
Page 11: ...itable for dirty clothes 6 Start pause When the washing machine is connected to the power socket and a program is selected lightly touch this button to start operation Du ring a wash cycle touch it lightly operation will stop and the indicator light start blinking Touch it again to resume operation To cancel a wash program during a wash cycle touch this button when the indicator light start blin k...
Page 12: ...X around 119 5 40 C O X around 107 5 C I T E H T N Y S 6 30 C Non fade heavily soiled synthetic fibre 30 O X around 70 3 7 Cold Fade and medium soiled synthetic fibre O X around 60 3 8 Wool 40 C Fade and medium soiled synthetic fibre O X around 50 2 9 Spin X X X 5 Note O means softener can be added when necessary means detergent can be added when necessary X means detergent MUST NOT be added 40 5 ...
Page 13: ...SERVICE MANUAL Front Load Washing Machine Chapter 6 Washing Mathods 6 1 Loading 6 2 Adding detergent 6 3 Selecting washing program HW50 1002W Synthetic y conditioner conditioner ...
Page 14: ...se button 5 Programme selection dial 6 Door 7 Filter Back 10 Back plate 11 Packing bolt x3 12 Earth terminal 13 Water inlet 14 Power lead 15 Drain hose 16 Back plate screw x 3 Hose clip x1 Water inlet hose x 1 Plastic plug x3 1 3 5 9 8 2 10 13 14 15 12 Tools required for installation Phillips screwdriver medium Flatblade screwdriver large Spirit level 13mm 16mm Spanners 11 11 11 16 4 6 7 Speed but...
Page 15: ...SERVICE MANUAL Front Load Washing Machine 7 2 Net dimension 520 HW50 1002W height 850mm width 595mm depth 520mm C 90 C 60 C 40 C 40 C 30 595 850 ...
Page 16: ...able from the clips on the back of the machine 1 Removing the packing bolts Important The packing bolts are designed to support the internal components during transit these MUST be removed before use a Remove the back cover plate by removing the 3 screws shown and sliding down the back cover plate 2 3 b Remove all 3 packing bolts from the back using a 13mm spanner or large flatblade screwdriver Re...
Page 17: ...nd to get the appliance level then tighten the nuts up to the underside of the appliance body using a 16mm spanner 6 5 6 C 90 C 60 C 40 C 40 C 30 Water inlet hose connection Important This washing machine MUST only be connected to a cold water supply Connect the water inlet hose the angled connection attaches to the water inlet on the back of the washing machine 7 The straight connection attaches ...
Page 18: ... of the top of the curve in the drain hose MUST be between 80 100cm from the floor 9 Fit the drain hose into the hose clip 10 and attach to the wall etc at the correct height Max 100cm Min 80cm Drain hose connection 9 10 HW50 1010W C 90 C 60 C 40 C 40 C 30 8 4 Drainage Hose ...
Page 19: ...SERVICE MANUAL Front Load Washing Machine 8 5 Connecting to the Power Supply HW50 1002W page 6 and the ...
Page 20: ...ure Sensor FA Interference Suppresser Door Door Lock Main inlet valve pre inlet valve Water Inlet Magnetic Valve Water level Switch Pressure Switch Drain pump Drainage Pump Heater Heating element Motor Motor HW50 1002W FA N N G FA1 FA2 MRN MRL Water level swith Heater Fuse FUSE NTC MRC DOOR L L Main inlet valve Drainge pump Pre inlet valve ...
Page 21: ...ight is off except the stop indication light If it s necessary to stop the program during the testing press the start pause button or makes power off if there s failure alarm during the testing pls deal with it according to the Alarm Handling Methods 7 Model selection Press the Speed and Intense button the machine will be on Model Selection mode the Buzzer beeps one time When it comes in the Model...
Page 22: ... 1 The start indicator wasn t lighted and thebuzzer sound abnormally Error message Door is not properly shut 20s after program is started Troubleshooting Error 2 The start indicator lighted on 0 2s andoff 0 2s for twice repeat 4s later Error message Drainage error water not emptied within 4 min Pushing the door to Check Whether Door is properly shut or not Y Shut the door properly Door lock is bro...
Page 23: ...t voltage to drain pump is it between AC 220 240V Replace PCB NTC exist open circuit Replace it Y Y Check if NTC is connected properly Cut off power and measure the resistance of temperature sensor by multimeter is it between 5 14kΩ Y N Connect NTC well N N Replace PCB Check if water is emptied Y Cut off power and water level pressure switch wire connection measure the resistance of 11 and14 pin i...
Page 24: ...multimeter is it between 32 35Ω Heater element must be broken please replace it N Check if inlet valve is jammed Clean inlet valve N Draw out the dispenser and check if water is entering Observe if the height of drain pipe not reach 80 cm If water level pressure switch and the hose is leaking gas N Check if tap is closed or water pressure is too low usual between0 2 1 MPa Open the tap or wait for ...
Page 25: ...e it The wire connected PCB and inlet valve is not properly Please reconnect it or replace it Y Cut off power and check if motor wires are connected well Reconnect well Y Measure if the resistance of motor binding by multimeter is it as followed 5 10 1 68 8 Ω at 20 C 8 9 2 00 8 Ω at 20 C Y Y N N Y Replace PCB Check if export voltage from PCB to electromagnetic valve is it between AC 220 240V N Put...
Page 26: ... but electrifying measure the import voltage of inlet valve is it between AC 220 240V Replace PCB Y N Without power connect inlet pipe to inlet valve then open the tap and observe if water is entering in dispenser Y Replace inlet valve Measure the power supply is it exists 220V 240V AC voltage Y Repair power supply N Press the power switch Check if power plug exists 220V 240V AC voltage at the imp...
Page 27: ...tap to make sure of no bends Reconnect inlet pipe N Check if filter of electromagnetic valve is jammed Clean filter Choose pre wash program and start then check if there is 220 240V at export pin of electromagnetic valve Y Y Choose pre wash program and start Check if there is 220 240V at import pin of electromagnetic valve Is there open circuit between electromagnetic valve and PCB Y N Replace ele...
Page 28: ...rt check if there is different noise from motor Check if hose connecting cylinder to pump is bent or jammed Turn on power and choose spin program to start Measure if import voltage of drain pump is 220 240V Cut off and check if the connection between drain pump and PCB is open Replace drain pump Replace the wire N Replace PCB Is belt loose or worn Remove belt and turn belt pulley by hand and then ...
Page 29: ...m outer cylinder Remove clothes Y Y Check if water is leaking from the inlet pipe or the tap N Check if there is foreign material nipped between cushion of sight window and sight window Check if all tubes and tie in is leaking water including the connecting of tube and valve dispenser tube and dispenser outer cylinder cushion of sight window hose and outer cylinder drain pump and gas valve Y Y Rep...
Page 30: ...SERVICE MANUAL Front Load Washing Machine Chapter 11 Maintenance HW50 1010 ...
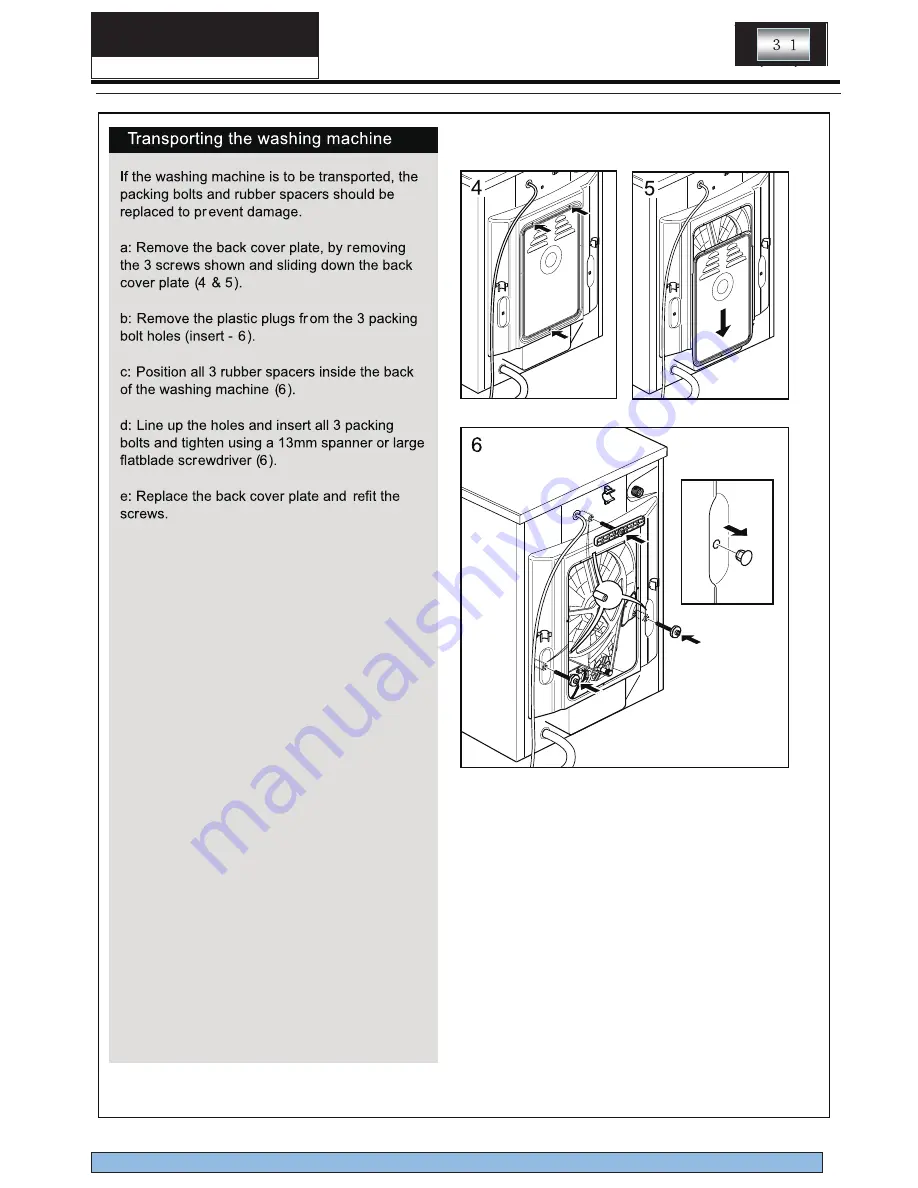
Page 31: ...SERVICE MANUAL Front Load Washing Machine HW50 1002W ...
Page 32: ...SERVICE MANAUL HW50 1002W Front Load Washing Machine 32 Sincere Forever ...