background image

26

8 - Installation

EN

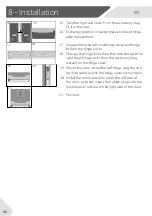
15.

Take the right axe cover from the accessory bag. 
Fix it with screw.

16.

Exchange position of caster plate and lower hinge 
after replacement.

17.

Disassemble the left small hinge cover and hinge 
lid from the hinge cover.

18.

Change the hinge lid to the other side and take the 
right small hinge cover from the accessory bag. 
Install it on the hinge cover. 

21.

Finished. 

18

17

19

16

15

20

21

19. Mount the door, install the left hinge, plug the con-

QHFWLRQFDEOHDQGƪ[WKHKLQJHFRYHUZLWKVFUHZV

20. Install the removed push rod on the left side of 

the door, and then insert the rubber plugs into the 
handle push rod hole on the right side of the door.

Summary of Contents for HVF430VW

Page 1: ...EN User Manual Upright Freezer HVF430VW HVF430VS ...

Page 2: ...er use of the appliance If you sell the appliance give it away or leave it behind when you move house make sure you also pass this manual so that the new owner can become familiar with the appliance and safety warnings 7KH V PERO LQGLFDWHV WKHUH LV D ULVN RI ƪUH WARNING Risk of ƪUH ƫDPPDEOH material VLQFH ƫDPPDEOH PDWHULDOV DUH XVHG 7DNH FDUH WR DYRLG FDXVLQJ D ƪUH E LQJQLWLQJ ƫDPP able material M...

Page 3: ...EN Content 3 1 Safety 4 2 Intended Use 11 3 Product Description 12 4 Use 13 5 Equipment 17 6 Care and Cleaning 18 7 Troubleshooting 20 8 Installation 23 9 T echnical Data 27 ...

Page 4: ...nd dry water splashes and stains with a soft clean cloth Do not install the appliance in direct sunlight or in the near of heat sou rces e g stRYHs KHDters Install and OHYHO the appliance in an area suitable for its size and use Make sure that the electrical infRUPDWLRQ on the rating plate agr eeswiththepowersupply IfitdoesnoW contactanelectrician The appliance is operated by a 220 240 VAC 50 Hz p...

Page 5: ...OLD QFH WXUQ RƩ WKH YDOYH RI WKH OHDNLQJ JDV RSHQ WKH GRRUV DQG ZLQGRZV DQG GR QRW XQSOXJ RU SOXJ LQ WKH SRZHU FDEOH RI WKH IUHH HU RU DQ RWKHU DSSOLDQFH 1RWLFH WKDW WKH DSSOLDQFH LV VHW IRU RSHUDWLRQ DW WKH VSHFLƪF DPELHQW UDQJH EHWZHHQ r DQG r 7KH DSSOLDQFH PD QRW ZRUN SURSHUO LI LW LV OHIW IRU D ORQJ SHULRG DW D WHPSHUDWXUH DERYH RU EHORZ WKH LQGLFDWHG UDQJH Do not pOace unstaEOH articaOs KeaYy...

Page 6: ...setunnecessarilylowtemperatureinthefreezercompartment Minus temperatures may occur at high settings Attention Bottles can burst Do not touch frozen goods with wet hands wear gloves Especially partment There is the risk to freeze or the formation of frost blister FIRST aid keep immediately under running cold water Do not pull Do not touch the inside surface of the freezer storage compartment when i...

Page 7: ...HUDWH WKH GHIURVWLQJ SURFHVV RWKHU WKDQ WKRVH UHFRPPHQGHG E WKH PDQXIDFWXUHU I WKH VXSSO FRUG LV GDPDJHG LW PXVW EH UHSODFHG E WKH PDQX IDFWXUHU LWV VHUYLFH DJHQW RU VLPLODUO TXDOLnjHG SHUVRQV LQ RUGHU WR DYRLG D KD DUG R QRW WU WR UHSDLU GLVDVVHPEOH RU PRGLI WKH DSSOLDQFH E RXU VHOI Q FDVH RI UHSDLU SOHDVH FRQWDFW RXU FXVWRPHU VHUYLFH OLPLQDWH WKH GXVW RQ WKH EDFN RI WKH XQLW DW OHDVW RQFH LQ WKH ...

Page 8: ... WARNING 7KH DSSOLDQFH FRQWDLQV WKH ǍDPPDEOH UHIULJHUDQW 62 87 1 5 D 0DNH VXUH WKH UHIULJHUDQW FLUFXLW LV QRW GDPDJHG GXULQJ WUDQVSRUWDWLRQ RU LQVWDOODWLRQ HDNLQJ UHIULJHUDQW PD FDXVH H H LQMXULHV RU LJQLWH I D GDPDJH KDV RFFXUUHG NHHS DZD RSHQ njUH VRXUFHV WKRURXJKO YHQWLODWH WKH URRP GR not SOXJ RU XQSOXJ WKH SRZHU FRUGV RI WKH DSSOLDQFH RU DQ RWKHU DSSOLDQFH QIRUP WKH FXVWRPHU VHUYLFH Q FDVH RI ...

Page 9: ...urs inside TR HQVXUH WKH VDIH SUHVHUYDWLRQ RI IRRGVWXƩV SOHDVH FRPSO with this instruction for use The details on the most appropriate part in the compartment of sidering the distribution of temperature that can be present in of the manual To avoid contamination of food please respect the following in structions crease of the temperature in the compartments of the appli ance Cleanregularlysurfaces...

Page 10: ...PHQW DQG KXPDQ KHDOWK ZKLFK FRXOG RWKHUZLVH EH FDXVHG E LQDSSURSULDWH ZDVWH KDQGOLQJ RI WKLV SURG XFW RU PRUH GHWDLOHG LQIRUPDWLRQ DERXW UHF FOLQJ RI WKLV SURGXFW SOHDVH FRQWDFW RXU ORFDO FLW RǎFH RXU KRXVHKROG ZDVWH GLVSRVDO VHUYLFH RU WKH VKRS ZKHUH RX SXUFKDVHG WKH SURGXFW 6LQFH WKH ǍDPPDEOH LQVXODWLRQ EORZLQJ JDVHV DUH XVHG SOHDVH FRQ WDFW WKH SURIHVVLRQDO DJHQW RU RXU DIWHU VDOH VHUYLFH WR GL...

Page 11: ... non retail applications Thisapplianceisintendedforfreezingfood Ithasbeendesignedexclusivelyforuseindry interior house holds It is not intended for commercial or industrial use ards and loss of warranty claims 2 2 Accessories Check the accessories and literature in accordance with this list User manual Warranty card Axe covers Upper right hinge for door reversibility Upper right hinge cover 2 2 EN...

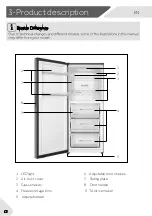
Page 12: ... 5 3 4 3 Product description EN 12 1 LED light 2 Air duct cover 3 4 Freeze storage bins 5 Adjustable feet 6 Adjustable door shelves 7 Rating plate 8 Door handle Glass shelves 1RWLFH LƩHUHQFH 9 9 Twist ice maker ...

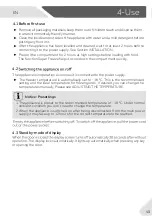
Page 13: ...r temperature is automatically set to 18 C This is the recommended setting and the ideal temperature for frozen goods If desired you can change the temperatures manually Please see ADJUSTING THE TEMPERATURE Notice Presettings 1 The appliance is preset to the recommended temperature of 18 C Under normal ambient condition you don t need to change the temperature 2 When the appliance is switched on a...

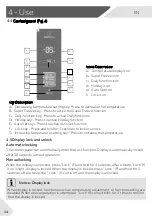
Page 14: ...on setting are disabled When above operation is attempted Lock f icon will blink for 3 timestoremind that the display is locked Control panel Fig 4 A Decreasing temperature setting key Press to decrease the temperature B Super Freeze key Press to active the Super Freeze function C Daily function key Press to active Daily functions D Holiday key Press to active Holiday function E Auto Set key Press...

Page 15: ... YDOXH LV GHWHUPLQHG DQG LFRQ D VWRSV EOLQNLQJ DIWHU VHFRQGV ZLWKRXW RSHUDWLRQ SuperFreezemodeisoptimalforpreserYingfoodnutrition itcouldfreezefoodinlesstime BeforeputtinglotsoffoodinsidetKefreezer actiYateSuperFreezefunctiontoKaYelower temperature tomaNesurebetterfreezeresult WKendisplayisunlocNed bytRXFKing SuperFreeze B tKeSuperFreezeicon b willbelig Kt tKefreezerworNsinSuperFreezemode ToH LW m...

Page 16: ...WKLV VLWXDWLRQ WKH IUHH HU FRXOG VWLOO IUHH H IRRG EXW XVHU VKRXOG FRQWDFW DIWHUVDOHV VHUYLFH DV VRRQ DV SRVVLEOH IRU RSWLPDO FRQWURO RI WKH IUHH HU 4 Use EN 16 Notice HoOiGD Iunction Q ROLGD PRGH WHPSHUDWXUH FRXOG QRW EH DGMXVWHG I RX GR VR ROLGD LFRQ ZLOO EOLQN IRU WLPHV WR UHPLQG WKDW WKH IUHH HU LV LQ ROLGD PRGH Q ROLGD PRGH LI XWR 6HW DLO RU 6XSHU UHH H IXQFWLRQ LV VHW ROLGD LFRQ G LV RƩ ROLG...

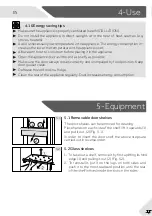
Page 17: ...ired by food position Keep door gasket clean Defreeze frozen food in a fridge Clean the rear of the appliance regularly Dust increases energy consumption 5 1 Removable door shelves The door shelvescan be removed for cleaning Place hands on each side of the shelf lift it upwards 1 and pull it out 2 Fig 5 1 In order to insert the door shelf the above steps are carried out in reverse order 5 2 Glass ...

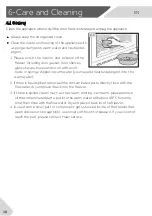
Page 18: ...eutral detergent into the warm water 2 If there is liquid spilled remove all the contaminated parts directly rinse with the ƫow water dry and place it back into the freezer 3 If there is spilled cream such as the cream melting ice cream please remove time thenrinsewiththeƫowwater dry and place it back into the frieezer 4 In case some small part or component gets stucked inside of the freezer bet w...

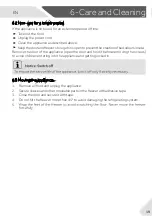
Page 19: ...dodoursinside Remove the door of the appliance open the door and hold it before removing the screws to avoid children entering into the appliance and getting locked in 6 3 Moving the appliance 1 Remove all food and unplug the appliance 2 Secureshelvesandothermoveablepartsinthefreezerwithadhesivetape 3 Closethedoorandsecureitwithtape 4 Do not tilt the freezer more than 45 to avoid damaging the refr...

Page 20: ...normal for the appliance to run longer Ь Normally it takes 8 to 12 hours for the appliance to cool down completely Ь Close the door and ensure the appliance is located on a level ground and there is no food or container jarring the door Ь Do not open the door too fre quently Ь Set the temperature higher un til a satisfactory temperature is obtained It takes 24 hours for the temperature to become s...

Page 21: ... normal in damp climate and will change when the hu midity decreases Wipe dry with a cloth Strong ice and frost in the freezer com partment Ь The goods were not adequately packaged Ь The door is not tightly closed Ь The door has been opened too frequently or for too long Ь The door gasket is dirty worn cracked or mis matched Ь Something on the inside prevents the door from closing properly Ь Alway...

Page 22: ...nged power interruption especially in summer Open the door as few times as possible Do not put additional food into the freezer during a power interruption If prior notice of a power interruption is given and the interruption duration is longer than 15 hours make some ice and put it in a container in the top of the freezer com partment As temperature in the freezer will rise during a power interru...

Page 23: ...uired ventila tion cross sections must be observed Fig 8 2 8 5 Aligning the appliance The appliance should be placed on a at and solid sur face If the appliance is placed on a pedestal strong and foam packing material as a pedestal 1 Tilt the appliance slightly backwards Fig 8 3 2 Set the feet to the desired level 3 The stability can be checked by alternately bump ing on the diagonals The slight s...

Page 24: ...ule of the compressor This oil can get through the closed pipe system during slanting transport Before connecting the appliance to the power supply you have to wait 2 hours Fig 8 5 so that the oil runs back into the capsule 8 8 Electrical connection Before each connection check if Power supply socket and fusing are appropriate to the rating plate The power socket is earthed and no multi plug or ex...

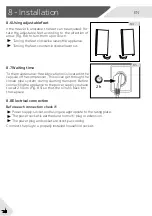
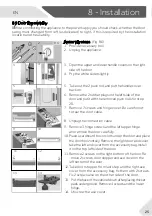
Page 25: ...r Be careful not to tear the door cable 8 Unplug the connection cable 9 Remove 3 hinge screws and the left upper hinge and remove the door carefully 10 Placeacardboardboxorclothunderthedoorandplace thedoorhorizontally Removetherightdoorendcover taketheleftendcoverfromtheaccessorybag Install itonthe top leftsideofthedoor Assembly steps Fig 8 6 1 2 8 6 10 3 4 6 5 7 11 Remove2screwsontherightbottomof...

Page 26: ...nge cover 18 Change the hinge lid to the other side and take the right small hinge cover from the accessory bag Install it on the hinge cover 21 Finished 18 17 19 16 15 20 21 19 Mount the door install the left hinge plug the con QHFWLRQ FDEOH DQG ƪ WKH KLQJH FRYHU ZLWK VFUHZV 20 Install the removed push rod on the left side of the door and then insert the rubber plugs into the handle push rod hole...

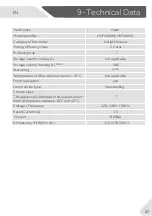
Page 27: ...zing L 386 Star rating Temperature of other compartments 14 C not applicable Frostfree system yes Climate class This appliance is intended to be used at an am bient temperature between 18 C and 43 C T Construction type freestanding Voltage Frequency 220 240V 50Hz Rated Current A 1 5 Coolant R600a Dimensions H W D in cm 172 5 70 5 69 1 27 EN 9 Technical Data ...

Page 28: ...HVF430VW HVF430VS 0060530008 ...

Reviews: