background image


.   


SERVICE MANUAL 

Model: HRFZ-250DAA 

4


Issue      2012-4-9 

Rev.    Ref0911S006V0 

receptacle. Don’t press the line under the cabinet or step on it. Take care not to roll on or damage the 

supply line when moves the machine from the wall.   

12.  In the case of leakage of inflammable gases like carbon monoxide, open the door and windows. 

Don’t pull out or insert the plugs of the appliance. 

13.  Don’t  touch  the  refrigeration  surface  of  the  freezing  compartment  when  the  refrigerator  is  in 

operation, especially when our hand is wet, else we may be glued to the surface. 

14.  Pull out the plug of power supply during clearance or power outage. Wait at least five minutes to 

resume the power supply in order to prevent damage to the compressor caused by continuous restart. 


Photo used in this manual 

The illustration and photos used in this Manual may not base on the final design of products, which may 

differ from the products in some way. 

1-3. How to read this Service Manual 

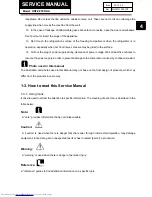
1-3-1. Using Icons 

Icons are used to attract the attention to specific information. The meaning of each icon is described in the 

table below: 

Note:         


A “note” provides information that is not indispensable. 

Caution:   


A “caution” is used when there is danger that the reader, through incorrect manipulation, may damage 

equipment, loose data, get an unexpected result or has to restart (part of) a procedure. 

Warning:   


A “warning” is used when there is danger of personal injury. 

Reference: 


A “reference” guides to find additional information on a specific topic. 

Summary of Contents for HRFZ-250DAA

Page 1: ...ans only and is not designed for use by the general public It dose not contain warnings and cautions to advice non technical individuals of potential dangers in attempting to service a product Product powered by electricity should by serviced or repaired only by experienced professional technicians Any attempt to service or repair the product or products dealt with in this service information by a...

Page 2: ... 3 2 The door right left change 9 Chapter 4 Adjustments and maintenance 10 4 1 Adjust the adjustable feet 10 4 2 Adjus the thermostat 10 4 3 Maintenance 11 Chapter 5 Flow chart 12 5 1 Refrigeration flow chart 12 5 2 Refrigeration flow scenography 13 Chapter 6 Circuit diagram 14 6 1 Brief principle diagram 14 Chapter 7 Trouble shooting 15 7 1 phenomena and solving 15 7 2 Compressor parameter 18 7 3...

Page 3: ...ve line test insulating gloves should be worn to avoid potential electrical shock 4 Confirm the rated current voltage and capacity before testing with any kinds of instruments 5 Watch if the upper door is open when we check something at a lower position 6 Take out every part in the cabinet before moving the machine especially things like panels e g glass shelf 7 Please wear intact cotton gloves wh...

Page 4: ...es to resume the power supply in order to prevent damage to the compressor caused by continuous restart Photo used in this manual The illustration and photos used in this Manual may not base on the final design of products which may differ from the products in some way 1 3 How to read this Service Manual 1 3 1 Using Icons Icons are used to attract the attention to specific information The meaning ...

Page 5: ...215 Fridge volume net 171 3 Features Manual Defrost No Adjustable Temperature Control Yes Defrost water outlet No Open door change right left Yes Kind of coolant R600a 4 Technical data Voltage Frequency 220 240V 50Hz Input power 80W 5 Aesthetics Colours Top cover YES Door White 6 Equipment or accessories Adjustable thermostat Yes Adjustable feet front rear Front 7 Product dimensions Unit dimension...

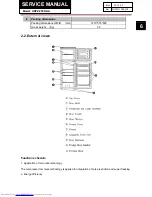
Page 6: ...acking dimensions Packing dimensions H W D mm 1473 575 605 Gross weight Kg 50 2 2 External views Function schedule 1 Application of low noise technology The compressor low noise technology is applied for integration of noise reduction and super freezing 2 Energy efficiency ...

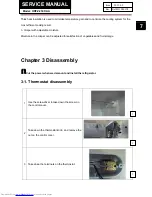
Page 7: ...r with adjustable moisture Moisture in the crisper can be adjusted for satisfaction of vegetables and fruit storage Chapter 3 Disassembly Cut the power when we demount and install the refrigerator 3 1 Thermostat disassembly 1 Use the screwdriver to take down the screw on the control cover 2 Take down the thermostat knob and remove the nut on the control cover 3 Take down the terminals on the therm...

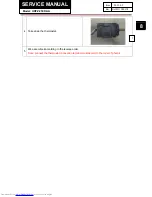
Page 8: ...L Model HRFZ 250DAA 8 Issue 2012 4 9 Rev Ref0911S006V0 4 Take down the thermostat 5 We assemble it according to the reverse order Note connect the thermostat connection terminal must accord to the order of photo 4 4 ...

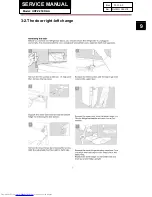
Page 9: ... SERVICE MANUAL Model HRFZ 250DAA 9 Issue 2012 4 9 Rev Ref0911S006V0 3 2 The door right left change ...

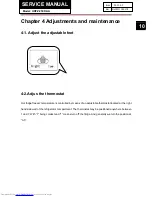
Page 10: ...e feet 4 2 Adjus the thermostat Our fridge freezer temperature is controlled by means of an adjustable thermostat located at the right hand side wall of the refrigerator compartment The thermostat may be positioned anywhere between 1 and 7 With 7 being coldest and 1 means turn off the fridge And generally we turn the position at 3 5 ...

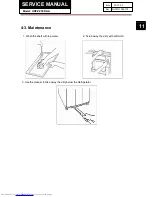
Page 11: ...MANUAL Model HRFZ 250DAA 11 Issue 2012 4 9 Rev Ref0911S006V0 4 3 Maintenance 1 Wash the shelf with tap water 2 Scrub away the dirty with soft cloth 3 Use the cleaner to take away the dirty below the Refrigerator ...

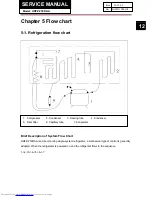
Page 12: ...escription of System Flow Chart HRFZ 250DAA is a direct cooling single system refrigerator a mechanical type of control is generally adopted When the refrigerator is powered on and the refrigerant flows in the sequence 1 2 3 4 5 6 7 1 Compressor 2 Condenser 3 Heating tube 4 Condenser 5 Drier filter 6 Capillary tube 7 Evaporator ...

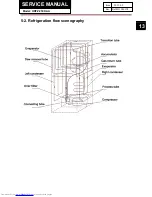
Page 13: ... SERVICE MANUAL Model HRFZ 250DAA 13 Issue 2012 4 9 Rev Ref0911S006V0 5 2 Refrigeration flow scenography ...

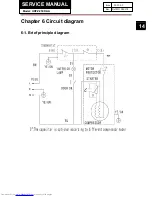
Page 14: ... SERVICE MANUAL Model HRFZ 250DAA 14 Issue 2012 4 9 Rev Ref0911S006V0 Chapter 6 Circuit diagram 6 1 Brief principle diagram ...

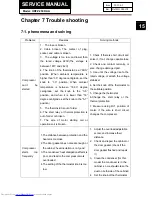
Page 15: ...is short circuit and solve it if not change capable fuse 2 Check and contact normally or else change damaged part 3 Use until the voltage rise to the rated voltage or attach the voltage stabilizer 4 Set the knob of the thermostat to the suitable position 5 Change the thermostat 6 Change the start relay or the thermal protection 7 Measure using R 1 position of meter if the wire is short circuit cha...

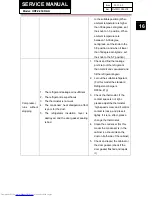
Page 16: ...poor for the dust 5 The refrigerator insulation layer is destroyed and the door gasket sealing is bad 1 Check and find the leakage point let out the refrigerant then meld it and vacuumed and fill the refrigerant again 2 Let out the suitable refrigerant For this model the standard Refrigerant charge is R600a 41g 3 Check the thermostat if the contact space is not right please adjust the thermostat h...

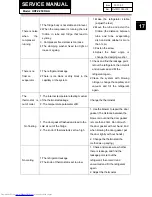
Page 17: ...then meld it and vacuumed and fill the refrigerant again 2 Clean the system with blowing nitrogen change the capillary and vacuum and fill the refrigerant again The thermostat is out of order 1 The internal temperature feeling medium of the thermostat leakage 2 The temperature parameter drift Change the thermostat No frosting 1 The door gasket flashed and lead to the cold air out of the fridge 2 T...

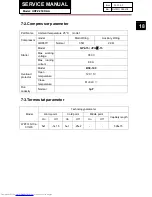
Page 18: ...ing QD65YV Normal 35Ω 29 Ω Starter Model QP2 15 JPQⅡ 15 Max working voltage 350 V Max running current 8 0 A Overload protector Model B50 100 Open temperature 120 5 Close temperature 61 9 9 Run capacity Normal 3μF 7 3 Termostat parameter Model Technology parameter Warm point Cold point Middle point Capillary length On Off On Off On Off WPF31S 102 011WX 5 1 7 1 5 5 1 25 2 598 15 ...

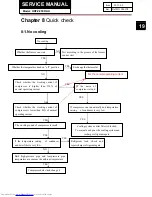
Page 19: ...er the working current of compressor is higher than 120 of normal operating current If the noise of compressor is loud Check whether the working current of compressor is lower than 80 of normal operating current The working sound of compressor is small If compressor can run naturally and temperature raising of condenser is very low If the temperature raising of condenser and drier filter is very l...

Page 20: ...r when shake it it should not have noise if it has means the starter Magnetic Disk burned 2 Reverse180 of hammer type starter and if it does not conduct contact junction carbonized and check the coil burn YES Check if the overload protector is normal 1 Measure whether two ends of overload protector is through using multi meter Ohm grade Not thorough means protector is defective 2 Measure starting ...

Page 21: ...arting current of compressor excess too much Test the resistance parameter of the compressor if it is ZERO inner winding is short circuit if it is infinite inner winding is break circuit If all technical parameter of compressor and compressor accessories starter overload protector are normal after above test but compressor still can not be started and overload protector action the actual starting ...

Page 22: ...rosting evenly normal Whether the thermostat is normal Check if compressor accessories and compressor is normal Adjust temperature setting Decrease the frequency opening door Guide user note that Don t put too much food into the freezer once and inner compartment should keep some gap so that the air flow Hot food should be cooled prior to being stored Guide user note that Don t put freezer near ho...

Page 23: ... big Whether the pipeline does resonate The capillary tube is not smooth or has burr Is the freezing evaporator is fixed tightly Refilling Add shock damper glue or fix the evaporator tightly Adjust distance to more than 5mm Adjust and fix bolts or fixing clip Replace rubber damper cushion Adjust and fix Adjust pipeline or add shock damper glue Adjust appliance and explain to user Explain to user E...

Page 24: ... SERVICE MANUAL Model HRFZ 250DAA 24 Issue 2012 4 9 Rev Ref0911S006V0 Sincere forever Haier Group Haier Industrial Park No 1 Haier Road 266101 Qingdao China http www haier com ...

Reviews: