background image

Installation

be removed from the box after every drying cycle. If your

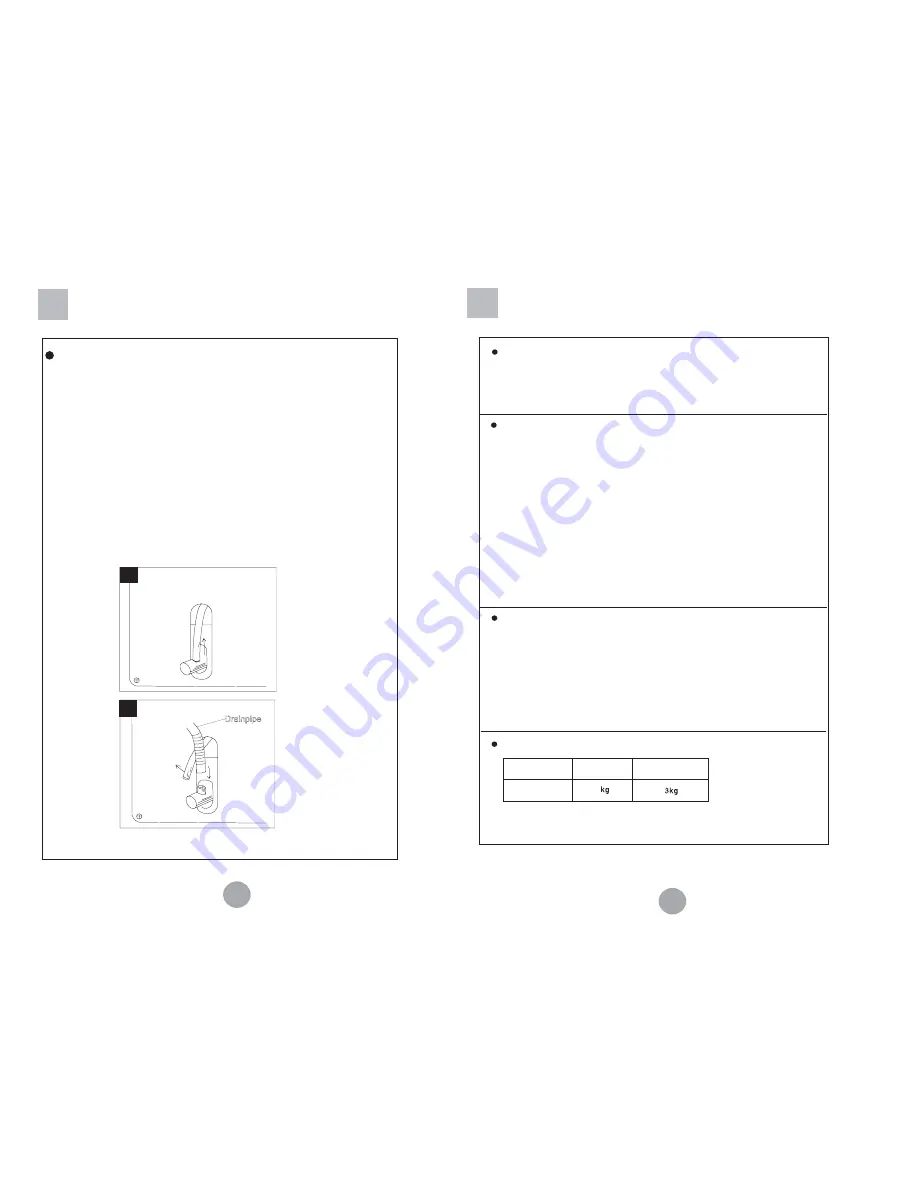
dryer is in the vicinity of a drain, you may allow the condensed

water to discharge directly into the drain through the drainpipe

provided  to avoid emptying the box every time.

The method to connect the drainpipe is as follows:

1. Loosen the hose clip with the drain switchover joint; 

2. Pull the hose off the joint;

3. Install the accessory drainpipe  on the joint;

4. Fix the hose in place with the clip;

Note: The outlet of the drainpipe must not be higher than 1.2 m above

the floor.

Preparation

Turning the power on

Before turning on the power , check:

Ƶ

Whether the supply voltage is in accordance with the value indicated

on the rating plate on the inside of the door;

Ƶ

Whether the supply receptacle can withstand the maximum power 
load to the dryer;

Attention

˖

1. Before use, clean any deposits from  inside the drum

of the dryer with a wet towel;

2. Clean debris on the filter screen to increase the

drying efficiency.

Treatment of laundry to dry

Ƶ

The dryer can only dry the laundry that has been spun dry. Do not

 put soaking wet laundry into the machine;

Ƶ

Empty all pockets of  such items as keys and coins

Ƶ

Pull up zippers,  fasteners and tie up ribbons to prevent the

 laundry from being entangled. If necessary,put small items into

 a bag or pillow case. 

Ƶ

To achieve a better drying result, shake the heavy laundry and make
it loose when loading it into the dryer

.

Warning: Do not dry wool, silk, down and other delicate fabrics to avoid

damage to fabrics. 

Cotton fabric 

Load to dry

Synthetic fabric 

Maximum load 

Laundry type 

Drain switchover

During the drying of the laundry, the condensate water is automatically

collected in the box inside the machine, so that the water needs to 

A

Drainpipe

B

Ƶ

Whether the supply receptacle is in accordance with the plug of 
the dryer.If not, replace the power supply cable or receptacle to 
make them accord with each other; The replacement of the power 
supply cable must be made by a qualified professional or our 
authorized service agent;

Ƶ

The dryer must be grounded securely.

Summary of Contents for HMS6-1

Page 1: ... Program selector Container handle Name of parts Door Plinth Button SAVE THESE INSTRUCTIONS Bottom plaque Programming guide 10 Important Safety Instructions 2 3 Name of Parts 1 This diagram may be slightly different from the layout of the machine you have just purchased due to techincal improvements Read all instructions before using dryer Dryers are provided with operating care and installations ...

Page 2: ... contribute to a chemical reaction that could cause a load to catch fire 11 Clean lint screen before or after each load 12 This dryer must be properly installed in accordance with the installation instructions before it is used 13 To prevent shock hazard and assure stability during operation the dryer must be installed and electrically grounded by a qualified service person in accordance with loca...

Page 3: ...VXUURXQGLQJ HQYLURQPHQW PXVW EH GU DQG YHQWLODWHG Ŷ To allow the dry er to perform better the ambient temperature shall not be lower than 1 0 nor higher than 3 5 Change the door opening direction I WKH GLUHFWLRQ RI WKH GU HU V GRRU LV not suitable to the location its opening direction PD EH FKDQJHG 7KH SURFHGXUH LV DV IROORZV 8QVFUHZ WKH KLQJH VFUHZV KROGLQJ WKH GRRU RQWR WKH PDFKLQH DQG UHPRYH WK...

Page 4: ...ilter screen to increase the drying efficiency Treatment of laundry to dry ƵThe dryer can only dry the laundry that has been spun dry Do not put soaking wet laundry into the machine ƵEmpty all pockets of such items as keys and coins ƵPull up zippers fasteners and tie up ribbons to prevent the laundry from being entangled If necessary put small items into a bag or pillow case ƵTo achieve a better d...

Page 5: ...ows the remaining time and the lock alternatively and the control panel will lock Press and hold down both buttons for 3 seconds once again and the child lock will release When the program is end or the power off during the program the child lock will release G LED screen The screen displays the remaining time for a program the delay time and other related information Note The remaining time to st...

Page 6: ... result required 4 Delicate function setting For delicate laundry that needs special care press this function button Once this function is selected the drying program will operate with a low drying temperature And the drying time will automatically increase by 20 minutes 5 Delay setting You may choose to start the dryer after a preset time The delay range is between 1 and 19 hours Each press incre...

Page 7: ...comes on while the box is emptied and the dryer will stop It will not restart until the box is emptied 4 Cleaning the condenser The condenser must be cleaned monthly Switch off the power supply before cleaning Hold the protrusions on both sides of the lower deco panel and open it Cleaning and Maintenance Using a coin or other tool push the slides on the cover to the position as shown in the figure...

Page 8: ...me display is halted or the remaining time displayed is skipping The remaining time will be adj usted and corrected continuously and automatically based on the following factors Ɣ7 SH RI ODXQGU Ɣ RDGHG DPRXQW Ɣ7KH GHJUHH RI VSLQQLQJ GU RI ODXQGU Ɣ PELHQW WHPSHUDWXUH The automatic adj ustment is a normal operation Trouble shooting E2 E5 E6 3URPSW DQG ODUP QIRUPDWLRQ I n case of an improper operatio...

Page 9: ...ensor HˉHumidity sensor K2ˉLevel switch K1ˉDoor switch PCB1ǃPCB2ˉPrinted circuit board PCB1 PCB2 P S M FA R1 R2 T1 T2 L K1 N TC H K2 K3ˉPower switch K3 N K3 L G Specifications Rated load kg Ty pe Item Power supply Max imum operating current A Max imum power W Dry ing program HMS6 1 220 240 V 50Hz 15 6 11 2800 Water proof level IPX 4 Dimensions H D W mm 855h620h595 ...

Page 10: ...afür dass mögliche Abweichungen zwischen der Abbildung oben und Ihrem Wäschetrockner vorhanden sein könnten Vielen Dank dass Sie ein Haier Produkt gekauft haben Bitte lesen Sie diese Betriebsanleitung sorgfältig bevor Sie das Gerät in Betrieb nehmen Sie enthält wichtige Informationen damit Sie viel Freude an Ihrem Gerät haben und ein sicherer und sauberer Betrieb gewährleistet ist Bewahren Sie die...

Page 11: ...Fachleute 14 Vor Reparatur oder Wartung den Trockner vom Stromnetz trennen Den Stecker nicht durch Ziehen des Anschlusskabels aus der Steckdose entfernen 15 Den Trockner nur zum Bestimmungsgemäßen Gebrauch verwenden 16 Setzen Sie sich keinenfalls auf den Trockner und benutzen Sie den Trockner nicht als Ablagestelle 17 Wenn die Anschlussleitung dieses Gerätes beschädigt wird muss sie vom Hersteller...

Page 12: ...üranschlag Wenn die Türöffensrichtung der Kleidungstrockenmaschine nicht geeignet fmaschine nicht geeignet für dieAufstellungspositionist können Sie die Türanschlag wechseln Die konkreten Vorgangsschritte sind wie folgt 1 Schrauben Sie die vier das Türscharnier befestigenden Befestigungsschraubenab und entnehmenSie die Tür 2 Bauen Sie das Türscharnier von der Tür ab entnehmen Sie die Scharnierabde...

Page 13: ...idung ŶhEHUSU IHQ 6LH RE GLH X WURFNQHQGH OHLGXQJ JHHLJQHW I U GLH RQGHQVWURFNQHU LVW Ŷ LH RQGHQVWURFNQHU NDQQ QXU JHVFKOHXGHUWH OHLGXQJ WURFNQHQ OHJHQ 6LH ELWWH QLFKW X QDVVH OHLGXQJ LQ GLH 0DVFKLQH HLQ Ŷ QWIHUQHQ 6LH JUXQGVlW OLFK GLH 6DFKHQ LQ 7DVFKHQ GHU OHLGXQJ 6FKO VVHO 0 Q H XVZ XQG HQWQHKPHQ 6LH GLH QLFKW I U 7URFNQHQ JHHLJQHWHQ HNRUVDFKHQ Ŷ6FKOLH HQ 6LH ELWWH 5HLVVYHUVFKOXVV JHORFNHUWH Q ...

Page 14: ... Schonprogramm Diese Taste drücken um die Schonprogramm zu starten Hierbei wird die Wäsche bei niedriger Trockentemperatur nur leicht getrocknet F Zeitvorwahl Vor dem Starten des Trockenprogramms Taste mehrfach drücken um die Zeit einzustellen wann das Trockenprogramm beendet sein soll Die Maschine startet automatisch zum entsprechenden Zeitpunkt jeweils in Intervallen von 30 Min 0 5 24 Std Die Ze...

Page 15: ...s Trockenprogramms diese Taste drücken bis die Anzeigelampe leuchtet Nochmal drücken um das akustisches Signal wieder zu aktivieren 5 Zeitvorwahl Das Programmende ist 1 19 Stunden vorwählbar 6 Programmstart Durch Drücken der Start P ause Taste wird das ausgewählte Programm gestartet 7 Programmende Das Programmende wird im Display angezeigt End Wird die Wäsche danach nicht entnommen startet der Tro...

Page 16: ...entleert wird und die Maschine erneut gestartet wird Reinigung und Pflege 4 Reinigung des Kondensators Der Kondensator soll einmal monatlich gereinigt werden vor Reinigung schalten Sie bitte zunächst die Stromversorgung aus Mit Händen greifen Sie die Flansche auf den beiden Seiten der Unterdekorplatte und öffnen Sie die Unterdekorplatte Mit Münze oder anderem Mittel schieben Sie die zwei Reiter an...

Page 17: ...geschleudert ƽTrommel regelmäßig gereinigt Trommelbeleuchtung brennt nicht ƽkein Strom ƽBirne kaputt Anzeige Restlaufzeit steht oder springt Mögliche Ursachen für sich ändernde Restlaufzeiten können sein ƽWäscheart ƽ Füllmenge ƽ Feuchtigkeitsgrad der Wäsche ƽUmgebungstemperatur Es kann sein daß bei Abweichungen die Restlaufzeit angepasst werden muß E2 E5 E6 Hinweise und Fehlermeldungen Code Typ Ur...

Page 18: ...H x T x B mm Max Leistung W Programm 855h620h595 Schaltplan FA Entstörfilter R1ˉHeizröhr1 R2ˉHeizröhr2 T1ˉThermostat T2ˉThermostat LˉGlühbirne PSˉDrainagepumpe MˉMotor NTCˉTemperatursensor HˉFeuchtigkeitssensor K1ˉWasserniveauschalter K2ˉTürschalter K3ˉStromschalter PCB1ǃPCB2ˉPC Schalttafel PCB1 PCB2 P S M FA R1 R2 T1 T2 L K1 NTC H K2 K3 N K3 L G ...

Reviews: