background image

6

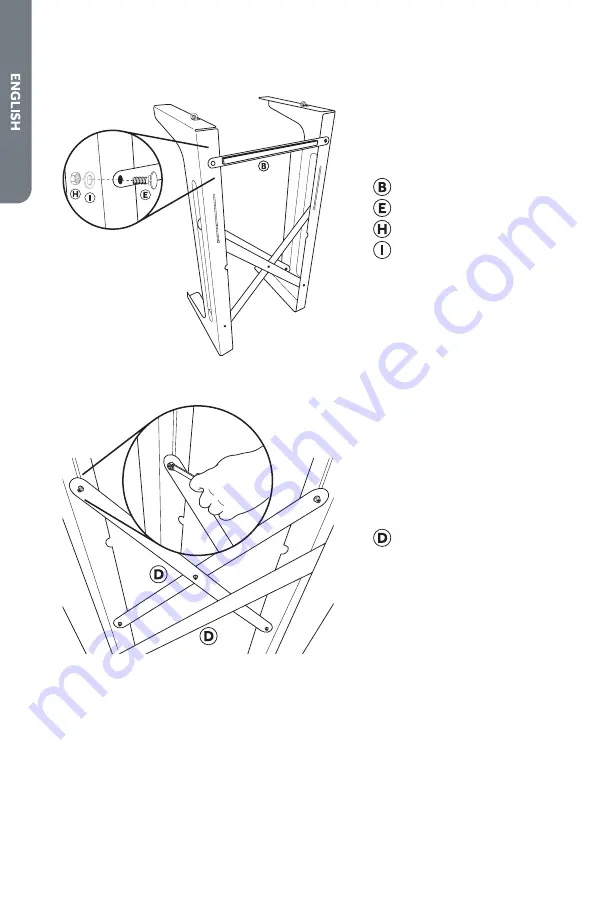
3.  

Using the carriage bolt, washer and lock nut attach the support brace with a 

7/16" wrench. Completely tighten both sides of the support brace.

  Support Brace
  Carriage Bolt
  Lock Nut
  Flat Washer

4.  Completely tighten all 7 cross-brace nuts with a 7/16" wrench.

  Cross Braces

Summary of Contents for HLP0001AXW

Page 1: ...r FR Dryer Stack Stand Kit FR For use with compact models HLP141E Dryer HLP28E Washer HLP21 Washer SP Dryer Stack Stand Kit SP For use with compact models HLP141E Dryer HLP28E Washer HLP21 Washer Installation Instructions FR Installation Instructions SP Installation Instructions HLP0001AXW ...

Page 2: ......

Page 3: ...features 3 INSTALLATION INSTRUCTIONS 4 Tools Needed 4 Location Requirements 4 STEP BY STep instructions 5 Assemble Stand 5 Attach Dryer 7 Attach Stand to Wall 8 Thank you for purchasing this Haier product The installation instructions will help you get the best performance from your products ...

Page 4: ... death or serious injury This product must be properly installed and located in accordance with the installation instructions before it is used Do not install this product where it will be exposed to temperatures below freezing or exposed to weather which can cause damage to the product Keep the area around your appliance free from combustible materials such as lint paper rags and chemicals Close ...

Page 5: ...3 parts and features Mounting Brackets Support Brace Double Sided Foam Tape Cross Braces Carriage Bolt Lag Bolt 8 Phillips head Screws 2 Lock Nut Flat Washer Split Lock Washer Star Washers 2 ...

Page 6: ...s baseboard heaters or cooking appliances Do not install on carpeting The location must have appropriate electrical and gas supply outlets See the Electrical Gas Supply Requirements section in your product s User Manual Do not install in a location where the dryer might come into contact with combustible materials such as but not limited to curtains thick carpet and or any materials that might obs...

Page 7: ...nd create pinch points during set up Keep hands clear of sliding cross braces and their connection points Do not insert finger into moving parts Doing so may result in severe injury cut or pinch 2 Grasp the left and right side as shown Pull apart Make sure the bolts have slid all the way to the bottom of the slot to ensure the stand is completely open ...

Page 8: ...r and lock nut attach the support brace with a 7 16 wrench Completely tighten both sides of the support brace Support Brace Carriage Bolt Lock Nut Flat Washer 4 Completely tighten all 7 cross brace nuts with a 7 16 wrench Cross Braces ...

Page 9: ...er and discard Panel Screws WARNING Excessive Weight Hazard Use two or more people to move and install dryer Failure to do so can result in death or personal injury 2 Lift dryer onto the stand and position the dryer so the screw holes align with the mounting bracket holes ...

Page 10: ...m the double sided foam tape on the back of the support brace Support Brace Double Sided Foam Tape WARNING Tip and Utility Rupture Hazard Stand must be securely assembled fastened to wall and dryer attached to stand per installation instructions Failure to do so could result in death personal injury or property damage 2 Carefully walk the stand and dryer assembly into the final location ...

Page 11: ...th of the support brace to adhere the double sided foam tape to the wall Support Brace 4 Locate a stud in the wall Using the lag bolt and split lock washer secure the support brace to the wall Stud Support Brace Lag Bolt Split Lock Washer ...

Reviews: