Installation
How to connect
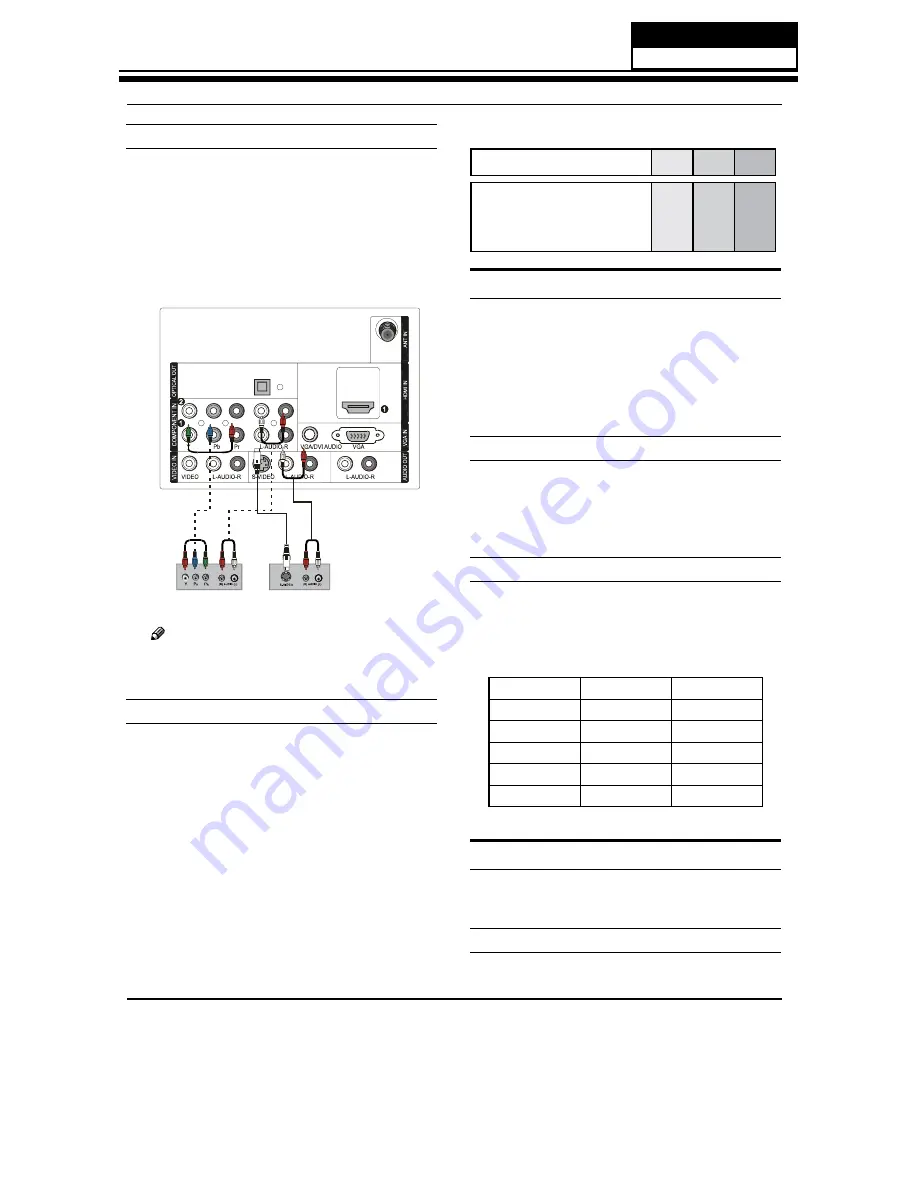
Connect the DVD video outputs (COMPONENT) to
A
the Y Pb Pr jacks on the TV and connect the DVD
audio outputs to the YPbPr Audio IN jacks on the TV,
as shown in the figure.
If your DVD only has an S-VIDEO output jack, connect
B
this to the S-VIDEO input on the TV, as shown in the
figure.
DVD
or
Note
If your DVD player does not have component
R
video output, use S-Video.
How to use
Turn on the DVD player, insert a DVD disc.
A
Use
B
INPUT
button on the remote control to select
component mode.
Press
C
PLAY
button on external equipment for
program play.
Refer to the DVD player’s manual for operating
D
instructions.
Component Input ports
Q
To get better picture quality, connect a DVD player to
the component input ports as shown below.
Component ports on the TV
Y
Pb
Pr
Video output ports on DVD
player
Y
Y
Y
Y
Pb
B-Y
Cb
P
B
Pr
R-Y
Cr
P
R
Connecting a DTV (digital TV)
This TV can receive Digital Over-the-air/Cable signals
without an external digital set-top box. However, if you do
receive Digital signals from a digital set-top box or other
digital external device, refer to the figure as shown below.
This TV supports HDCP (High-bandwidth Digital
Contents Protection) protocol for Digital Contents
(480p,720p,1080i).
How to connect
Use the TV’s COMPONENT, VGA or HDMI jack for
q
video connections, depending on your set-top box
connector. Then, make the corresponding audio
connections.
How to use
Turn on the digital set-top box. (Refer to the owner’s
A
manual for the digital set-top box.)
Use INPUT on the remote control to select
B
COMPONENT, VGA or HDMI source.
Signal
COMPONENT
HDMI
480i
Yes
Yes
480p
Yes
Yes
720p
Yes
Yes
1080i
Yes
Yes
1080p
Yes
Yes
Connecting a digital audio output
Send the TV’s audio to external audio equipment (stereo
system) via the Digital Audio Output (Optical) port.
How to connect
Connect one end of an optical cable to the TV Digital
A
Service Manual
Model No.: HL40XP1
21
Summary of Contents for HL40XP1
Page 10: ...Service Manual Model No HL40XP1 9 2 2 External pictures four faces Front Side Left Side ...
Page 11: ...Service Manual Model No HL40XP1 10 Right Side Back Side ...
Page 18: ...4 4 1 Function Description Display the signal Service Manual Model No HL40XP1 17 ...
Page 19: ...Service Manual Model No HL40XP1 18 ...
Page 49: ...8 2 2 Auto Color Service Manual Model No HL40XP1 48 ...
Page 50: ...8 2 3 Whinte Balance Color Temp 8 2 4 Picture Mode Service Manual Model No HL40XP1 49 ...
Page 52: ...8 2 7 Aging Mode 8 2 8 Power On Mode Service Manual Model No HL40XP1 51 ...
Page 53: ...8 2 9 Camma Table 8 2 10 Reste to default Service Manual Model No HL40XP1 52 ...
Page 54: ...8 2 11 Reset all setting to default Service Manual Model No HL40XP1 53 ...
Page 56: ...9 2 Power Supply Board Failure Check Service Manual Model No HL40XP1 55 ...


