background image

Operation


Haier LCD HDTV 

EN-16

Font Color: To adjust the font color: White, Green, Blue, 

Red, Cyan, Yellow, Magenta and Black.

Font  Opacity: To adjust the font opacity: Solid, 

Translucent and Transparent.

Background Color: To adjust the background color: 

Black, White, Green, Blue, Red, Cyan, Yellow and 

Magenta.

Background Opacity: To adjust the background 

opacity: Solid, Translucent and Transparent.

Window Color

To adjust the window color: Black, 

White, Green, Blue, Red, Cyan, Yellow and Magenta.

Window Opacity: To adjust the window opacity: 

Translucent, Transparent or Solid.

Default: 


Y

Press 

VOL+

ENTER

 button to enter the 

submenu.

Are you sure?

OK

Cancel

Press 

VOL+/- 

button 

to select OK or Cancel, then press 

OK 

to confirm. If 

OK

 the parameter will return to the 

factory set.

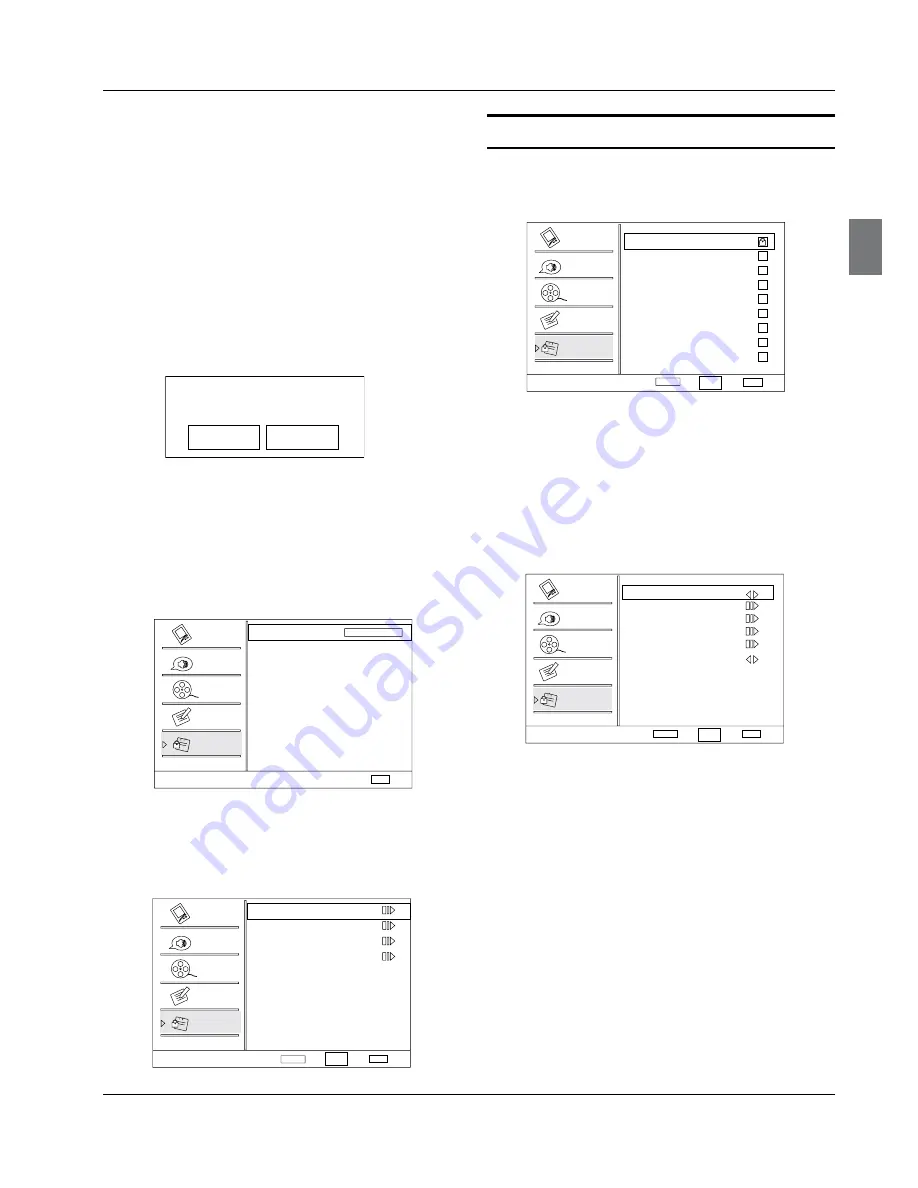
Lock menu

Press 

MENU

 button and 

CH+/- 

button until the 

following menu appears on the


screen.

Lock

Enter Password

Back

EXIT

Video

Audio

Channel

Lock

Function

Press 

VOL+

ENTER

 button ato enter and then press 

digits button to input the digits( The initial password 
is 0000. If you forget your password, you can always 
input 9443 to regain control) . The menu will display 
as follows:

Lock

Channel Block
Program Block
Change Password
Clean All

Select

Back

EXIT

Video

Audio

Channel

Lock

Function

Enter

ENTER

CH+/-

VOL+/-

Function

 Channel Block


Y

:Press 

VOL+

ENTER

 button

 to 

enter the submenu as follows.

Channel Block

10-1 Digital

11

Analog

11-1 Digital

12 Analog

13 Analog

14 Analog

14-1 Digital

14-2 Digital

14-3 Digital

15 Analog

Select

Back

EXIT

Set

Video

Audio

Channel

Lock

Function

WCAU-DT

MBC DTV

ATSC-1

ATSC-2

ATSC-3

ENTER

CH+/-

VOL+/-

Press 

CH+/- 

button to select the channel you want to 

lock, then press 

ENTER

 button to confirm. The channel is 

locked and a lock mark appears in the pane. If you want 

to unlock the channel, repeat the operation above again. 

Then press

 EXIT 

to exit step by step.

Program Block:  


Y

VOL+

ENTER

 button to enter the 

submenu as follows.

Program Block

Parental Lock

Parental Guide

MPAA Rating

CA Eng Rating

CA Fren Rating

Block Unrated

Select

ENTER Enter

Back

EXIT

Video

Audio

Channel

Lock

Function

On

On

CH+/-

VOL+/-

Parental Lock


:  Press 

VOL+/- 

button to select On 

or Off. Used to lock all the system following. To set 

Off, the system following can not be available.

Parental Guide


:  Press 

VOL+

ENTER

 button to 

enter the submenu as follows. Press

CH+/-

/

VOL+/-


buttonto select the item you want to lock. Then 

press 

ENTER

 button to confirm to lock and press 

again to resume it. Parental Guide Technology: 

The "P.L. Technology" allows you to use U.S. and 

Canadian Movies and TV PROGRAMS Guide 

ratings to block certain types of TV programs and 

movies. 

     To clearly understand TV program rating codes,        

read the following information:

Summary of Contents for HL19K2

Page 1: ...liser votre téléviseur conservez ce guide pour vous y reporter ultérieurement Se recomienda leer con atención este manual antes de poner en funcionamiento su televisor y conservarlo para consultas futuras HL19K2 HL22K2 HL22F2 HL22FW2 HL22FP2 LCD HDTV Televiseur HD à ecran a DCL HDTV LCD OWNER S MANUAL GUIDED UTILISATION DEL TELEVISOR LCD HDTV 01 0090509670 ...

Page 2: ...instructions Keep these instructions 2 Heed all warnings 3 Follow all instructions 4 Do not use this apparatus near water 5 Clean only with dry cloth 6 Do not block any ventilation openings Install in accordance with the manufacturer s instructions 7 Do not install near any heat sources such as radiators heat registers stoves or other apparatus including 8 amplifiers that produce heat Protect the ...

Page 3: ...er product This easy to use manual will guide you in getting the best use of your product Remember to record the model and serial number They are on label in back of the unit Model number serial number Date of purchase Staple your receipt to your manual You will need it to obtain warranty service ...

Page 4: ...music 19 To play video 20 Maintenance 21 Specification 21 Troubleshooting 21 Warranty 22 Warning 1 Safety Instructions 2 Introduction 4 Controls 4 Connection Options 5 Remote control 5 Installation 7 External Equipment Connections 7 Accessories 7 Antenna Connection 7 Choose Your Connection 8 Connecting a VCR 8 External A V Source Setup 8 Conmponent Setup 8 Connecting a computer 9 Cable TV Setup 9 ...

Page 5: ...e to the one you want to watch In the MENU screen the INPUT button serves as the ENTER button 3 MENU Menu display Press to access the on screen menu display 4 VOL Presstoadjustthevolume IntheMENUscreen thesebuttonsserveasleft rightbuttons 5 CH Press to scan through channels To scan quickly through channels press and hold down either In the MENU screen these buttons serve as up down buttons 6 Power...

Page 6: ...ideo signal source to these jacks 6 VIDEO In Connect the video signal from a video device to this jack 7 USB input Connect a USB flash drive to view MPEG2 videos JPEG images or listen to MP3 songs 8 PCVideo In Connect a video cable from a computer to this jack 9 PC Audio In Connect the audio L R cables from a computer to this jack 0 HDMI In Connect a HDMI device to receive digital audio and uncomp...

Page 7: ...e on screen menu L RECALL Press to jump back and forth between two channels M USB REPEAT N USB STOP O USB Next Chapter P USB Previous Chapter Q CH LIST Open the channel list inTV R FAVORITE Open the favourite channel list inTV For TV without DVD PICTURE CCD INPUT ARC MENU VOL EXIT USB PLAY PAUSE REV DISPLAY GUIDE MTS SAP CH CH VOL ENTER STOP PREV FAVORITE AUDIO SLEEP REPEAT NEXT CH LIST MUTE RECAL...

Page 8: ...IN VHF Antenna UHF Antenna Turn clockwise to tighten Bronze Wire Be careful not to bend the bronze wire when connecting the antenna Bronze Wire Multi family Dwellings Apartments Connect to wall antenna socket Wall Antenna Socket RF Coaxial Wire 75 ohm Single family Dwellings Houses Connect to wall jack for outdoor antenna Outdoor Antenna To improve the picture quality in a poor signal area please ...

Page 9: ... VCR to the Video input Insert a video tape into the VCR and press B PLAY on the VCR Refer to the VCR owner s manual Select the input source with using the C INPUT button on the remote control and then press CH button to select the source press ENTER button to confirm External A V Source Setup How to connect Connect the audio and video cables from the A external equipment s output jacks to the TV ...

Page 10: ...tion change the refresh rate to another rate or adjust the brightness and contrast on the menu until the picture is clear If the refresh rate of the VGA graphic card can not be changed change the VGA graphic card or consult the manufacturer of the VGA graphic card Note Use a DVI cable R R Avoid keeping a fixed image on the TV s screen R R for a long period of time The fixed image may become perman...

Page 11: ... in order for your TV to work properly Read the instructions that follow Switching On Off the TV set First connect power cord correctly A Select the viewing source by using B INPUT button on the remote control When finished using the TV press C POWER button on the remote control The TV reverts to standby mode If you intend to be away on vacation disconnect the D power plug from the wall power outl...

Page 12: ...p of the menu in this manual may R R differ from the actual set display The picture options can be changed only in Custom R R mode the other modes are fixed Function Mode Y Y Select the type of picture which best corresponds to your viewing requirements by selecting picture mode in Video menu You may select the picture mode directly by pressing the PICTURE button on the remote control Brightness Y...

Page 13: ...then press VOL to increase or decrease the level of the higher pitched sounds SRS TS XT Y Y To turn the simulated surround sound on or off Equalizer Y Y To adjust the equalizer Off Rock Pop Live Dance Techno Classic and Soft Speaker Y Y To adjust the speaker on or off SPDIF Type Y Y To adjust the SPDIF output Off Dolby Digital and PCM AVL Y Y This will reduces the differences in volume level among...

Page 14: ...ime Shifting Mode Y Y To turn the Time Shifting Mode on or off Set the A Time Shifting On then insert the USB drive in the USB input Press B PLAY PAUSE to play or pause the program If you want to stop time shift function press the STOP button Channel Menu Options Channel menu will appear in main menu only in TV mode Press A MENU button and CH button until the following menu appears on the screen C...

Page 15: ...ndicate that the current data is not stored correctly Please connect the TV antenna or Cable TV coaxial R R cable to the Antenna input on the TV Then please complete the channel scan The Time Shift feature is available when using your ATSC tuner and QAM cable tuner Function Menu Options Press A MENU button and CH button until the following menu appears on the screen Function Language English OSD T...

Page 16: ...XIT Video Audio Channel Lock Function CH VOL Analog Caption Press VOL button to select the Closed Caption options It helps the hearing impaired with the broadcast program as well as helping children learn how to read A built in decoder displays the audio portion of a program as text on the screen when this option is selected CC1 When CC1is displayed on TV means CC mode is turned on CC2 to CC4 For ...

Page 17: ...unction Enter ENTER CH VOL Function Channel Block Y Y Press VOL ENTER button to enter the submenu as follows Channel Block 10 1 Digital 11 Analog 11 1 Digital 12 Analog 13 Analog 14 Analog 14 1 Digital 14 2 Digital 14 3 Digital 15 Analog Select Back EXIT Set Video Audio Channel Lock Function WCAU DT MBC DTV ATSC 1 ATSC 2 ATSC 3 ENTER CH VOL Press CH button to select the channel you want to lock th...

Page 18: ... as follows Then press CH button to select the item you want to lock Then press ENTER button to confirm to lock and press again to resume it Allowed Rating Blocked Rating MPAA Rating Select Back EXIT Video Audio Channel Lock Function Set G PG PG 13 R NC 17 X ENTER CH VOL To understand clearly about movie rating codes read the following list U S Movie Rating Chart G General Audience this type of mo...

Page 19: ...in the New Password and Confirm Password Then you can change the password when you input the same number twice Clean All Y Y Press VOL ENTER button to enter the submenu Are you sure OK Cancel Press VOL button to select OK or Cancel then OK to confirm If OK the parameter will return to the factory set Note If there is any lock mark on the top of the set such R R as channel lock parental lock and so...

Page 20: ...B HD that follows USB power consumption spec The television operation may be halted due to D excessive rate of information code errors In such case restart the system Please note there are many nonstandard USB mobile devices in the market If a nonstandard device is used then an identification problem may occur USB Media Menu operation Plug in an external storage device into USB port A Press B USB ...

Page 21: ...ress ENTER button to enter the play interface 1 Play Time 4 Shuffle On or Off 2 File Name 5 Audio Only 3 Repeat 6 Information Press D MENU button to display the option list 1 Play Pause 4 Show Info 2 Repeat 5 Show Spectrum 3 Shuffle On or Off 6 Audio Only Press the button on the remote control to select the E adjusted item press ENTER button to confirm PLAY PAUSE REV STOP PREV REPEAT NEXT 1 2 3 4 ...

Page 22: ...tenance Early malfunctions can be prevented Careful and regular cleaning can extend the amount of time you will have your new TV Be sure to turn the power off and unplug the power cord before you begin any cleaning Cleaning the Screen Here s a great way to keep the dust off your screen A for a while Wet a soft cloth in a mixture of lukewarm water and a little fabric softener or dish washing deterg...

Page 23: ...Refer to Page 18 for adjustments No picture in some channel Verify if correct channel is selected Adjust the antenna Make adjustments by Fine Tune and Manual Scan No color for some channel program black and white Verify if the same problem exists in other channels Check out of picture and sound systems Refer to relative instructions in the Manual for color adjust Spots with some or all pictures Ve...

Page 24: ...y Haier and shall be the sole and exclusive remedy available to the purchaser Correction of defects in the manner and for the period of time described herein shall constitute complete fulfillment of all abilities and Responsibility of Haier to the purchaser with respect to the product and shall constitute full satisfaction of all claims whether based on contract negligence strict duality or otherw...

Reviews: