background image

Manuale di Installazione Uso e Manutenzione - Installation, Use and

 Maintenance Manual

pag. 22

B.

 Impostazione giorno: sotto l'interfaccia di impostazione giorno, preme-

re il tasto 

SET

brevemente per iniziare l'impostazione giorno, premendo i

pulsanti su e giù per selezionare il giorno corretto, dopo questo, premere

il tasto 

SET

per salvare e tornare all'interfaccia principale.

B.

 Day setting: under day setting interface, press 

SET

button for short to

begin the day setting, by pressing UP and DOWN buttons to select the

correct day, after this finished, press 

SET

button to save and return to the

main interface.

C.

 Impostazione del timer settimanale: nel menù timer settimanale sul-

l'impostazione dell'interfaccia, premere il tasto 

SET

per avviare il timer

impostato, premere il tasto 

SET

di volta in volta per selezionare il periodo

di lunedì 1 a domenica periodo 2 (vale a dire lunedì periodo 1-domenica

periodo 2).

C.

 Weekly timer setting: under weekly timer on setting interface, press

SET

button to begin the timer on setting, press 

SET

button time after time

to select Monday period 1 to Sunday period 2 (namely Monday period 1

to Sunday period 2).

Dopo aver selezionato il giorno, premere il tasto ON/OFF per confermare

che il timer ON è valido/non valido.

After selecting the day, press ON/OFF button to confirm timer ON is

valid/invalid.

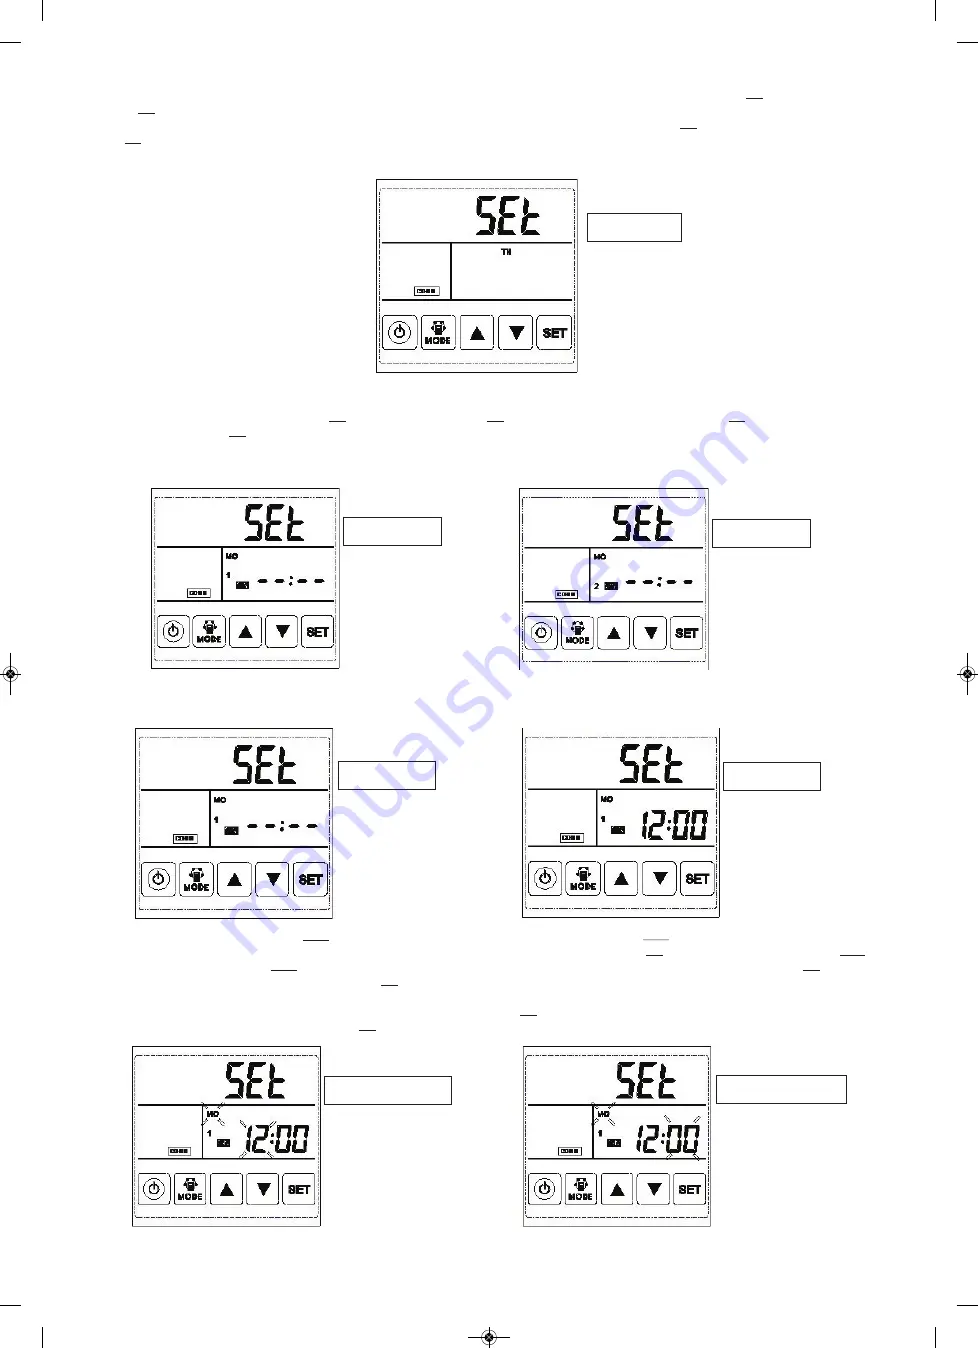
Impostazione Giorno

Day Setting

Timer 1 di Periodo ON

Period 1 Timer ON

Timer 2 di Periodo ON

Period 2 Timer ON

Timer su valido

Timer ON valid

Timer su NON valido

Timer on invalid

Quando il timer è valido, premere il tasto 

MODE

per entrare nell'imposta-

zione "hour", premendo il tasto su e giù per impostare "hour". Dopo l'im-

postazione "hour", premere il tasto 

MODE

per accedere all'impostazione

"minute". Dopo l'impostazione "minute", premere il tasto 

SET

per salvare e

passare al timer del giorno successivo sull'impostazione, e ripetere le

operazioni descritte sopra per impostare tutti i giorni e i periodi su timer.

Dopo aver impostato tutto il tempo, premere il tasto 

SET

per salvare i dati.

When timer on is valid, press 

MODE

button to enter “hour” setting, by pres-

sing UP and DOWN button to 

SET

“hour”. After “hour” setting, press 

MODE

button to enter “minute” setting. After “minute” setting, press 

SET

button to

save and switch to the next day timer on setting, and repeat the above

steps to set all days and periods timer on. After setting all the time on,

press 

SET

button to save the data.

Impostazione Timer sull’ ora

Timer on hour setting

Impostazione Timer sui minuti

Timer on minute setting

Summary of Contents for HACI-RP 25

Page 1: ...MANUALE DI INSTALLAZIONE USO E MANUTENZIONE INSTALLATION USE AND MAINTENANCE MANUAL UNITÀ DI RECUPERO CALORE HEAT RECOVERY UNITS HACI RP 25 130 ErP 2018 ...

Page 2: ...CI pag 14 12 MESSA IN SERVIZIO pag 16 13 PANNELLO DI COMANDO pag 17 14 ISTRUZIONI D USO pag 17 15 TABELLA DI INDIRIZZO ModBUS pag 24 16 INTRODUZIONE DEL SELETTORE pag 26 17 INSTALLAZIONE ACCESSORI pag 27 18 MANUTENZIONE pag 29 19 LOCALIZZAZIONE DEI GUASTI pag 31 20 SMALTIMENTO pag 31 21 PARTI DI RICAMBIO pag 32 INDEX 1 SYMBOL USED pag 3 2 WARNINGS AND GENERAL RULES pag 3 DECLARATION OF CONFORMITY ...

Page 3: ...gral part of the appliance and as a consequence must be kept carefully and must ALWAYS accom pany the appliance even if transferred to other owners or users or transferred to another plant If damaged or lost request ano ther copy from the Manufacturer Gli interventi di riparazione o manutenzione devono essere eseguiti da personale autorizzato o da personale qualificato secondo quanto previ sto dal...

Page 4: ...terruttore generale dell impianto su spento It is prohibited to open the doors for accessing the internal parts of the appliance without first having switched off the master switch of the system È vietato disperdere abbandonare o lasciare alla portata di bambini il materiale dell imballo in quanto può essere potenziale fonte di pericolo It is prohibited to disperse abandon or leave the packing mat...

Page 5: ...per il control lo delle funzioni di ventilazione e di free cooling 4 TECHNICAL FEATURES Air to air enthalpy heat recovery device thermal efficiency up to 76 Galvanized steel self supporting panels internally and externally insulated accessibility from side door F9 efficiency class filter with synthetic cleanable media and G3 pre filter on fresh air G3 filter on return air intake Integrated pressur...

Page 6: ...ATORE DI CALORE HEAT EXCHANGER Efficienza termica invernale Winter thermal effic 3 73 0 74 0 76 0 74 0 76 0 76 0 74 2 Efficienza entalpica invernale Winter enthalpy effic 3 65 0 65 0 67 0 65 0 65 0 62 0 59 0 Efficienza termica estiva Summer thermal effic 4 73 0 74 0 76 0 74 0 76 0 76 0 74 0 Efficienza entalpica estiva Summer enthalpy effic 4 62 0 62 0 63 0 60 0 63 0 60 0 58 0 Efficienza termica a ...

Page 7: ...50 35 804 814 100 150 675 862 19 855 480 111 270 480 111 111 162 162 37 41 1070x960x350 50 904 894 107 200 754 960 19 955 500 135 270 500 135 135 202 202 43 47 1125x1060x350 65 884 1186 85 250 1115 940 19 945 428 170 388 428 170 170 228 228 65 70 1390x1055x455 80 1134 1186 85 250 1115 1190 19 1200 678 170 388 678 170 170 228 228 71 76 1390x1305x455 100 1216 1199 85 250 1130 1273 19 1290 621 171 38...

Page 8: ...ti al vettore e specificati nella clausola di riserva riportata nella bolla di accompagnamento 9 2 Sollevamento e Movimentazione E vivamente consigliato 9 1 Checks upon receipt When receiving the goods before unloading all the material delivered must be checked to ascertain the presence of any damage caused during transport Any damage found must be reported to the carrier accepting the goods with ...

Page 9: ...le normative antinqui namento previste N B L installatore e l utilizzatore nell uso dell unità devono tenere conto e porre rimedio a tutti gli altri tipi di rischio connessi con l impianto Ad esempio rischi derivanti da ingresso di corpi estranei oppure rischi dovuti al convo gliamento di gas pericolosi infiammabili o tossici ad alta temperatura Wear suitable and accident prevention clothing durin...

Page 10: ...ive e corrosive che possono danneggiare i vari componenti in maniera irreparabile Prevedere spazi tecnici adeguati tali da garantire le operazioni di installazione nonché di manutenzione e di sostituzione dei compo nenti quali batterie filtri ecc Nell eventualità che la macchina debba essere installata sospesa bisogna prevedere un sistema di aggancio a soffitto per ciascuna delle sezioni che compo...

Page 11: ...gned with the unit vents The unit can be installed turned upside down if need for easy inspec tion Collegamenti aeraulici 1 Il collegamento delle bocche dell unità ai condotti deve essere sigillato per evitare perdite d aria e deve rispettare le direttive e i regolamenti per tinenti 2 I due canali di rinnovo ed espulsione devono essere leggermente incli nati verso il basso nello sbocco esterno per...

Page 12: ... or frost when satura tion curve is formed from A to C Use pre heater to ensure conditions are kept to right of the curve B to B to move C to C to prevent con densation or frost formation If heater is equipped to the unit operation of heater should be synchronous with the unit so that the heater starts to work only when unit starts Warning risk of fire 8 To avoid the outdoor exhaust air cycling ba...

Page 13: ...ower supply cable Specifica cavo segnali Spec of normal controller cable 2 x 1 5 mm 2 x 0 5 mm Isolate power during extended off periods Isolate power and take care when cleaning unit Risk of electric shock Clean the filter regularly A blocked filter may result in poor indoor air quality Isolate power during extended off periods Isolate power and take care when cleaning unit Risk of electric shock...

Page 14: ...re OA X o OA X Y quindi il by pass si chiuderà automaticamen te Si prega di fare attenzione che il passaggio di by pass aperto chiuso sarà di circa 1 minuto in ritardo Check that all cable sizes circuit breakers and wire connections are correct before following below commissioning steps 1 Press button MODE to turn on off the ventilator 2 Match the correct speed to ERV Press MODE for 6 seconds to e...

Page 15: ...FF per circa 6 secondi è possibile blocca re e sbloccare il controller 1 ON OFF press ON OFF button once for starting twice for closing In ON status backlit LCD display lights up in OFF status backlit LCD display off without operation for 6 seconds backlit LCD display off too By pres sing ON OFF button for around 6 seconds can lock and unlock the con troller Temperatura Temperature Settimana Week ...

Page 16: ... the electrical heater to the PBC faston contact LD3 and LD4 and change parameter 01 to value 1 users can set the supply air temperature by pressing and button The set ting temperature range is 10 25 C A If 0 C setting temperature minus SA temperature 5 C Then 1st stage heater on 2nd stage heater off B If Setting temperature minus SA temperature 5 C Then 1st and 2nd stage heater on The CO2 symbol ...

Page 17: ... scelto il numero di parametro corect premere il tasto MODE per breve il valore del parametro lampeggia nell angolo in alto a destra in questo momento per cambiare il valore con il tasto su e giù per salva re Attenzione Dopo l impostazione parametri il sistema ha bisogno di circa 15 secondi per registrare durante questo periodo l alimentazione non deve essere spenta Per impostare i parametri appro...

Page 18: ...e al valore di impostazione allora ERV ritorna allo stato precedente standby velo cità 1 2 3 ecc se ERV è già in alta velocità quando la concentrazione di CO2 superiore a valore di impostazione ERV mantiene la velocità massima in esecuzione CO2 valore di impostazione predefinito è 00 il che significa funzione di CO 2 off La gamma di regolazione è 80 250 che significa 800 2500PPM valore di regolazi...

Page 19: ...press Up and Down button to charge minute After time setting press SET button to save and return to the main interface Timer Settimanale ON Weekly Timer ON Timer Settimanale OFF Weekly Timer OFF Impostazione Ora Hour Setting Impostazione Minuti Minute Setting 8 Impostazione del tempo Tenere premuto il tasto SET per sei secondi per entrare in modalità di set taggio di impostazione del tempo Sotto q...

Page 20: ...ezionato il giorno premere il tasto ON OFF per confermare che il timer ON è valido non valido After selecting the day press ON OFF button to confirm timer ON is valid invalid Impostazione Giorno Day Setting Timer 1 di Periodo ON Period 1 Timer ON Timer 2 di Periodo ON Period 2 Timer ON Timer su valido Timer ON valid Timer su NON valido Timer on invalid Quando il timer è valido premere il tasto MOD...

Page 21: ...trare in minute dopo aver impostato minute premere SET per salvare e passare al timer del giorno successivo ripetere le operazioni descritte sopra per impostare tutti i giorni e i periodi timer OFF Dopo aver impostato il timer spento premere il tasto SET per salvare i dati When timer off is valid press MODE button to enter hour setting by pres sing Up and Down button to SET hour after hour setting...

Page 22: ...11 Velocità ventilatore di espulsione Velocità ventilatore 0 stop 2 speed 1 3 velocità 2 5 velocità 3 8 velocità 4 9 velocità 5 10 velocità 6 11 velocità 7 12 velocità 8 13 velocità 9 14 velocità 10 Controllo principale 12 Temperatura ambiente valore misurato Controllo principale 13 Temperatura esterna valore misurato Controllo principale 14 Temperatura aria di scarico valore misurato Controllo pr...

Page 23: ...ed 9 14 speed 10 Main Control 11 Exhaust fan speed Fan speed 0 stop 2 speed 1 3 speed 2 5 speed 3 8 speed 4 9 speed 5 10 speed 6 11 speed 7 12 speed 8 13 speed 9 14 speed 10 Main Control 12 Room temperature observed value Main Control 13 Outdoor temperature observed value Main Control 14 Exhaust air temperature observed value Main Control 15 Defrosting temperature observed value Main Control 16 Ex...

Page 24: ...egnale in tensione per attivare il recuperatore Si possono avere 2 situazioni allorché viene chiuso il con tatto Recuperatore spento quando il contatto viene chiuso i ventilatori fun zioneranno ad alta velocità quando il contatto esterno si apre il recupe ratore ritorna in OFF Recuperatore acceso quando il contatto viene chiuso i ventilatori si portano alla massima velocità quando il contatto vien...

Page 25: ...ERE ACCIDENTALMENTE COLLEGATA ALLA CORREN TE ELETTRICA E QUINDI NECESSARIO TOGLIERE L ALIMENTA ZIONE ELETTRICA BEFORE UNDERTAKING WHICHEVER INSTALLATION OPERATION MAKE SURE THAT THE MACHINE IS SWITCH OFF AND THAT IT CAN NOT BE ACCIDENTALLY CONNECTED TO THE POWER IT IS THE REFORE NECESSARY TO CUT OFF THE ELECTRIC SUPPLY DURING ALL MAINTENANCE Sensore di CO2 da parete QSW Il Sensore CO2 è fornito co...

Page 26: ...enza assorbita pari a 20 W The humidity sensor comes complete with a 5 metre long cable and connectors for connection to the electronic board on the machine If necessary a longer cable can be used to load the installer limits and specification in the previous paragraph See Chapter 11 For details of the connection to the electronic card The device should be installed in the room where live most of ...

Page 27: ...e nance frequency will depend on working environment and unit running time PRIMA DI INTRAPRENDERE QUALSIASI OPERAZIONE DI MANUTEN ZIONE ASSICURARSI CHE LA MACCHINA SIA SPENTA E CHE NON POSSA ESSERE ACCIDENTALMENTE COLLEGATA ALLA CORREN TE ELETTRICA E QUINDI NECESSARIO TOGLIERE L ALIMENTA ZIONE ELETTRICA DURANTE LA MANUTENZIONE 1 E un dovere dell utente effettuare tutte le operazioni di manuten zio...

Page 28: ...resent inside the heat exchangers and verify that there are no foreign object WARNING you must not wash the heat exchangers If they are excessively dirty or damaged they have to be replaced ANNUALE ANNUAL PULIZIA FILTRI Rimuovere la polvere dai filtri utilizzando un aspirapolvere WASHING OF THE FILTERS Remove the dust on the filters using a vacuum cleaner TRIMESTRALE QUARTERLY Se i filtri sono ecc...

Page 29: ...o low verify on the terminal board of the motor that the connection is correct and that the voltage correspond to that of the nameplate La girante ruota al contrario The rotor turn backwards Rumore Noise Flusso d aria eccessivo Excessive air flow Trafilamenti d aria dai giunti dei canali per mancata sigillatura o fessurazioni Air leakage from the duct joints Ventola sbilanciata Unbalanced fan Corp...

Page 30: ...Manuale di Installazione Uso e Manutenzione Installation Use and Maintenance Manual pag 32 20 PARTI DI RICAMBIO 20 SPARE PARTS ...

Page 31: ... 11 Filtro G3 G3 Filter CF0P30MICH050050 2 15 Filtro PM 2 5 PM 2 5 filter CF0M90MICH050480 2 12 By pass MV00BYP0MICH0000 1 14 Scheda elettronica di controllo PCB CT00000MICEH0250 1 65 1 Flangia circolare di raccordo canale Spigot MV00BOC0MICH0800 4 4 Recuperatore di calore Plate heat exchanger PR000E000MICH065 2 8 Motore Motor 50 Hz 60Hz MTE00000MICH0650 2 9 Girante Impeller VT000GIRMICH0650 2 11 ...

Page 32: ......

Reviews: