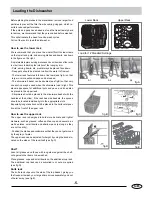
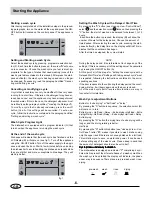
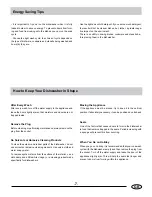
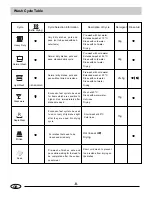
background image

Safety Is a Good Habit to Develop

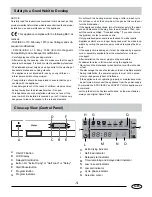
Close-up View (Control Panel)

NOTICE

Carefully read the instructions contained in this manual, as they

provide important information which is essential to safe and proper

installation, use and maintenance of the appliance.


  This appliance complies with the following EEC di-

rectives:

-73/23/EEC of 19 February 1973 (Low Voltage) and sub-

sequent modifications;

-   8 9 / 3 3 6 / E E C   o f   3   M a y   1 9 8 9   ( E l e c t r o m a g n e t i c

Compatibility) and subsequent modifications.

- Carefully dispose of the packing material.

- After removing the packing, check to make sure that the appli-

  ance is not damaged. If  in doubt, contact a qualified professional.

- The dishwasher must only be used by adults for the washing of

  household dishes and cooking utensils.

- The appliance is not intended for use by young children or

  inform persons without supervision.

- Young children should be supervised to ensure that they do

  not play with the appliance.

- Keep detergents out of the reach of children, who must also

  be kept away from the dishwasher when it is open.

- This appliance cannot be installed outdoors, not even if the

  area in which it is installed is covered by a roof; it is also very

  dangerous to leave it exposed to the rain and elements.

- Do not touch the heating element during or after a wash cycle.
- Do not lean or sit on the door when it is open as this could over
  turn the dishwasher.
- If the appliance malfunctions, turn off water supply to the appli-
  ance and disconnect the plug from the wall socket. Then, con-
  sult the section entitled, "Troubleshooting." If you cannot solve
  the problem, contact a service centre.
- Only specialised personnel are authorised to make repairs.
- Appliances which are no longer being used must be made inop-
  erable by cutting the power supply cord and removing the door
  lock.
- If the supply cord is damaged, it must be replaced by a special
  cord or assembly available from the manufacturer or its ser-
  vice agent.
- After installation, the power plug must be accessible.
- Fundamental rules to follow when using the appliance:
 * Never touch the dishwasher when barefoot or with wet hands
   or feet;
 * We discourage the use of extension cords and multiple sockets;
 * During installation, the power supply cord must not be exces-
    sively or dangerously bent or flattened;
 * If the appliance is not operating properly or maintenance must
   be performed, disconnect the appliance from the power supply.
To maintain the EFFICIENCY and SAFETY of this appliance,we
recommend:
- call only the Service Centers authorized  by the manufacturer.
- always use original Spare Parts

.1.

GB

H
I
L
M
N
O
P
Q

Extra drying indicator

Half load indicator

Delayed start indicator

Time-remaining and delayed start indicator

Low rinse aid indicator

Low salt indicator

Cycle phase indicator

Selection cursor

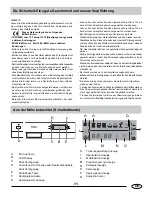
A
B
C
D
E
F
G

ON-OFF Button

LCD Display

Delayed Start Button

Button For "Extra Drying" or "Half Load" or "Delay"

Start/Pause Button

Program Button

Program indicator

A

E

F

C

D

B

H

G

Q

P

I

L

M

N

O

Summary of Contents for DW12-LFE S

Page 1: ...0120505105 Dishwasher DW12 LFE S DW12 LFE SS Instructions for Use NL PT ES IT FR DE GB ...

Page 2: ...he appliance malfunctions turn off water supply to the appli ance and disconnect the plug from the wall socket Then con sult the section entitled Troubleshooting If you cannot solve the problem contact a service centre Only specialised personnel are authorised to make repairs Appliances which are no longer being used must be made inop erable by cutting the power supply cord and removing the door l...

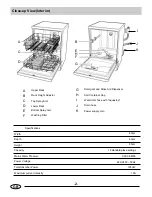
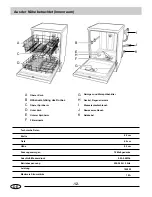
Page 3: ...etergent and Rinse Aid Dispenser Specifications Width Depth Height Capacity Mains Water Pressure Power Voltage Total Absorber Power Salt Container Cap GB 60cm 60cm 85cm 12 standard place settings 0 03 0 6MPa 220 240V 50Hz 1950W Water inlet hose with Aquastop Power supply cord Drain hose Maximum current intensity 10A A C D I E F H G B J K ...

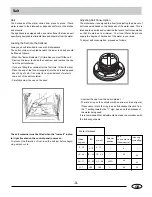
Page 4: ...must be filled when the low salt indica tor light located on the control panel comes on To prevent the formation of rust load the salt just before begin ning a wash cycle Adjusting Salt Consumption The dishwasher is designed to allow for adjusting the amount of salt consumed based on the hardness of the water used This is intended to optimize and customize the level of salt consumption so that it ...

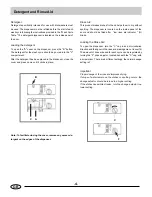
Page 5: ...he edges of the dispenser Rinse Aid This product makes dishes froth and helps them to dry without spotting The dispenser is located on the inside panel of the door and should be filled after low rinse aid indicator N blinks Loading the Rinse Aid To open the dispenser turn the C cap in an anti clockwise direction and then pour in the rinse aid making sure not to overfill The amount of rinse aid use...

Page 6: ...r additional pots and pans and it can also be placed in the upper rack Silverware should be placed in the silverware basket with the handles at the bottom if the rack has side baskets the spoons should be located individually into the appropriate slots Especially long utensils should be placed in the horizontal posi tion at the front of the upper rack How to use the upper rack The upper rack is de...

Page 7: ...lay period it is preferable not to change any of the settings If this is necessary all of the settings must be cancelled by pressing the ON OFF button A At this point all of the steps for setting the wash cycle with a Delayed Start Time and Setting and Starting a wash cycle must be repeated following the instructions contained in the corre sponding sections If the door is opened to the unit during...

Page 8: ...ming maintenance always remove the plug from the socket No Solvents or Abrasive Cleaning Products To clean the exterior and rubber parts of the dishwasher do not use solvents or abrasive cleaning products Use only a cloth and warm soapy water To remove spots or stains from the surface of the interior use a cloth damp and a little white vinegar or a cleaning product made specifically for dishwasher...

Page 9: ...ash at 60 C Rinse with warm water Hot rinse Drying 15g Pre wash with cold water Extended wash at 50 C Rinse with cold water Rinse with hot water Drying Hot rinse at 65 Drying ERF ERF ERF ERF ERF 25 5g Extra drying Cycle Heavy Duty Normal Wash Soak Rapid Wash Glass ware Light Wash Rinse IEC EN50242 Pre wash of dishes pots and pans while waiting for the load to be completed after the subse quent mea...

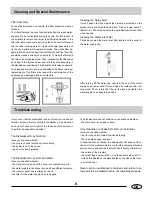
Page 10: ...screw the end of the water supply hose remove the filter and clean it carefully under run ning water Then return the filter to its place and tighten the water supply hose back into position Troubleshooting It may occur that the dishwasher does not function or does not function properly Before calling for assistance See what can be done first have you forgotten to press one of the buttons or to per...

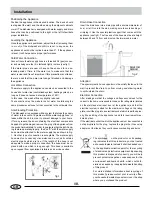
Page 11: ... which is long enough This hose is available upon request from specialised retailers and service centres Hot Water Connection The water supply to the appliance can also be connected to the house s hot water line centralised system heating system as long as it does not exceed a temperature of 60 In this case the wash efficiency slightly reduced fig 2 Drain Hose Connection Insert the drain hose into...

Page 12: ...e oder setzen Sie sich niemals auf die offene Tür da der der Geschirrspüler dadurch umgeworfen werden kann Bei Störungen am Gerät müssen Sie immer sofort die Wasserversorgung zum Gerät abstellen und den Stecker aus der Steckdose ziehen Ziehen Sie dann den Abschnitt Störungssuche zu Rate Wenn Sie das Problem nicht selbst lösen können wenden Sie sich bitte an Ihre Kundendienststelle Der Geschirrspül...

Page 13: ...6MPa Betriebsspannung 220 240V 50Hz Leistung 60 cm 1950W 60 cm 12 DE A B C D E F G H I J K Oberer Korb Oberer Sprüharm Höhenverstellung des Korbes Unter Korb Unterer Sprüharm Filtereinsatz Reiniger und Klarspülbehälter Deckel Regeneriersalz Abwasserschlauch Netzkabel Wasserzulaufschlauch 10A Maximale Stromstärke A C D I E F H G B J K ...

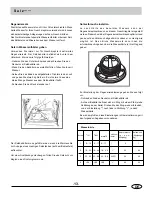
Page 14: ...artige Ablagerungen auf dem Geschirr bilden Das Gerät verwendet spezielle Wasserenthärter mit einem Salz das Kalkstein und Mineralien aus dem Wasser entfernt Salz in Wasserenthärter geben Verwenden Sie immer nur für Geschirrspüler bestimmtes Regeneriersalz Der Salzbehälter befindet sich unter dem Unterkorb Er muss wie folgt gefüllt werden Nehmen Sie den Unterkorb heraus und schrauben Sie den Decke...

Page 15: ...Spülprogrammen aufgefüllt werden oder wenn die Warnleuchte für Klarspüler an jenen Modellen aufleuchtet die über eíne solche Warnleuchte verfügen Klarspüler einfüllen Öffnen Sie den Behälter indem Sie den Deckel C nach links drehen Füllen Sie genügend Klarspüler nach ohne den Behälter zu überfüllen Die für jedes Programm erforderliche Klarspülermenge lässt sich einregeln indem Sie den Dosierer F u...

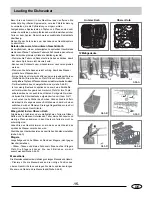
Page 16: ...ann zweigeteilt werden siehe Abb B Ist nur wenig Besteck zu spüllen kann somit eine Korbhälfte entfernt werden Sie gewinnen hierdurch Platz für lhre Töpfe außerdem kann er so auch in den Oberen Korb gestellt werden Verteilen Sie Silverbestecke aufgelockert und mit dem Griff nach unten in alle Fächer des Korbes Ordnen Sie die Löffeln individuell in die angemessenen Schlitzen wenn der Korb einen sei...

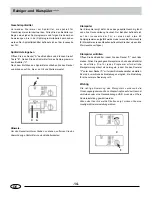
Page 17: ...ucht nur eine geringe Menge an Energie Es ist normal dass nach Abschluss des Spülgangs ein wenig Wasser im Ablauffilterbereich verbleibt STARTVERZÖGERUNG optional Drücken Sie die Taste D bis Anzeige L eingeblendet Dann schalten Sie die Taste C Am Beginn des Spülprogramms kann zwischen 1 und 12 Stunden im Voraus programmiert So aktivieren Sie die Startverzögerung Drücken Sie die START PAUSE Taste s...

Page 18: ...n Vermeiden Sie alle unnötigen Risiken Verwenden Sie keine Lösungs oder Scheuermittel Verwenden Sie zum Reinigen der Außen und Gummiteile des Geschirrspülers keine Lösungs oder Scheuermittel Verwenden Sie immer nur ein Tuch mit warmem Seifenwasser Um Flecken von der Oberfläche im Innenraum zu entfernen verwenden Sie am besten ein Tuch das mit Wasser und ein wenig Essig befeuchtet wurde oder ein Sp...

Page 19: ...ach dem Gebrauch Kein Trockenprogram Vorspülen von Geschirr Töpfen und Pfannen während man darauf wartet dass die Ladung nach der nächsten Mahlzeit vervollständigt wird Mit heißem Wasser vorspülen Längerer Spülablauf mit 70 C Mit kaltem Wasser klarspülen Mit heißem Wasser klarspülen Trocknen Mit kaltem Wasser vorspülen Längerer Spülablauf mit 55 C Mit kaltem Wasser klarspülen Mit heißem Wasser kla...

Page 20: ...chirr beschädigen Reinigung der Sprüharme Es kann vorkommen dass sich Speisereste an den Sprüharmen verkrusten und die Löcher blockieren siehe Abbildung Innenraum Buchstaben C E Prüfen Sie die Sprüharme regelmäßig und reinigen Sie sie wenn erforderlich Gibt s ein Problem Das Spülwasser läuft nicht ab Überprüfen Sie ob der Ablassschlauch eingeklemmt oder verbogen ist Kalksteinflecken oder weißer Fi...

Page 21: ...auch gemäß Abb 1 am Wasserhahn angeschlossen sein Keine andere Verbindung ist akzeptierbar Der Wasserversorgungsschlauch darf unter keinen Umständen durchgeschnitten werden da er stromführende elektrische Teile enthält Wenn die Schlauchlänge zur Herstellung der erforderlichen Verbindung nicht ausreicht muss dieser Schlauch durch einen anderen ersetzt werden der lang genug ist Dieser Schlauch ist i...

Page 22: ... Puis con sultez le chapitre intitulé Diagnostic rapide Si ne pouvez résoudre le problème par vous même adressez vous à un Service Après vente Les réparations doivent être réalisées exclusivement par du per sonnel spécialisé Pour la mise au rebut rendez les appareils inutilisables en sectionnant le câble d alimentation et en démontant le verrou de la porte Si le cordon d alimentation est endommagé...

Page 23: ...on d alimentation Puissance absorbée totale 22 FR A B C D E F G H I J K Filtre de lavage Distributeur de détergent et de liquide de rinçage Bras d aspersion inférieur Panier supérieur Réglage de la hauteur du panier Bras d aspersion supérieur Panier inférieur Bouchon du réservoir à sel Tuyau arrivée d eau Tuyau de vidange Câble branchement secteur 10A Intensité maximale du courant A C D I E F H G ...

Page 24: ...dure des dépôts se formeront sur la vaisselle et sur les ustensiles de cuisson Cet appareil est équipé d un système d adoucissement spécial qui utilise un sel spécialement conçu pour éliminer le calcaire et les minéraux présents dans l eau Comment remplir l adoucisseur Utilisez exclusivement du sel spécial pour lave vaisselle Le distributeur de sel est situé en dessous du panier inférieur et doit ...

Page 25: ...z le au bout de 80 lavages ou lorsque le voyant de niveau de liquide de rinçage s allume sur les modèles qui en sont équipés Comment remplir le distributeur de liquide de rinçage Pour ouvrir le distributeur de liquide de rinçage tournez le couvercle C dans le sens inverse des aiguilles d une montre et remplissez le distributeur en veillant à ne pas faire déborder le liquide Vous pouvez régler la q...

Page 26: ...s deux sections lorsque la quantité de couverts est peu importante Dans ce cas vous disposez de plus d espace pour ranger des cocottes ou des casseroles supplémentaires Vous pouvez également placer le panier à couverts dans le panier supérieur Rangez les couverts dans le panier à couverts en positionnant le manche vers le bas si le panier dispose de paniers latéraux disposez chaque cuillère dans l...

Page 27: ... s augmenteront jusqu à 12 00 Après avoir choisi le temps de la réservation et le programme du lavage appuyer sur le bouton Démarrage Pause à ce temps là dans M se clignotera le compte à rebours du lave vaisselle va commencer quand le compte à rebours se diminue à O le programme du lavage commence le voyant du compte à rebours M va montrer le temps reste du programme Nota Au cours de la marche du ...

Page 28: ...oduits d entretien abrasifs Pour le nettoyage de l extérieur et des parties en caoutchouc de l appareil n utilisez en aucun cas de solvants ou de produits d entretien abrasifs Utilisez un chiffon imbibé d une solution d eau chaude et de savon Pour enlever les taches ou salissures présentes sur la surface intérieure de votre appareil utilisez un chiffon que vous tremperez dans une solution d eau et...

Page 29: ...sselle peu sale juste après utilisation N cycle de séchage Prélavage de plats de cocottes et de casseroles en attendant de remplir le lave vaisselle avec la vaisselle du repas suivant Prélavage à l eau chaude Lavage prolongé à 70 C Rinçage à l eau froide Rinçage à l eau chaude Séchage Lavage à 60 C Rinçage à l eau chaude Rinçage à l eau chaude Séchage Lavage rapide à 40 C Rinçage à l eau froide La...

Page 30: ...ersion Il peut arriver que des particules d aliments s incrustent dans les bras d aspersion et bloquent les orifices voir Premier plan intérieur lettres C E Contrôlez régulièrement les bras d aspersion et nettoyez les lorsque cette opération s avère nécessaire Diagnostic des pannes La vidange de l eau ne s effectue pas Contrôlez que le tuyau de vidange n est ni écrasé ni plié Il y a des dépôts de ...

Page 31: ...ire que le botier A traversé par le tuyau d alimentation soit fixé au robinet d arrivée d eau comme illustré dans la Fig 1 Seul ce type de raccordement est valable Ne sectionnez en aucun cas le tuyau d alimentation car il contient des composants électriques sous tension Si la longueur du tuyau est insuffisante pour garantir un raccordement correct remplacez le par un tuyau de longueur appropriée V...

Page 32: ...sistenza Solo il personale specializzato è autorizzato a fare riparazioni Gli elettrodomestici che non possono più essere utilizzati devono essere resi inutilizzabili tagliando il cavo di alimentazione e togliendo la chiusura dello sportello Occorre posizionare la lavastoviglie in modo che la spina sia accessibile In caso di installazione su pavimento rivestito di moquette questa non deve ostruire...

Page 33: ... e brillantante Caratteristiche tecniche Larghezza 60 cm Profondità 60 cm Altezza 85 cm Capacità 12 coperti standard Pressione dell acqua da 0 03 0 6MPa Tensione di potenza 220 240V 50Hz 1950W Potenza assorbita totale Vista da vicino Interno 32 IT Tubo allacciamento dell acqua Tubo di scarico dell acqua Cavo di allacciamento elettrico 10A Massima intensita del corrente A C D I E F H G B J K ...

Page 34: ... il tappo Regolazione del consumo del sale La lavastoviglie è predisposta per la regolazione del quantitativo di sale consumato in base alla durezza dell acqua disponibile Ciò permette di migliorare e personalizzare il livello di consumo del sale riducendolo al minimo Per regolare il consumo di sale procedere nel modo seguente Svitare il tappo del contenitore del sale Sul collo del contenitore è p...

Page 35: ...brillanti e ne facilita l asciugatura senza macchie Il contenitore si trova nel pannello interno dello sportello e deve essere riempito dopo circa 80 cicli di lavaggio Inserimento del brillantante Per aprire il contenitore del brillantante ruotare il tappo C in senso antiorario quindi aggiungere il brillantante prestando attenzione a non farlo fuoriuscire Il quantitativo di brillantante utilizzato...

Page 36: ... una sezione quando il carico di posate è limitato In questo modo ci sarà più spazio per altre pentole e tegami sul cestello inferiore Sistemare le posate nell apposito cestello con il manico rivolto verso il basso se nel cestello vi sono contenitori laterali per le posate i cucchiai devono essere posizionati individualmente negli appositi contenitori Gli utensili particolarmente lunghi devono ess...

Page 37: ...ene a 12 00 Dopo scelto il tempo di prenotare e la procedura di lavata pressa il bottone di avviare pausa il della luce M sarà brillato nel quel momento la lavastoviglie comincia a contare l ore partendo dalla fine quando il numero è diminuito a zero comincia a operare la procedura di lavata e la luce M è diventata a mostrare il tempo per operare questa procedura Notare durante la lavastoviglie st...

Page 38: ...sempre la spina dalla presa non correte alcun pericolo Niente solventi ne abrasivi Per pulire l esterno e le parti in gomma della lavastoviglie non occorre usare ne solventi ne abrasivi ma solo un panno imbevuto di acqua tiepida e sapone Per eliminare eventuali macchina sulla superfice della vasca utilizzare un panno imbevuto di acqua ed un po di aceto bianco o prodotto specifico per la pulizia de...

Page 39: ...ciclo di asciugamento Pre lavaggio dei piatti della batteria da cucina quando aspetti il completamento del caricodopo il pasto successivo Pre lavaggio con acqua calda Lavaggio prolungato da 70 C Risciacquatura con acqua fredda Risciacquatura con acqua calda Asciugamento Viene usata acqua fredda per il secondo prelavaggio Lavaggio prolungato da 55 C Risciacquatura con acqua fredda Risciacquatura co...

Page 40: ...to del rifornimento d acqua Dopo avere chiuso il rubinetto d acqua svita la fine del tubo di rifornimento d acqua rimuovi il filtro e lo pulisci attentamente sotto l acqua corrente E poi rimetti il filtro al suo posto originale e stringi il tubo di rifornimento d acqua al suo posto Può succedere che la lavastoviglie non funzioni o non funzioni correttamente Prima di contattare l assistenza cercare...

Page 41: ...a al rubinetto come illustrato nella fig 1 Non è accettabile nessun altro tipo di collegamento Il tubo di alimentazione dell acqua non deve essere tagliato per nessun motivo dal momento che contiene componenti elettrici sotto tensione Qualora la lunghezza del tubo non sia adatta all allacciamento desiderato il tubo deve essere sostituito con un altro di lunghezza adeguata Tale tubo può essere rich...

Page 42: ...esaria para realizar una instalación uso y mantenimiento seguros del aparato Este aparato cumple con las siguientes directivas 73 23 CEE del 19 de febrero de 1973 Baja tensión y posteriores modificaciones 89 336 CEE del 3 de mayo de 1989 Compatibilidad electromagnética y posteriores modificaciones Elimine el material de embalaje con cuidado Una vez quitado el material de embalaje compruebe que el ...

Page 43: ...Potencia total absorbida 42 A B C D E F G H I J K Distribuidor de detergente y abrillantador Brazo aspersor inferior Filtro de lavado Cesto superior Adaptador de la altura del cesto Brazo aspersor superior Cesto inferior Tapón del contenedor de sal ES Tubo de alimentación del agua Tubo de desagüe Toma de corriente eléctrica 10A Máxima intensidad de corriente A C D I E F H G B J K ...

Page 44: ...ñada sal inmediatamente antes de iniciar un programa de lavado Sal La dureza del agua varía de un lugar a otro Si el agua utilizada en el lavavajillas es dura se formarón depósitos en la vajilla y utensilios El aparato está equipado con un ablandador que utiliza sal es pecial que elimina la cal y los minerales del agua Llenado del distribuidor de sal Utilice únicamente sal para lavavajillas El rec...

Page 45: ...s del distribuidor Abrillantador Este producto hace que la vajilla brille y se seque sin manchas El distribuidor está situado en la parte interior del panel de la puerta y debe rellenarse cada 80 ciclos de lavado o cuando se enciende el indicador luminoso correspondiente en los modelos que lo incluyen Llenado del distribuidor de abrillantador Para abrir el distribuidor gire el tapón C hacia la izq...

Page 46: ...los botes y platos Las vajillas de plata se debe colocar con el mango hacia abajo en la cesta para vajillas de plata si tiene una lateral las cucharas se debe colocar solamente en una cesta adecuada Especialmente para las largas se debe colocar a un puesto delantero horizontal en la cesta superior Cómo utilizar la cesta superior El cesto superior está diseñado para contener la vajilla más delicada...

Page 47: ... C los números en pantalla aumentarán hasta 12 00 Una vez haya programado el tiempo diferido y el programa de lavado pulse el botón de encender apagar y parpadeará el símbolo en pantalla iniciándose la cuenta atrás pondrá en marcha el programa y el indicador M mostrará todo el tiempo que quede para finalizar el programa Atención durante el periodo de retardado no se puede cambiar el programa Si es...

Page 48: ...Saque el enchufe Antes de efectuar cualquier operación de limpieza o mantenimiento No corra riesgos No utilice productos de limpieza abrasivos ni disolventes Para limpiar el exterior y las partes de goma del aparato Utilice un paño humedecido con agua tibia y detergente Para eliminar las manchas de la superficie interior utilice un paño humedecido en agua con un poco de vinagre o un producto de li...

Page 49: ...o sucia inmediatamente después de su uso Sin secado Prelavado de la vajilla ollas x y sartenes mientras se completa la carga Prelavado con agua caliente Programa de lavado largo a 70 C Aclarado con agua fría Aclarado con agua caliente Secado Lavado a 60 C Aclarado con agua tibia Aclarado con agua caliente Secado Programa de lavado corto a 40 C Aclarado en frío Lavado corto en frío para evitar que ...

Page 50: ...spersores Puede ocurrir que las partículas de alimentos se incrusten en los brazos aspersores y que bloqueen los orificios vea el Primer plano Interior letras C E Compruebe los brazos aspersores de forma periódica y límpielos siempre que sea necesario Algunos problemas El lavavajillas no vacía el agua Ha comprobado si el tubo de desagüe está torcido o doblado Acumulación de cal o película blanca e...

Page 51: ...No debe utilizarse ningún otro tipo de conexión El tubo flexible de alimentación no debe cortarse bajo ningún concepto ya que contiene partes eléctricas activas Si la longitud del tubo flexible no alcanza para realizar una conexión correcta sustitúyala por un tubo más largo Este tubo flexible está disponible a través de minoristas especializados y del Servicio de asistencia técnica Atención Fije c...

Page 52: ...anual pois fornecem importantes indicações referentes à segurança da instalação utilização e manutenção Este aparelho está em conformidade com as seguintes directivas da CE 73 23 EEC de 19 de Fevereiro de 1973 Baixa Tensão e posteriores alterações 89 336 EEC de 3 de Maio de 1989 Compatibilidade electromagnética e posteriores alterações Elimine cuidadosamente os materiais da embalagem Após a remoçã...

Page 53: ...nsão Potência total máxima 52 PT A B C D E F G H I J K Filtro de lavagem Compartimento do detergente e do abrilhantador Braço irrigador inferior Cesto superior Regulador da altura do cesto Braço irrigador superior Cesto inferior Tampa do Depósito do sal Mangueira de abastecimento de água Mangueira de descarga Cabo de ligação eléctrica 10A Intensita maxima da corrente A C D I E F H G B J K ...

Page 54: ...tá equipado com um descalcificador especial que utiliza um sal especificamente concebido para eliminar o calcário e os minerais da água Colocação do sal no descalcificador Utilize sempre sal próprio para máquinas de lavar loiça O compartimento do sal está localizado debaixo do cesto inferior e deve ser cheio do seguinte modo Retire o cesto inferior e de seguida desenrosque e remova a tampa do comp...

Page 55: ...m manchas O compartimento está situado no painel interior da porta e deverá ser cheio ao fim de cada 80 ciclos de lavagem ou então quando o indicador de falta de abrilhantador se acender nos modelos equipados com esta função Colocar o abrilhantador Para abrir o compartimento rode a tampa C no sentido contrário ao dos ponteiros do relógio e de seguida adicione o abrilhantador tendo o cuidado de não...

Page 56: ...achos e panelas adicionais Este cesto também pode ser colocado no cesto superior Coloque os talheres no cesto com o cabo para baixo Se o cesto tiver compartimentos laterais coloque as colheres na abertura própria Talheres compridos devem ser colocados horizontalmente na parte frontal do cesto superior Utilização do cesto superior O cesto superior foi concebido para a loiça mais delicada e leve com...

Page 57: ... Colocar a máquina em funcionamento Programação diferida Pressione o botão D ver pormenor do painel de comandos seleccione programação diferida e o cursor de selecção Q acende de seguida pressione o botão C o inicio da lavagem pode ser atrasado de 1 a 12 horas Cada vez que o botão é pressionado o display M mostra o número de horas adiadas com que deseja iniciar o programa Seleccione o tempo deseja...

Page 58: ...re sempre a ficha da tomada Não corra riscos Solventes ou produtos de limpeza abrasivos Não utilize solventes ou produtos de limpeza abrasivos para limpar o exterior e as partes de borracha da máquina Utilize um pano e água morna com sabão Para eliminar manchas da superfície interior utilize um pano embebido em água e um pouco de vinagre branco ou então um produto de limpeza específico para máquin...

Page 59: ... secagem Pré lavagem de pratos tachos e panelas enquanto aguarda a carga completa Pré lavagem a água quente Lavagem prolongada a 70 C Enxaguamento com água fria Enxaguamento com água quente Secagem Pre lavagem a água fria Lavagem prolongada a 55 C Enxaguamento com água fria Enxaguamento com água quente Secagem Lavagem a 60 C Enxaguamento com água morna Enxaguamento com água quente Secagem Lavagem ...

Page 60: ...es obstruindo assim os orifícios ver Vista detalhada interior letras C E Verifique os braços aspersores periodicamente e limpe os quando necessário Resolução de problemas A máquina de lavar loiça não efectua a descarga Verificou se a mangueira de descarga está torcida ou dobrada Pode acontecer que a máquina de lavar loiça não funcione correctamente Antes de contactar o serviço de assistência técni...

Page 61: ...esta precaução correrá o risco de o tubo de entrada da água ficar obstruída e danificar aparelho Ligação da água quente O tubo de abastecimento de água do aparelho também pode ser ligado ao circuito de água quente da casa sistema central sistema de aquecimento desde que não exceda uma temperatura de 60 C Neste caso o tempo do ciclo de lavagem será cerca de 15 minutos mais curto e a eficácia da lav...

Page 62: ...RIJK Lees de aanwijzingen in deze handleiding goed door aangezien ze belangrijke informatie bevatten die noodzakelijk is voor een veilige en correcte installatie gebruik en onderhoud van het apparaat Dit apparaat voldoet aan de volgende EEG richtlijnen 73 23 EEG dd 19 februari 1973 Laagspanning en daaropvolgende wijzigingen 89 336 EEG dd 3 mei 1989 Elektromagnetische Compatibiliteit en daaropvolge...

Page 63: ...lmiddel dispenser Onderste sproeiarm Derde sproeier Technische kenmerken Breedte 60 cm Diepte 60 cm Hoogte 85 cm Capaciteit 12 standaardcouverts Druk leidingwater 0 03 0 6MPa Stroomspanning 220 240V 50Hz 1950W Totaal energieverbruik 62 NL Watertoeverslang Afvoerslang Elektrische aansluitkabel 10A Maximum intensitet A C D I E F H G B J K ...

Page 64: ...iveau laag controlelampje op het bedieningspaneel aan gaat Om roestvorming te voorkomen het zout pas aanbrengen net voor de aanvang van een wasprogramma Zoutverbruik aanpassen Het zoutverbruik van de vaatwasser kan worden aangepast aan de hardheid van het water Dit is voorzien om het zoutverbruikniveau te optimaliseren en aan te passen tot minimaal gebruik Uw waterleidingbedrijf kan informatie ver...

Page 65: ... zit aan de binnenzijde van de deur en moet na 80 wasbeurten worden gevuld of wanneer het glansspoelmiddel controlelampje aan gaat bij modellen voorzien van deze functie Glansspoelmiddel aanbrengen Dop C tegen de wijzers van de klok in draaien om de dispenser te openen en het glansspoelmiddel aanbrengen zonder de dis penser te ver te vullen De hoeveelheid glansspoelmiddel die voor elke cyclus word...

Page 66: ... gedeelte wordt gebruikt wanneer er weinig bestek is Dit geeft extra ruimte voor potten en pannen Het bestekmandje kan tevens in de bovenkorf worden aangebracht Bestek in het bestekmandje aanbrengen met de handgrepen naar beneden wanneer de korf zijmandjes heeft de lepels individueel aanbrengen in de desbetreffende uitsparingen Met name lang keukengerei horizontaal aanbrengen aan de voorzijde van ...

Page 67: ...rukt verhoogt de cijfer bij M na elkaar totdat het bij 12 00 is Kies de gewenste reserveren tijd en het was programma uit druk de knop start pauze op Blinkt M op dit moment de en telt de vaatwasser begin de tijd terug Wanneer het terugtellen tijd tot nul is begint de vaatwasser met het wasprogrma te werken bovendien geeft er op het lampje M de reste tijd weer op Opmerkingen Tijden het terugtellen ...

Page 68: ...n Neem nooit risico s Geen oplosmiddelen of schurende reinigingsmiddelen Om de buitenzijde en rubberen onderdelen van de vaatwasser te reinigen geen oplosmiddelen of schurende reinigingsmiddelen gebruiken Gebruik een vaatdoekje en een warm sopje Om vlekken en dergelijke van het oppervlak van het interieur te verwijderen een doekje bevochtigd met water en wat witte azijn of een schoonmaakmiddel spe...

Page 69: ...die aan niet zeer vuile schotels moet gebruikt worden nadat ze g e b r u i k t w o r d e n G e e n drogende cyclus alstublieft Korte koude voorspoeling om te voorkomen dat etens resten vastdrogen op de borden Voorspoelen met heet water Uitgebreid wassen op 70 C Spoelen met koud water Spoelen met heet water Drogen 2 Koude vorwas Uitgebreid wassen op 55 C Spoelen met koud water Spoelen met heet wate...

Page 70: ...de vaatwasser verminderen en vaatwerk en keukengerei beschadigen De sproeiarmen reinigen Het kan voorkomen dat etensresten vast komen te zitten op de sproeiarmen en daardoor de openingen blokkeren zie Detailopname binnenzijde letters C E De sproeiarmen periodiek nakijken en indien nodig reinigen Het kan voorkomen dat de vaatwasser niet werkt of niet goed werkt Kijk eerst wat er gedaan kan worden a...

Page 71: ...nsluiting is aanvaardbaar De watertoevoerslang in geen enkel geval doorsnijden aangezien deze elektrische onderdelen bevat die onder stroom staan Wanneer de slang niet lang genoeg is voor een correcte aansluiting de slang vervangen met een slang die lang genoeg is Deze slang is op aanvraag verkrijgbaar bij gespecialiseerde detailhandelaren en servicecentra Opgelet De speciale kunststof steun moet ...

Page 72: ...Installation Diagram ...

Reviews: