background image

CH+

CH-

VOL-

VOL+

MENU

VHF-L   188.16 MHz      CH NO:4


Auto Search


Tune 

The TV set has three methods to set the channels, which are Auto search, Search and Fine tune.
In this section, how to use the remote control to set the channel is explained. You can also use the buttons 
on the TV set to set channel.

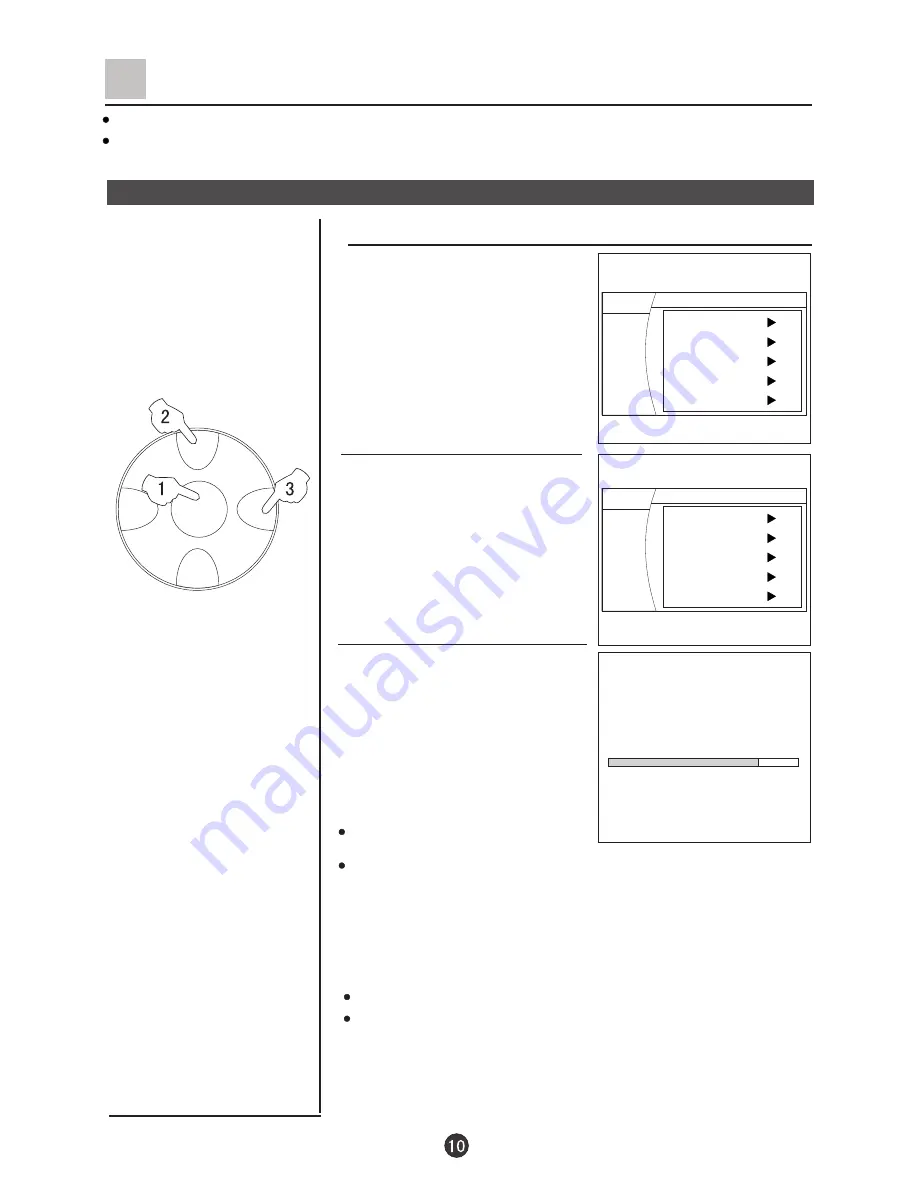
Auto search

1. Press the MENU button to display
   the menu, then press CH+/-buttons 
   to select TUNE menu, press VOL+
   button to enter. 

2. Press the CH+/- buttons to move 

the indicator to " Auto Search ". 

3. Press the VOL+ button, and 
"Auto Search" mode  will work. 
The TV set will search automatically 
all available programs, after search 
is finished, all available programs 
will be stored in turn. 

If you want to stop the search, 
just press the MENU button.
The order of the automatic search is due to the frequency of 
the program, generally speaking, it is used only the first time 
you search the program, and after the order of the program 
has been made, you don't have to use this function, 
otherwise the order of the program will be mixed.

Auto search

After searching (Continued)

Press the CH+/- buttons to check channels.
If the colour or sound is abnormal in a  certain channel, it may be  
because that the colour or sound system has not  been set 
properly, then, you may adjust it to proper system (Refer to 
page  8). 

Exchange

Program edit

Search                  

Auto Search

Quick Search


MENU 

Picture

Sound

Tune

Setup

Timer

Exchange

Program edit

Search                  

Auto Search

Quick Search


MENU 

Picture

Sound

Tune

Setup

Timer

Summary of Contents for D32A9-AKM

Page 1: ...Please READ this manual carefully before operating the unit and keep it for future reference COLOR TV RECEIVER OWNER S MANUAL The Owner s Manual for the Follow Models D32FA9 AKM D32FA9 AK ...

Page 2: ...cture modes and set the picture quality 15 Color Temp function 16 3A Optimize and 3DNR functions 17 Comb filter and LayerEn Color En Functions 18 Sound adjusting 19 Select the sound modes and set the sound quality 19 Equalizer and mute functions 20 Time set up function 21 Set current time and on off time functions 21 Remind Program Function 22 Set up function 23 Select the menu Language and Screen...

Page 3: ...entilated location 5 The back cover must only be removed by a registered electrical service person Removing the back cover may result in electric shock fire or damage to the TV set 3 Don t place the TV set in direct sunlight or near a heat source 6 If the TV set is not going to be used for a long time or there is a severe thunder Lighting storm it is recommended that the TV set be disconnected fro...

Page 4: ... coaxial cable to remove the disturbance caused by airwave Preparation for the remote control the plug type may vary depending on the model Battery installation Take off the battery compartment cover Place two AAbatteries make sure that battery polarity matches with the mark inside the battery compartment Operation notes for the remote control unit Under normal conditions the life time of batterie...

Page 5: ...DIO L MONO Track L MONO R Track R Position of Buttons and Plug ins Front and Side panel Back panel CH VOL TV AV MENU VIDEO AUDIO R L Side AV terminal Power switch Infrared receiver Channel position up down Volume up down TV Video input selector MENU Power indicator Note The cabinet and buttons of TV is only for reference AV output terminals Antenna input VGA input terminal AV2 input terminals AV1 ...

Page 6: ...enu call button Calendar amusement function exit button Hotel lock button Digital album No available To eliminate the sound of the programs DC standby and power button TV and AV exchange button A changeover between TV and other input signals like AV select button Select a TV channel directly selection button Changeover from one digital two digital and three digital Volume adjustment button adjustm...

Page 7: ...adjust the numerical value After that press the MENU button to return the main menu 4 If you want to exit the menu press the MENU button repetitiously Picture menu Sound menu Tune menu Setup menu Timer menu H lock menu Picture Mode Standard 50 30 Brightness Contrast Color Hue Sharpness Advance 50 50 0 Color Temp Cool Picture Sound Tune Setup Timer Sound Mode 3D Mono Off Off Trubass Off 0 Standard ...

Page 8: ...V is in the state of standby press the POWER button or the CH buttons on the remote control Note 1 Press the CH buttons which is on the TV set to get out of the standby state when the remote control is not in use 2 Press the POWER button on the remote control to the standby mode 3 Press the power button on the TV set to completely power off the TV 4 To eliminate the magnetization completely the TV...

Page 9: ...djust the volume to your need If the colour or sound of a certain channel is abnormal If the TV set you bought is abnormal in colour or sound in a certain channel it might be because the colour or sound system has been set improperly You may follow the instruction below to adjust it Press the MENU button then press CH buttons to select function menu and you can see the form Then press VOL button t...

Page 10: ...18 as shown in the figure 2 If you want to return to the last watched program channel 8 you can simply press the SWAP button 3 If you want to return to channel 18 press the button again Through this function you can easily change between the channel you are using and the channel you used last time Auto program scan 1 Press the SCAN button to scan through all the memorized TV channels 2 When it is ...

Page 11: ...ilable programs will be stored in turn If you want to stop the search just press the MENU button The order of the automatic search is due to the frequency of the program generally speaking it is used only the first time you search the program and after the order of the program has been made you don t have to use this function otherwise the order of the program will be mixed Auto search After searc...

Page 12: ...uttons the TV set will begin to search up or down when the TV set has searched a program the TV set will stop searching If the program is not the one you need you can press the button again let the TV set continue to search until it has searched the TV signal you need Note Usually five seconds after the channel has been changed the channel number will disappear automatically If you want to know wh...

Page 13: ...ress the VOL button to enter the Fine Tune Menu and then until it has searched the TV signal you need the VOL button to search downwards or the VOL button to search upwards If the program Lock and the program Lock of the Lock Set are ON the screen is black and LOCK will shown The program is locked 1 Repeat the steps 1 4 of Fine Tune to select the Lock item Press the VOL button to turn the Lock fun...

Page 14: ...vered 2 Repeat those steps just now 3 Press the VOL buttons to turn the SKIP function to OFF Tune Continued Skip unnecessary channel Skip unnecessary channel The Program skip feature enables you to skip hide programs that you do not wish to be displayed when using the CH buttons These channels will still be displayed by directly using the channel number buttons on the remote control Press the VOL ...

Page 15: ...nising it is best to start from the lowest programme number first 1 Press the MENU button to display the menu then press CH buttons to select TUNE menu press VOL button to enter 2 Press the CH buttons to move the indicator to Exchange 3 Press the VOL button to sub menu 4 Press the VOL buttons to set the Current Program to 3 Press the CH buttons to move the indicator to Exchange Program then press ...

Page 16: ...icture quality When the Picture Mode is User mode you can set the picture quality 1 Press the PICTURE button the Picture menu will appear on the screen Press the CH buttons to move the indicator to the desired option For example Contrast then press VOL buttons to set the desired quality Press the PICTURE button to exit the Picture menu Brightness Contrast Color Sharpness Press VOL button Option Pr...

Page 17: ...e PICTURE button the Picture menu will appear on the screen Press the CH buttons to move the indicator to Color Temp MENU Picture Mode Standard 50 30 Brightness Contrast Color Hue Sharpness Advance 50 50 0 Color Temp Cool Picture Sound Tune Setup Timer Press the VOL buttons to select Cool Warm or Standard ...

Page 18: ...nction 1 Press the PICTURE button the Picture menu will appear on the screen Press the CH buttons to move the indicator to Advance then press the VOL button to sub menu Press the CH buttons to move the indicator to 3DNR Press the VOL buttons to select the desired item MENU Picture Sound Tune Setup Timer 3A Optimize On Comb filter Off 3DNR Off Layer en Off Color en Off MENU Picture Sound Tune Setup...

Page 19: ...r on the screen Press the CH buttons to move the indicator to Layer en Or Color en Press the CH buttons to move the indicator to Advance then press the VOL button to sub menu Press the VOL buttons to select On or Off 3A Optimize On Comb filter Off 3DNR Off Layer en Off Color en Off MENU Picture Sound Tune Setup Timer 3A Optimize On Comb filter Off 3DNR Off Layer en Off Color en Off MENU Picture So...

Page 20: ...ired picture quality Four kinds of sound modes can be selected in turn S o u n d q u a l i t y Set the sound quality When the user mode is selected you can customize the sound quality 1 Press the SOUND button the Sound menu will appear on the screen Press the CH buttons to move the indicator to the desired option then press VOL buttons to set the desired quality Press the SOUND button to exit the ...

Page 21: ...sting Tip The Equalizer can be adjusting only for the user mode 1 Press the MUTE button once a sign of mute will appear on the screen the sound will be eliminated completely 2 Press the volume button or press the MUTE button again and the sound will be recovered How to use the Mute function When you want to listen to the sound nearby or when you are answering the telephone or talking with your fri...

Page 22: ...wered on off at a preset time and it can start with a program you have preset Here take On Time function for example The Off Time function is same with it 1 Press the TIME button the Time menu will appear on the screen The available optionis green Press the VOL buttons to select the desired item Press the CH buttons to adjust the value After setting the Current time press MENU button to confirm Ti...

Page 23: ... confirm Tips Press the CH buttons to move the indicator to Remind Program then press the VOL buttons to adjust For example 18 TIP The unit of the TIMER menu is minute Screen Display Press CALL HELP button to call the screen display such as channel number colour system sound system Current time Off Time On Time On program Remind time Remind program Sleep Time 12 27 23 00 18 00 10 Off MENU Picture ...

Page 24: ...the OSD language selected How to start screen saver function When the SCREEN SAVER is ON If no signal has been received and after five minutes it will stand by automatically 1 Press the FUNCTION button the Function menu will appear on the screen Press the CH buttons to move the indicator to Screen Saver Press the VOL button to turn the function On or Off Language English Screen Saver On Curtain Co...

Page 25: ...s the VOL button to select the desired Switch on mode HDM Scan function The HDM scan includes Pixel 75Hz 100Hz and 60P etc 1 Press the FUNCTION button the Function menu will appear on the screen Press the CH buttons to move the indicator to HDM scan Press the VOL buttons to set the desired scan Language English Screen Saver On Curtain Color sys PAL50 HDM scan 100Hz Transparency On Tilt 0 MENU Pict...

Page 26: ...to Tilt Press the VOL buttons to adjust Setting Transparency Menu When the function is ON the menu display is transparent 1 Press the FUNCTION button the Function menu will appear on the screen Press the CH buttons to move the indicator to Transparency Press the VOL button to turn the function On or Off Language English Screen Saver On Curtain Color sys PAL50 HDM scan 100Hz Transparency On Tilt 0 ...

Page 27: ...WD and then press the Digital number button to input the password Press the CH buttons to move the indicator to Confirm PWD and then press the Digital number button to input the password again Press the CH buttons to move the indicator to Confirm and then press the VOL to confirm If it is correct then the screen displays success 5 If the confirmed password is not accordance with the new password t...

Page 28: ... the CH buttons to move the indicator to Lock then press the VOL button to turn the function On or Off Description of each lock function 2 When the Channel Lock is set ON the Locked channel is limited 1 When the LOCK is set ON if the buttons on the TV are pressed the screen will indicate that the TV set is in the status of Lock and the buttons won t work 3 If you forget your password or a password...

Page 29: ...en Sun Mon Tue Wed Thu Fri Sat Press the VOL buttons to move the indicator to the year the month and then press the CH buttons to adjust the year and the month to demand the desired date Picture Still function When you watching TV press the STILL button to still the picture Press the STILL button or any others to resume the playing Still When you watching TV press the ZOOM button to change the pic...

Page 30: ...f Time On Time On program Remind time Remind program Sleep Time 12 27 10 Off MENU Picture Sound Tune Setup Timer 1 2 2 3 3 4 4 5 5 6 6 7 7 8 8 No Program Current Program 2 Setting Favorite programs After setting the Favorite function you can select the programs that you favorite Favorite 1 2 2 3 3 4 4 5 5 6 6 7 7 8 8 No Program Current Program 2 Favorite 1 Press the FAVORITE button twice then the ...

Page 31: ...ettings on the Windows start menu and click on Control Panel 2 Double click on the Display icon 3 Click on the Settings tab on the display dialog box 4 Adjust the resolution to 640X480 pixels 5 Click the Advanced button and click the Monitor tab on the dialog box Set the vertical frequency to 60Hz and then click the OK button 6 Connect the PC to the TV set by the VGA terminal Others Functions Cont...

Page 32: ...2IN AV1IN L R L R L R External connections In the following the methods of connecting the video audio system and PC for the TV set will be explained Video Audio Output Connection VGA Input PC To Audio Video input VCR Etc To VGA input To Video input ...

Page 33: ... OUTPUT TO AUDIO RIGHT OUTPUT Side AV VCD To Video T erminal To Audio L T erminal To Audio R Terminal To Audio Video Input To Audio Right Output To Audio Left Output To Video Output External connections Continued In the following the methods of connecting the video audio system and other sets for the TV set will be explained Video Audio Input Connection YUV VIDEO AUDIO Pr cr Pb cb AVOUT L R AV2IN ...

Page 34: ...th snow Noise Colour Spot Normal volume Scramble Normal or Weak Volume No colour Normal volume No Picture No sound No sound Normal Normal Disturb Noise Double or Triple Image Electrical interference which can be caused by cars motorbikes etc Fluorescent lamps and dirty insulators on overhead power cables This is called ghosting which can be minimized with an outside aerial and good quality cable a...

Page 35: ...pecifications are subject to change without notice The same specifications of different models M o d e l Dimensions mm Power consumption Color system Sound system Sound output Accessories 10W 10W PAL SECAM AV NTSC Power supply 160V 250V 50Hz Remote control X1 Owner s manual X1 Battery AA X2 D32FA9 AK 941 W x 572 H x 610 D ...

Page 36: ...01 0090508146 ...

Reviews: