background image

MENU

CH+

CH-

VOL-

VOL+

LOCK

Direct-digit Choosing 
             Button


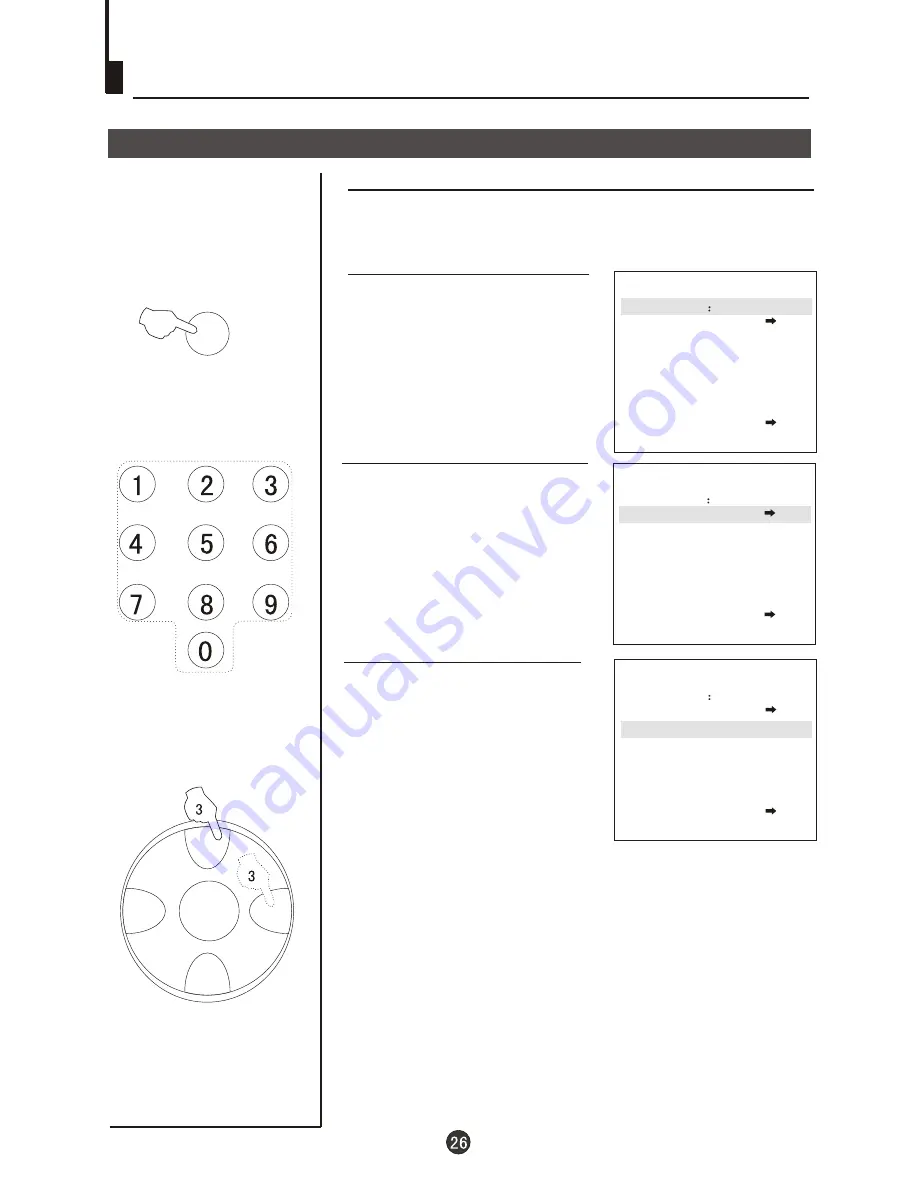
Setting the Lock

(continued)

Setting the Lock

Setting the Lock

There are TUNING LOCK, PRESET  PROG. ,AV LOCK,
CHILD LOCK and MAX.VOLUME five lock setting, you 
can set it due to your need.

1. Press the LOCK button, the 
screen will show as the form 
on the right.

2. Press the 

Direct-digit 

Choosing 

button 0 for four 

times( or input the password
 you set), and enter the menu 
of LOCK.

3. Press CH+/- button, move 
the indicator to  TUNING 
LOCK, then press VOL+ 
button to set it ON or OFF.

Note:


1.When the TUNING LOCK is set ON, if you want to enter the 
TUNING menu, you will have to type the password.

2.The PRESET PROG allows you to turn on the TV always with 
one channel.

3.When AV LOCK is set ON, AV cannot be used, hence the 
screen will change into black and indicate that it has been 
locked. The TV set will be in the status of mute.
4.When the CHILD LOCK is set ON, if the buttons on the TV 
are pressed, it will indicate that the TV set is in the status of 
CHILD LOCK, and the buttons won't work.
5.The MAX VOLUME allows you to set a figure of the top limit of
volume.

6.The UNLOCK allows you to set all the lock to OFF .

LOCK SET UP
PASSWORD ----
CHANGE PW.
TUNING LOCK         OFF
PRESET PROG.        OFF
AV LOCK                   OFF
CHILD LOCK             OFF
MAX. VOLUME         OFF
UNLOCK

LOCK SET UP
PASSWORD ----
CHANGE PW.
TUNING LOCK         OFF
PRESET PROG.        OFF
AV LOCK                   OFF
CHILD LOCK             OFF
MAX. VOLUME         OFF
UNLOCK

LOCK SET UP
PASSWORD ----
CHANGE PW.
TUNING LOCK         OFF
PRESET PROG.        OFF
AV LOCK                   OFF
CHILD LOCK             OFF
MAX. VOLUME         OFF
UNLOCK

Summary of Contents for 21FA10-AM

Page 1: ...COLOUR TV RECEIVER OWNER S MANUAL Please read this manual carefully before operating the unit and keep it for future reference The Owner s Manual for the Follow Model 21FA10 AM ...

Page 2: ...C C auto off and mute Setting the other function and screen protection Timer off 9 Setting the timer Curtain function calendar display Channel exchange Setting the lock Changing your password Connecting Additional Equipments Troubleshooting Specifications 2 3 3 3 4 4 4 Using 5 6 7 7 11 11 12 13 14 15 Multiple picture modes 1 5 18 18 20 Game Game control buttons and method of playing the game 28 29...

Page 3: ... cover otherwise it is possible to damage the components in the TV set and harm you 3 Don t place the TV set in the sunshine or near heat source 6 When the TV set isn t going to be used for long time or it is in thunder and lightening please pull out the plug from AC outlet and the antenna plug from the cover of the TV set Explanation on the display tube In general it is not needed to clean the tu...

Page 4: ...nd electric wire together coaxial cable to remove the disturbance caused by airwave Preparation for the remote control Battery installation Tips for remote operation Remove the batteries cover The battery life should be about one year under normal use When the remote control will not be used for a long period of time or when the batteries are worn out remove the batteries to prevent leakage Do not...

Page 5: ...ù µ À Ê ä È ë Ë Ó Ò ô Æ µ Ó Ò É ù µ À Ê ä È ë Ë Ó Ò ô Æ µ ó É ù µ À Ê ä ö Ë Ó Audio left channel output terminal Audio right channel output terminal Video output terminal Ò ô Æ µ ó É ù µ À Ê ä ö Ë Ó Antenna input socket Ò ô Æ µ ó É ù µ À Ê ä ö Ë Ó Video Cr input terminal Video Cb input terminal Video Y input terminal S VIDEO input terminal Position of Keys and Plug ins Back panel Front and side pa...

Page 6: ... channels as well as to control the game Program Play forward Button Calendar Change the aspect ratio Start Restart Game Button Game Exit Button Program Play backward Button Sound Mode Select Button Digit Select Button Change the channel position number between one digit two digits and three digits Picture Mode Select Button There are DYNAMIC STANDARD MILD MEMORY PICTURE MUTEand COLOR MUTE six mod...

Page 7: ...standby status 4 Press the button on the TV set to completely turn off the TV NOTE 1 You can also press the 0 9 button to call off the standby status instead of pressing the DC Standby button Press the digit button of the preset channel limited to one digit you can complete the selection of channel while you turn on the TV set To operate the preset of TV channel please see TUNING on page 11 14 2 W...

Page 8: ...you have viewed channel 1 2 3 4 5 6 after the TV is powered on and the channel you are watching now is number 7 then press PRE button you can view channel 6 5 4 3 and you may press the Back button to return to channel 7 If the channel position number you select is larger than 218 the TV will use the first two number as the channel position Choose the proper volume you like Press VOL button to adju...

Page 9: ... the television will start scanning from the present channel with a rate of two seconds per cha nnel and until all the preconcerted programs have been displayed once the TV set will return to the starting channel 2 If you want to terminate this function during the scanning press the SCAN button again and the program will stay at the present channel DISP Usually when you press the DISP button the c...

Page 10: ... to this channel from the current channel press SHUTTLE button once Press the QSET button to switch the saving mo de on off And the screen will displa y on off at the same time Press the QSET button more than 3 secon ds to call the ENERGY SAVE menu 2 Press VOL button and CH button to set the options of AMBI LUM AMBI SND after this select the ADJUST option and press VOL button to display OK the set...

Page 11: ... CH to tune automatically Press VOL to tune manually press VOL to adjust the volume if there is no FM on screen button button button 1 Press FM to enter 2 Press CH to start to tune automatically button FM SEARCHING FM 106 3MHZ FM 106 3MHZ PRESS 0 KEY TO MEMORIZE FM 106 3MHZ PRESS 1 9 KEY TO MEMORIZE FM1 106 3MHZ MEMORIZED Note 1 Press VOL to tune manually Other steps is the same as the auto tuning...

Page 12: ...programs will be stored in turn and the TV set will return to the first channel If you want to stop the search just press VOL button The order of the automatic search is due to the frequency of the program generally speaking it is used only at the first time you search the program and once the order of the program has been confirmed you don t have to use this function otherwise the order of the pr...

Page 13: ... move the indicator to SEARCH 4 Press VOL button to start searching VOL button is used to search the lower frquency channel VOL button is used to search the higher frequency channel Repeat the steps until you find the channel you need Direct digit Choosing Button 2 Press MENU button continuously until select TUNING menu TUNING POS E IT POS EX SEARCH UP AUTO MEMORY D TUNING POS E IT POS EX SEARCH U...

Page 14: ...e sound become satisfactory VOL button is used to search the lower frquency channel VOL button is used to search the higher frequency channel Direct digit Choosing Button 2 Press CH button to select POS EDIT and VOL button to enter POSITION 1 BAND VL SKIP ON MFT UP 3 Press CH button to select POSITION and VOL button to select the channel Take channel 1 for example Note the same way to adjust the B...

Page 15: ... also use the Direct digit Choosing button on the remote control to select this channel directly If you want to recover the skipped channel 1 Use Direct digit Choosing button to select the number of the channel to be recovered 2 Do the above steps again 3 Press VOL button to set SKIP OFF Direct digit Choosing Button 2 Press CH button to select POS EDIT and VOL button to enter 3 Press CH button to ...

Page 16: ...YOURSELF NO PICTURES BLACK AND WHITE PICTURE If the picture mode is set to PICTURE MUTE or COLOR MUTE it will autorenew to DYNAMIC mode when you restart your TV set with remote control Set the parameter of MEMORY 2 Press CH button move the indicator to the option you want to adjust then press VOL button to do the adjustment Then the parameter will be automatically stored in MEMORY option OPTION CO...

Page 17: ...und This function can let you regulate the volume to the preconcerted parameter quickly such as the LOW VOL NORMAL VOL HIGH VOL 2 Press CH button move the indicator to the HIGH VOL then press VOL button to adjust the parameter you expect With the same method you can adjust the parameter of the LOW VOL and NORMAL VOL Suppose the LOW VOL is A NORMALVOL is B HIGH VOL is C they should be 0 A B C 100 3...

Page 18: ...is changed 2 Press CH button move the indicator to the S C C then press VOL button to set it ON or OFF To prevent from forgetting to turn off the TV this TV could turn off automatically That is if the off timer is set on and after two hours without any operation this TV will switch into standby mode automatically to save your energy 1 Press button a sign will appear at the bottom center of the scr...

Page 19: ...Á Ä Ó ï Ñ Ô Æ Á Ä Æ Á Ä Ó ï Ñ Ô Æ Á Ä 3A filter and screen protection PICTURE ADJUST 3A FILTER B B ON 3A FILTER USER 2500K I 3300K I 5600K I 6500K I 7300K I 8500K I 9300K I 12000K I 15000K I SELECT ADJUST 2 Press CH button to move the indicator to the item you want to adjust and then VOL button to adjust it Note FILTER can switch USER STANDARD 6500K 7300K 8500K and 9300K in cycle and the color tem...

Page 20: ...off and sleep off Timer off 2 Press CH button move the indicator to OFF TIMER then press VOL button to set the time 1 Press MENU button continuously until select TIMER menu press CH button to select CLOCK and VOL button to set the time it will be the standard of the clock of ON OFF TIMER TIMER CLOCK 0 00 OFF TIMER 0 00 ON TIMER OFF ON POS 0 APP TIME OFF APP POS 0 TIMER CLOCK 0 00 OFF TIMER 0 00 ON...

Page 21: ...reset time in the standby status and display the preset program 3 Press CH button move the indicator to ON TIMER Then press VOL button to set the time The method is the same as OFF TIMER 4 Press CH button move the indicator to ON POS press VOL button to set the channel with which the TV is turned on take 1 for example 1 Press MENU button continuously until select TIMER menu TIMER CLOCK 18 00 OFF T...

Page 22: ...method is the same as OFF TIMER 4 Press VOL button to set the channel number you want e g 100 At the preset time the TV set will automatically change to the preconcerted channel This function is available only when the TV set is on and it cannot be used in the status of standby or power off Channels appointment 1 Press MENU button continuously until select TIMER menu press CH button to select CLOC...

Page 23: ...eived by the TV set when the B B function is set ON the screen will change into the form on the right shows Press MENU button continuously until select the PICTURE menu Then press CH button to move the indicator to B B and press VOL button to set it ON PICTURE ADJUST 3A FILTER B B ON SELECT ADJUST ...

Page 24: ...to adjust the YEAR press VOL button to adjust the MONTH MENU CH CH VOL VOL MENU CH CH VOL VOL Setting the other Function continued How to use the Curtain function 2 Press CH button and move the indicator to CURTAIN then press VOL button to select from I II to III I curtain II fade in and fade out III mixed I and II AUG 2006 SU MO TU WE TH FR SA Curtain function calendar display 1 Press MENU button...

Page 25: ...ator to POS EX Then press VOL button to enter the sub menu 3 Press CH button move the indicator to EX POS1 then press VOL button to set the channel number to 1 5 Press CH button move the indicator to EXCHANGE then press VOL button to confirm Then the programs of the two channel will be exchanged EX POS2 1 EXCHANGE RETURN EX POS1 1 1 Press MENU button continuously until select TUNING menu EX POS2 9...

Page 26: ...OFF AV LOCK OFF CHILD LOCK OFF MAX VOLUME OFF UNLOCK LOCK MENU CH CH VOL VOL Direct digit Choosing Button This TV set provides you with the LOCK function you can choose it due to your need to protect your TV set Changing your password Changing your password 1 Press LOCK button the screen will show as the form on the right 2 Press the 0 button for four times and enter the menu of LOCK setting Press...

Page 27: ...ROG allows you to turn on the TV always with one channel 3 When AV LOCK is set ON AV cannot be used hence the screen will change into black and indicate that it has been locked The TV set will be in the status of mute 4 When the CHILD LOCK is set ON if the buttons on the TV are pressed it will indicate that the TV set is in the status of CHILD LOCK and the buttons won t work 5 The MAX VOLUME allow...

Page 28: ...nd digit press VOL button again to start the second digit selection REACH will display on the screen if 2 is also selected and WIN will display on the screen if 2 is selected on the third position and the score will also display on the screen 3 You can press the GAME button to restart the game when it is game over or during the process of the game Used to select the score This TV set provides you ...

Page 29: ...he DVD VCR and stereo system to theAV output to enjoy a higher quality of picture and sound effect Signal flow White Audio left channel Red Cr and audio right channel Blue Cb Green Y Yellow Video Note About the S VIDEO 1 When receive s video signal you must remove video signal when receive video signal you must remove s video signal 2 When receive side video signal you must remove back video signa...

Page 30: ...er attempt to remove the back cover as the TV set has dangerous voltages in side that may cause a fatality or fire 3 The cabinet may produce the occasional snapping sound This is normal and caused by the materials in the cabinet expanding with room temperature changes Electrical interference which can be caused by cars motorbikes etc Fluorescent lamps and dirty insulators on overhead power cables ...

Page 31: ...be Environment conditions Color system Sound system Sound output power BG DK Working temperature Working humidity Storage temperature Storage humidity 5 35 20 80 15 45 5 90 Power requirements 640 W x 339 D x 455 H mm 3W See rating plate Dimension mm Power consumption See rating plate Specifications NOTE Design and specifications are subject to change without notice The dimension in this manual is ...

Page 32: ...01 0090505538 ...

Reviews: