HAGOR Products GmbH | Oberbecksener Straße 97 | D-32547 Bad Oeynhausen | Telefon: +49(0)57 31-7 55 07-0 | Mail: [email protected]
11
2
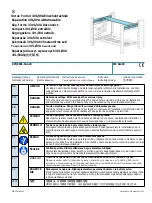
height
screen
height
screen
H = height
screen x2
478
748
A
748
A
L = width
screen x2
width
screen
width
screen
SCREEN 1
SCREEN 3
SCREEN 2
SCREEN 4
1
Mark on the wall 2 points of reference (A) for the mounting rail.
Segnare sulla parete i 2 punti di riferimento (A) per il fissaggio della staffa.
PORTATA MASSIMA Kg 200 -
MAXIMUM WEIGHT Kg 200
CONTENUTO DELLA CONFEZIONE -
PARTS
Cod. 5397
GHIERA -
RING
Cod. 309008
DADO M8
Cod. 309062
RONDELLA PIANA Ø 8
Cod. 309155
RONDELLA SPACCATA Ø 8
Cod. 4506
PERNO M8 -
PINS M8
Cod. 309135
VITE M6x16
SCREW M6x16
x 16
x 8
x 16
x 8
x 8
x 8
HEXAGON NUT M8
FLAT WASHER Ø 8
SPRING WASHER Ø 8
x 4
x 2
x 2
Cod. 5398
PANNELLO ORIZZON-
Cod. 5403
ANGOLARE VERTICA-
x 4
Cod. 5402
GANCIO
MOUNTING RAIL
Cod. 5404
GIUNZIONE
JUNCTION FOR THE
VERTICAL BRACKET
INTERFACE BRACKET
Cod. 5389
SACCHETTO VITERIA -
SCREW
2
3
Join the mounting rail with the junction.
A
A
WARNING: DANGER
THE WALL MOUNTING ARE NOT INCLUDED, AND MUST BE CHOSEN BY THE INSTALLER.
IMPORTANT:
The maximum weight is guaranteed for concrete wall, solid brick, steel, solid wood or otherwise adapt structures.
Check that the fixing point are intact and conform for the purpose in time.
THE MANUFACTURER IS NOT RESPONSIBLE FOR ANY DAMAGES ARISING FROM MOUNTING INCORRECTLY
OR WALL MOUNTING NOT APPROPRIATE TO SUPPORT THE WEIGHT INDICATED.
Unire i pannelli orizzontali con le giunzioni.
Fissare il pannello orizzontale superiore con i riferimenti .
Importante: il pannello deve essere perfettamente orizzontale, si consiglia l’uso della livella “laser”.
ATTENZIONE: PERICOLO
I FISSAGGI A PARETE NON SONO IN DOTAZIONE, E DEVONO ESSERE SCELTI DALL’INSTALLATORE.
IMPORTANTE:
La portata massima è garantita per pareti di calcestruzzo, mattone pieno, acciaio, legno massello o comunque
strutture adeguate.
Verificare che i punti di fissaggio siano integri e adeguati allo scopo nel tempo.
LA DITTA COSTRUTTRICE NON SI ASSUME ALCUNA RESPONSABILITA’ IN CASO DI DANNI DERIVANTI
DA FISSAGGI NON CORRETTI O DA FISSAGGI A PARETI NON ADATTE A SOSTENERE IL PESO INDICATO.
A
Fix the top mounting rail with references .
Important: the mounting rail must be perfectly horizontal, we recommend the use of the “laser” level.
A
Junction
Mounting rail
Giunzione
Pannello orizzontale
Legen sie 2 der Montageschienen nebeneinander und verschrauben sie sie mittels des Verbinders.
Place 2 of the mounting rails next to each other and screw them together using the connector.
Markieren sie an der Wand zwei Punkte als Referenz (A) für die Montageschiene.
Mark on the wall 2 points of reference (A) for the mounting rail.
Montageschiene
Mounting rail
Verbinder
Connector
Summary of Contents for 5450
Page 11: ......