background image

241

GB

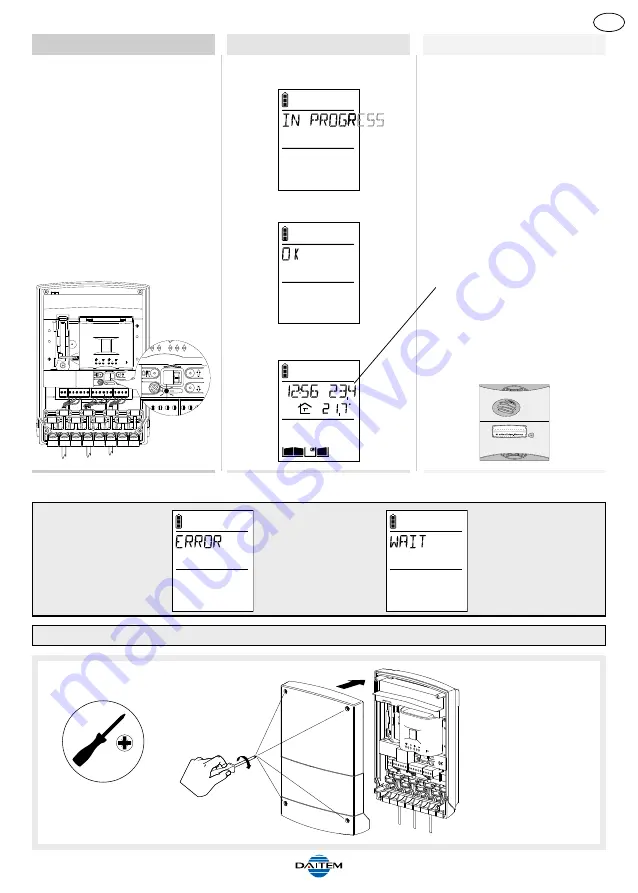
Close the controller.

Pozidriv 2

Controller

Handset unit

Outdoor caller unit

The radio link LED lights up
green for 2 sec.

The outdoor caller unit beeps
for 2 sec.

9. 

The handset displays:

then

C

beeps for 2 sec 

and

The radio link has been created.

If an error occurs, 
the handset displays:

It beeps 3 times 
and then
automatically 
returns to the next
screen:

Start the radio link
creation procedure
again. 

Carry out the radio link creation procedure again for all the handsets.

Display of time, indoor and outdoor
temperature, gate, side gate and
latch status (if position contacts
connected).

“BEEP”

Summary of Contents for SC901AX

Page 1: ...DECLARATION OF CONFORMITY Manufacturer Hager Security SAS Address F 38926 Crolles Cedex France Product type Doorphone Trade mark Daitem We declare under our sole responsibility that the products to which this declaration relates are compliant with the essential requirements of the following directives R TTE Directive 99 5 CE Low Voltage Directive 2006 95 CE ROHS directive 2002 95 CE in compliance ...

Page 2: ...radio link 268 9 3 Deleting radio links and returning to factory programming 270 10 Changing the batteries 274 10 1 In the main controller 274 10 2 In the battery base 274 10 3 In the handset 278 11 Questions Answers 279 12 Technical data 281 213 GB Waste processing of electrical and electronic devices at the end of their service life Applicable in European Union countries and other European count...

Page 3: ...ttons tag reader 2 call buttons with keypad tag reader Connection of an electrical latch or lock Handset units can communicate with each other inter handset communication function Handset Base Outdoor caller units wired to main controller road side Main controller garden side Connection of gate motorisation system 214 GB 1 Introduction ...

Page 4: ...atches the gate motorisation system the automatic garage door control system 1 lighting 1 communication with another handset 2 doorphone programming Using the outdoor caller unit access is controlled using an access code a tag reader Identifying each user with a tag The outdoor caller units have a front panel with a tag reading zone allowing each user to control access quickly once the tag has bee...

Page 5: ...losing the cover Cover Controller base Fixing bracket Connection terminal blocks Captive screws for bracket fixing Cable clamp do not remove Grommet remove Tag reading zone Programming keypad for entering access code to allow pedestrians and cars to enter Gate access control button Latch side gate access control button 2 1 1 Outdoor caller units with armoured cover 2 1 2 Controller 2 Description 2...

Page 6: ...ase Handset base Mains power pack Base connection jack Transparent removable cover Removable transparent cover Fixing T Battery flap Battery Handset base Base legs in table position 2 2 1 Mains powered base 2 2 Interior handset unit ...

Page 7: ...ch side gate control button Garage control button 1 Lighting control button 1 Up and down scroll keys Left and right scroll keys Backlighting is activated whenever a button is pressed It goes out again after 5 seconds when no other button is pressed 1 These functions require a relay output receiver to be installed 218 GB IMPORTANT when installing the system the handset s must be charged on their b...

Page 8: ...ss Missed call no signal poor average good excellent Radio range lighting off lighting on Lighting status Garage side gate and latch status gate closed gate open gate 1 open 2 closed or gate half open if sliding motor gate 1 closed 2 open or side gate open latch closed latch open Garage status Indoor temperature indication Temperature unit C Celsius F Fahrenheit Indoor temperature garages closed g...

Page 9: ...on screen Handset battery status Time Gate side gate and latch status Lighting status Indoor temperature The temperature displayed is the handset temperature Outdoor temperature The temperature displayed is measured at the first access point programmed Garage status 220 GB 3 Tooling required ...

Page 10: ...upplied On the back of the caller unit MHF01X A0831A04823 Coller sur certif On the handset SCA100AF A0831A04823 Coller sur certif Inside the controller 1 Unscrew the 4 cover screws and open the controller 2 Remove the pre cut part Pozidriv 2 221 GB 4 Preparation 4 1 Guarantee stickers ...

Page 11: ...04823 SCA500AX A0831A04823 GUARANTEE The conditions according to which the guarantee and after sales service apply are described in the general price list and can be sent on request Some after sales service products and accessories such as MHU01X power pack SC501AX interior handset unit base SC501AX belt clip SC801AX handset flip cover non exhaustive list for indication purposes only have a 2 year...

Page 12: ...positioned in the designated slot Thread the cable through here Alternative cable passage IMPORTANT when installing the system the handset s must be charged on the base before it they can be used 4 2 1 Handset on mains powered base IMPORTANT the MHU01X power pack supplied must be used 4 2 Charging the handset before installation 1 Open the base 2 Remove the 4 anti slip pads ...

Page 13: ...ative guides Pozidriv 0 Pozidriv 0 8 Screw it back into the same place hence locking the base in table position 9 Close the base Pozidriv 2 10 Tighten the locking screw to prevent the base from being opened by mistake 11 Stick the 4 anti slip pads to the back of the base and then put it on the table 224 GB ...

Page 14: ...ransparent cover can be removed The handset displays this message for 2 sec Then CHARGING if the battery is not sufficiently charged or If the battery is sufficiently charged You can now move on to the next chapter describing how to install the doorphone IMPORTANT the mains socket must remain accessible so that the power pack can be easily disconnected 225 GB ...

Page 15: ...Preparation Guarantee stickers about how to open the battery powered base 1 Connect the BatLi23 battery supplied 2 Close the battery flap 3 Stick the 2 anti slip pads supplied where indicated 4 Put the base legs in table position and put the base down 226 GB ...

Page 16: ...ibing how to install the doorphone TIP to make it easier to pick the handset up the removable transparent cover can be removed The handset displays this message for 2 sec Then CHARGING if the battery is not sufficiently charged or If the battery is sufficiently charged 227 GB ...

Page 17: ...he pillar pierce one of the cable knock outs with a cutter 4 Push the screw covers out using a flat screwdriver 5 Thread the cable through the hole knocked out in step 3 and screw the caller unit in place Put the screw covers back 6 Use a pencil or permanent marker to write the names Stick a transparent protection label on top Pozidriv 2 3 5 TIP you can print the labels using the software EtikPrin...

Page 18: ...rmoured cover 232 4 mm 145 mm 145 mm 160 4 mm 145 mm 145 mm 1 2 IMPORTANT use the label supplied and carefully position it in the space provided TIP you can print the labels using the software EtikPrint available on the Daitem web site 229 GB ...

Page 19: ...4 Pozidriv 2 6 3 5 230 GB ...

Page 20: ...7 8 9 3 5 231 GB ...

Page 21: ...11 10 12 IMPORTANT when the armoured cover is positioned on the unit there should be a 1 mm clearance use the shim for this purpose between the pillar and armoured cover Pozidriv 2 232 GB ...

Page 22: ...e the area is always clear place the controller as high up as possible 80 cm min make sure there are no obstacles between the controller installation point and the house where the handset s is are installed Do not wind the cable up nearby or inside the controller Instead cut off any excess length Do not place the products near metal surfaces screens fences gates etc or sources of electromagnetic d...

Page 23: ...ozidriv 2 1 To make it possible to thread the cables through for the outdoor caller unit external power supply motorisation system etc remove the grommets and pierce a hole with the same diameter as the cable using a Philips screwdriver 2 Cut the cables to the necessary length and then thread them through the grommets Expose the end of the wires over a length of approximately 1 cm The cables must ...

Page 24: ...ch is closed whatever its status IMPORTANT so that the system recognises the latch it must be wired before the radio link is created between the handset and the controller 235 GB 3 Connecting the outdoor caller unit Connect the 4 outdoor caller unit wires to terminal blocks 15 to 18 on the controller 3 5 15 16 17 18 15 Green Data 16 Yellow Data 17 Red power 18 Black power TIP if the cable between ...

Page 25: ...equires an external power supply If a push button allowing manual control of the automatic system has already been installed connect terminal blocks 12 and 14 in parallel on this manual control input NC C NC NO IMPORTANT for the information feedback to be properly managed the position contact ref CP500 on the price list must be wired before power up and be in closed position when the radio link is...

Page 26: ...8 21X battery must be installed for current based applications Connect the battery supplied to the connector IMPORTANT the transformer used must have the 12 V 10 VA min double insulation symbol 230 V power supply without an earth connection Trans former 12 V output 230 V input Cable length 0 to 10 m 0 32 mm2 and cross section 10 to 25 m 0 75 mm2 Connect the 908 21X battery supplied to its connecto...

Page 27: ...rly connected If the radio link creation LED flashes three times every 5 seconds remove the controller s power supply check the outdoor caller unit wiring reconnect the controller s power supply or the battery is not connected Check is it inserted and or connected Mr et Mme Evêque Mourroux BEEP 3 5 Solar panel Connect a 12 V 8 W min power solar panel ref MJU01X on price list to terminal blocks 1 a...

Page 28: ... digit using the key C return to steps A and B to set the minutes and then once the desired time has been programmed press The handset beeps for 2 sec 4 The handset then moves on to radio link set up mode and displays 5 Pick up the handset stand next to the controller and follow the procedure on the next page The key selects the previous character IMPORTANT each call button on the outdoor caller u...

Page 29: ... 7 The radio link creation LED lights up orange 6 Put the controller in radio link creation mode by pressing The radio link creation LED lights up orange KEY 1 IMPORTANT when using a translucent MHF01X or MHF02X outdoor caller unit and 1 button armoured cover only the bottom key KEY 1 can be accessed once the armoured cover has been placed on the unit ...

Page 30: ...en C beeps for 2 sec and The radio link has been created If an error occurs the handset displays It beeps 3 times and then automatically returns to the next screen Start the radio link creation procedure again Carry out the radio link creation procedure again for all the handsets Display of time indoor and outdoor temperature gate side gate and latch status if position contacts connected BEEP ...

Page 31: ...n C C 3 You can hear what is happening around the outdoor caller unit at the selected access point Reception is good if at least 3 bars are displayed If this is not the case move the handset 4 Press on the key and test the radio range again for each access point Radio range bar graph 6 Testing the radio range IMPORTANT if the handset units or controllers are too close to each other when you are te...

Page 32: ...hapter describes how to move the handset unit from a table position in which the handset unit is normally placed at this stage in the installation see chapter on Charging the handset unit before installation to a wall position 7 2 1 Handset on mains powered base The table mounting procedure is described in the chapter on Charging the handset unit before installation 7 Installing the interior hands...

Page 33: ... 8 Rotate the back of the base until it is in wall position 6 Unscrew the locking screw 7 Insert the screw here and tighten it Pozidriv 0 Pozidriv 0 Pozidriv 2 4 Unscrew the base locking screw 5 Open the base ...

Page 34: ... 10 Check the power pack jack is in the right position 11 Feed the power cable through one of the guides on the back of the base Thread the cable through here Alternative cable passage 12 Fix the base to the wall using appropriate washers and screws 13 Close the base Other guides possible Pozidriv 2 ...

Page 35: ...mains 220 V Pozidriv 2 16 Place the handset on the base The handset beeps once C If necessary the icon flashes to show the handset is being charged Electrical shock hazard IMPORTANT the mains socket must remain accessible so that the power pack can be easily disconnected ...

Page 36: ...on handset on battery operated base Mark 3 fixing holes and drill a hole in the wall with a Ø 6 mm drill it 2 Insert the washer and fix the T using appropriate screws and washers Pozidriv 2 Roughly 1 2 m high 3 Remove the handset from the base 4 IMPORTANT the removable transparent cover must be in place when fixing the base to the wall Clip it back on if this is not the case ...

Page 37: ...248 GB 5 Put the legs of the base in wall position 6 Hook the base on to the T 7 Put the handset on the base C If necessary the icon flashes to indicate that the handset is charging The handset beeps ...

Page 38: ...andset rings 1 except if it is in silent mode and the backlighting flashes The name of the access point calling 2 is displayed C 1 If there is no answer the handset rings for 20 sec factory setting then stops The duration of ringing can be adjusted see Programming handset operating options If the handset is on the base it rings at the programmed volume see Modifying handset operating options If th...

Page 39: ...e wrong button press then enter the access code again For additional tests gate access listen in and inter handset communication functions etc please refer to the corresponding chapters in the user manual The doorphone is now operational If need be you can customise it by following the instructions in the chapters on Modifying outdoor caller unit operating options and Modifying handset operating o...

Page 40: ...ormation and activate the appropriate applications lighting automatic control system etc or respond according to their programming These applications or responses are also called functions A Receiver product can have several functions e g 2 channel relay output receiver strobe and siren sounding etc It should be noted that products may act as Transmitters and Receivers Examples Audio communication...

Page 41: ...e Light button on the handset is pressed this activates the lighting controlled by the output receiver for 5 minutes A radio link is created and a function is allocated to this radio link as part of the same procedure This procedure is as follows Transmitter Receiver 1 Switch to radio link creation mode 2 Switch to radio link creation mode 3 Select the function 4 Select the button or event associa...

Page 42: ...examples By creating a radio link between a controller and an output receiver the following applications can be set up gate opening can switch on lighting to facilitate night time access and gate closing can switch off lighting electrical latch opening can switch on courtesy lighting for a programmable duration etc pressing on the outdoor caller unit call button can trigger a door bell installed e...

Page 43: ...d when the latch is opened 4 Side gate closed This event is displayed when the side gate closes as long as limit switches have been wired 5 Day breaking This event is displayed when the day breaks Useful for switching off night lighting 6 Night falling This event is displayed when the night falls Useful for switching on night lighting or 4 Select the key associated with the function Press gate lat...

Page 44: ...hts up green for 2 sec Otherwise start the procedure again 5 Validate the procedure Press The radio link has been created IMPORTANT if an error occurs the radio link LED flashes red 3 times The radio link creation process should be performed again in this case ...

Page 45: ...d as a transmitter Application examples By creating a radio link between the or keys on the handset and an output receiver the following applications can be set up Radio link n 1 Press once on the key to open the garage door and press again to close Radio link n 2 Press once on the key to switch on lighting for a programmable duration ...

Page 46: ...ion C C C 2 Switch to radio link creation mode 3 Select the function Information available in the receiver product manual Press on the or key Select a command from the following GARAGE 1 GARAGE 2 GARAGE 3 GARAGE 4 LIGHT 1 LIGHT 2 LIGHT 3 LIGHT 4 then or Using the keys ...

Page 47: ...urs the handset displays It beeps 3 times and then automatically returns to the general information screen Perform the radio link creation procedure again C C 5 Validate the procedure Press C C then C and beeps for 2 sec Garage or light icon displayed the handset displays ...

Page 48: ...te 2 Side gate Triggers the external motorisation system manual control to open the side gate 3 Latch Triggers the controller latch Transmitter Controller 1 Switch to radio link creation mode 9 1 3 The controller is used as a receiver Information available in the transmitter product manual 2 Switch to radio link creation mode Press The radio link creation LED lights up orange ...

Page 49: ... or event associated with the function 5 Validate the procedure The radio link creation LED lights up orange Otherwise perform the procedure again The radio link has been created IMPORTANT if an error occurs the radio link creation LED flashes red 3 times Perform the radio link creation procedure again ...

Page 50: ...dset 1 Switch to radio link creation mode Information available in the transmitter product manual 2 Switch to radio link creation mode C C C Display the following screen using the keys 9 1 4 The handset is used as a receiver ...

Page 51: ...oduct manual 4 Select the key or event associated with the function 5 Validate the procedure The handset displays C C then C beeps every 2 sec and The radio link has been created If an error occurs the handset displays It beeps 3 times and then automatically returns to the general information screen Perform the radio link creation procedure again C C ...

Page 52: ...nstalling the doorphone you have created radio link n 1 e g handset programmed for the 1st call button and input 1 To create radio links n 2 n 3 n 4 and n 5 follow the procedure below Radio link n 2 2nd call button Radio link n 1 1st call button Radio link n 3 Radio link n 4 Input 1 Input 2 Input 3 Input 4 Radio link n 5 Controller Handset Outdoor caller unit 1 Switch the controller to radio link ...

Page 53: ...r caller unit call button to call the handset C C Display the following screen using the keys C KEY 1 IMPORTANT if you are using an MHF01X or MHF02X translucent outdoor caller unit and a 1 button armoured cover only the bottom button KEY 1 is accessible once the cover is in place The radio link creation LED flashes orange ...

Page 54: ...splays C C then C beeps for 2 sec and The radio link has been created If an error occurs the handset displays It beeps 3 times and then automatically returns to the general information screen Perform the radio link creation procedure again C C Display of time indoor and outdoor temperature gate side gate or latch status if position contacts connected BEEP ...

Page 55: ...s to be created between each one To do this proceed as follows IMPORTANT each handset can be linked via radio with a maximum of 7 other handsets C C C 1st handset 2nd handset 1 Switch the handset to radio link creation mode C Display the following screen using the keys 2 Switch to radio link creation mode C C Display the following screen using the keys C ...

Page 56: ...d 4 The handset displays C C then C and The radio link has been created If an error occurs the handset displays It beeps 3 times and then automatically returns to the general information screen Perform the radio link creation procedure again C C beeps for 2 sec beeps for 2 sec ...

Page 57: ...eated between a handset and a controller To do this open the controller cover and proceed as follows C C C Handset Controller 1 Switch the handset to radio link test mode 2 Press or C Display the following screen using the keys C 9 2 Testing the radio links ...

Page 58: ...splays 3 The key is linked via radio to the controller side gate output The key is linked via radio to the controller latch output 3 Select the controller to be tested using the keys 4 Press again on 6 After several seconds the handset exits radio link test mode and returns to the general information screen 5 Press twice on The controller beeps 3 times and the display goes out ...

Page 59: ...radio links created between a controller and a handset Controller Handset Outdoor caller unit 2 Switch the handset to radio link deletion mode C C Display the following screen using the keys C 1 Press The radio link creation LED lights up orange 9 3 Deleting radio links and returning to factory programming ...

Page 60: ...een for 2 sec The radio link creation LED flashes orange 4 The handset displays C C then C beeps for 2 sec and The radio link has been deleted If an error occurs the handset displays It beeps 3 times and then automatically returns to the general information screen Perform the radio link deletion procedure again C C The outdoor caller unit beeps for 2 sec BEEP ...

Page 61: ...r to factory programming This procedure is used to delete all the radio links and reset all handset and controller parameters to their factory value 1 Switch the handset to radio link deletion mode C C Display the following screen using the keys C C ...

Page 62: ...tically returns to the general information screen Perform the radio link deletion procedure again C C 3 Quickly press and then release the key 4 Press and hold for more than 10 sec until the radio link LED stops flashing red The LED will then light up green for 2 sec The outdoor caller unit beeps for 2 sec The handset and controller have been returned to their factory settings ...

Page 63: ...ery enclosure IMPORTANT There is a risk of explosion if the battery ies is are not properly replaced Replace the flat battery ies with the same type Do not expose the battery to excessive heat e g a flame and do not throw it in a fire Dispose of flat batteries in the appropriate waste disposal containers Li 10 Changing the batteries 10 1 In the controller IMPORTANT disconnect the controller from t...

Page 64: ...ase check the batteries have been correctly inserted Pozidriv 2 No reprogramming is required after the batteries have been changed Mr et Mme Evêque Mourroux BEEP 5 Replace it with a new one ref 908 21X making sure to thread the connector through the hole in the enclosure 6 Reposition the battery enclosure in the controller 7 Reconnect the battery 8 Connect a new MPU01X battery ...

Page 65: ...tery has to be replaced within a month C 2 If the base is fixed to a wall remove the fixing T 3 Open the battery flap 1 Remove the handset from the base 5 Close the battery flap again 4 Remove the flat BatLi23 and replace it with a new one 10 2 In the battery base ...

Page 66: ...277 GB 6 If necessary put the base back on the fixing T 7 Put the handset on the base C If necessary the icon flashes to indicate that the handset is charging The handset beeps ...

Page 67: ...dvisable to change the handset batteries 3 Replace the flat MTU01X battery with a new once 4 Close the handset put the belt clip back on and then place the handset back on its base in order to start it up 5 Programme the time using and The temperature display will be updated several minutes after the handset has been powered If necessary the icon flashes to indicate that the handset is charging 3 ...

Page 68: ...ck on its base Check the mains power supply or the state of the handset base battery Can I clean my doorphone Use soapy water and a soft cloth to clean products whenever necessary Do not use alcohol or acetone to clean them What should I do if the handset does not ring during a communication test Check the radio range see Testing the radio range and move closer to the controller if necessary Check...

Page 69: ... Why is the BATTERY BASE message displayed Change the handset base battery Why is the CHARGE HANDSET message displayed Put the handset on the base to charge it Why is the MEMORY FULL message displayed when a radio link is created The handset s memory capacity has been reached Delete some of the radio links see Appendix Specific cases Creating a radio link between several handsets Why is communicat...

Page 70: ...04 Operating temperature from 5 C to 55 C Base powered by batteries BATLi23 lithium battery 2 x 3 6 V 17 Ah mains supply via 220 V 6 V transformer Rechargeable handset powered by MTU01X plug in lithium ion battery Rechargeable handset battery life when off base 15 days 3 Battery base battery life 5 years 3 1 The free field range corresponds to the maximum theoretical distance separating the contro...

Page 71: ...282 ...

Page 72: ...283 ...

Page 73: ...804563 C 02 2011 www daitem com ...

Reviews: