background image


Date : 20/09/2012 

6T 8205-02a


User manual 

CUSTOMISATION AND PARAMETER SETTING 


14 


To  activate  the  loudspeakers,  click 

  and  adjust  the  volume  using  the  associated  cursor.  The  higher  the 

percentage set, the higher the volume. 


To turn off the microphone, click on 

 (mute). 


To  activate  the  microphone,  click 

  and  adjust  the  volume  using  the  associated  cursor.  The  higher  the 

percentage set, the higher the sensitivity. 

Click 'return' to go back to the previous screen. 


3.2.3  Screen 

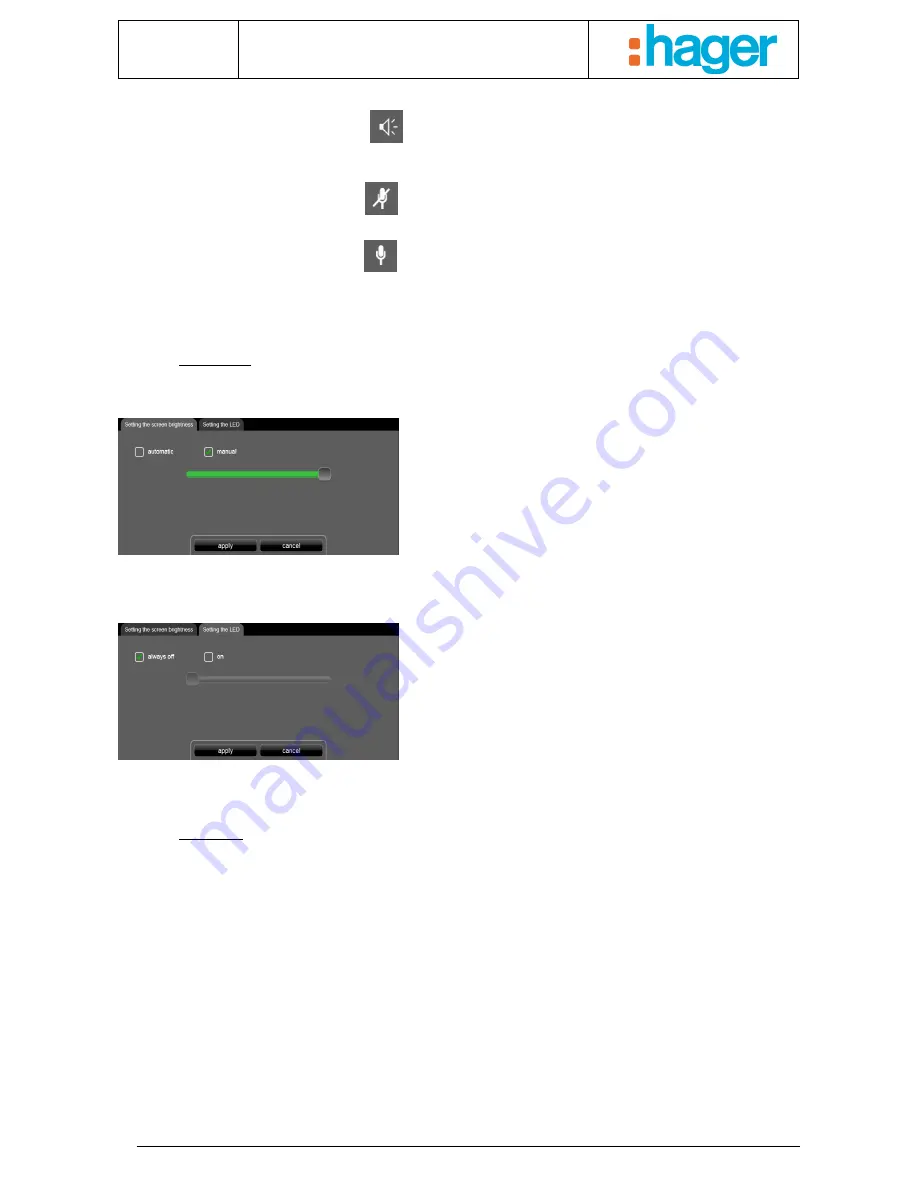
Setting the screen brightness 


Used to adjust the brightness of the screen: 

- automatic: the brightness automatically adjusts in 

response to the ambient light intensity. 

- manual: You can adjust the brightness using the 

associated cursor. The higher the percentage set, the 
higher the brightness. 

-


Click on ‘apply’ to confirm or ‘cancel’ to return to the previous screen. 


Setting the LED 


Used to adjust the indicator LED function: 

- always off: The indicator LED on the front panel is 

always turned off. 

- on: The indicator LED on the front panel is turned on. 

 You can adjust the brightness of this indicator LED using 

the associated cursor. The higher the percentage set, the 
higher the brightness. 

-


Click on ‘apply’ to confirm or ‘cancel’ to return to the previous screen. 


3.2.4  Profile 

Displaying profile name 

Used to select and configure the profile in order to customise the appearance and set the user rights of the various 
clients in the installation. 

Example 1: In a family residence, the son requires access for his bedroom but not for the other rooms. 

Example  2: In  a hotel,  it  is important that the receptionist  is  able to manage  all the rooms; however,  a customer in 
room "X" must not be able to access or modify the settings for room "Y". Neither must he be able to visualise them. 

This menu can be used to modify some of the settings entered by your installer during commissioning. 

Summary of Contents for domovea

Page 1: ...tebis domovea touch panel...

Page 2: ...2 3 SEQUENCES VIEW 9 2 4 CAMERAS VIEW 10 2 5 FAVORITES VIEW 10 2 6 DISPLAY AND FILTER 10 2 7 FAVORITES 11 3 CUSTOMISATION AND PARAMETER SETTING 12 3 1 STANDBY MODE 12 3 2 PARAMETERS 12 3 2 1 Configura...

Page 3: ...el surface 2 Loudspeaker 3 Microphone 4 Movement sensor 5 Indicator LED 6 USB port 7 Reset 8 On Off 9 Temperature sensor 1 3 Safety instructions The device must only be installed by a qualified electr...

Page 4: ...view is used to Select the domovea server to which you wish to connect see below Access the parameter setting menu by clicking on see section 3 Select the language by clicking on Switch off the system...

Page 5: ...automatic daylight saving time adjustment and synchronise the clock with a time server Connection indicator LED If your domovea touch panel loses its connection with the KNX bus this indicator LED swi...

Page 6: ...ON 6 Access to the parameter setting menu Quick links to the views Select dashboard view Select sequences view Select devices view Select cameras view Select favorites view The dashboard functions wil...

Page 7: ...d blinds in your installation Displays all of the shutter and blind devices in your installation Selecting the heating mode Displays all of the heating and air conditioning thermostat devices in your...

Page 8: ...utters with a single command The icon designates a group of devices By clicking on a group without sending a command a detailed view of all the devices in that group can be accessed This view contains...

Page 9: ...ding on the programming Automation Start the sequence at 09 00 every day except Saturday and Sunday All of these parameters have been programmed by your installer during commissioning By clicking on t...

Page 10: ...full screen display of the image captures an image of the screen 2 5 Favorites view This view displays all of your favorite devices See section 2 7 for parameter setting of the favorites 2 6 Display a...

Page 11: ...on the view displayed you can classify the devices by type lighting shutters etc Comment in camera view instead of Filter the Archives icon is displayed allowing access to images stored by screen capt...

Page 12: ...ol at the top right of the screen to access the parameter setting bar Select the icon to access the chosen function Standby function Cleaning function Settings menu Device shutdown menu 3 1 Standby mo...

Page 13: ...ed enable detection is activated disable detection is disabled Threshold wake up display defines the distance below which the screen must leave standby mode There are six adjustable thresholds from 0...

Page 14: ...us screen Setting the LED Used to adjust the indicator LED function always off The indicator LED on the front panel is always turned off on The indicator LED on the front panel is turned on You can ad...

Page 15: ...On client startup for when the system starts up On settings access for when the settings are modified To leave default group for when the view changes Moreover you have the possibility of authorising...

Page 16: ...ptions Dashboard Groups Sequences Cameras Favorites Settings Click on apply to confirm or cancel to return to the previous screen 3 2 5 Journal Used to consult the various events on the domovea server...

Page 17: ...mask same as for the IP address Default gateway same as for the IP address DNS server addresses Used to enter the settings for the domain server DNS Automatic DNS servers YES the network server automa...

Page 18: ...function An hourglass appears in the middle of the screen indicating the number of seconds remaining until the screen is enabled again After this timed period the screen goes back to the initial view...

Reviews: