background image

English 


Instructions for use


continuously for more than 5 minutes. Switch off the appliance afterwards and 

allow the motor to cool down. 

Multistage switch 

The  unit  is  equipped  with  a  multistage  switch.  The  following  settings  are 

available: 

0

 - The unit is switched off 

1

 - Very low speed, good  starting  speed  for mixing "soft" ingredients  such  as 

flour, butter, etc 

2

 - Low speed, best speed for blending liquid ingredients. 

3

 - Medium speed, optimum speed for mixing cake and bread dough. 

4

 -  Medium  high  speed,  for  whipping  butter  to  form  fine  foam,  sugar,  for 

desserts etc. 

5

 - High speed, for beating meringue, cake jelly, whipped cream etc. 

Turbo

  -  This  button  allows  you  to  have  the  full  power  of  your  appliance 

immediately at your disposal. 

How to use 

IMPORTANT: MAKE SURE THAT THE ATTACHMENTS ARE FITTED CORRECTLY 

BEFORE USING THE APPLIANCE.


-


Place the base support on a flat, steady surface. 

-


Press  the  arm  tilt  button  and  at  the  same  time,  lift  the  arm  on  the  support 

upwards. 

-


Place the bowl in the special space, inserting it perfectly over the pin in the 

base of the support. 

-


Fit the motor body complete with attachments onto the arm, inserting it from 

the front of the support and so that the beaters or kneading hooks fit into the 

driving  slots.  Slide  it  downwards,  pressing  gently  until  the  plastic  gear 

mechanism on the attachment clicks into place inside the slot on the arm. 

-


Pour the ingredients into the  bowl and  pressing the arm tilt button lower the 

arm of the support using the handgrip on the power body. 

-


Plug the power cord into a mains power source. 

-


Switch  on  the  appliance  by  switching  the  multistage  switch,  the  beater  or 

kneading hooks will start to rotate. 

IMPORTANT

:  The  appliance  has  been  designed  to  operate  for  brief 

periods (max. 5 minutes). Switch off the appliance after 5 minutes of use 

and allow the motor to cool for at least 15 minutes before using again. 

Summary of Contents for Max Mixer Pro

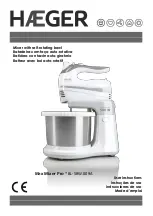
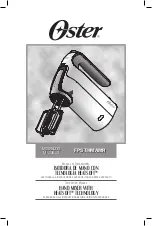
Page 1: ...self rotating bowl Batedeira com ta a auto rotativa Batidora con taz n auto giratorio Batteur avec bol auto rotatif User instructions Instru es de uso Instrucciones de uso Mode d emploi Max Mixer Pro...

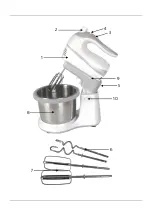
Page 2: ...1 2 8 7 4 3 9 5 10 9 6...

Page 3: ...declines to accept responsibility for damage s arising out of usage contrary to the instructions specified below Not for commercial use This appliance is designed for HOME USE ONLY and may not be use...

Page 4: ...n should be supervised to ensure that they do not play with the appliance Special safety instructions Make sure that the voltage on the appliance rating plate corresponds to that of the mains electric...

Page 5: ...aters with the geared ring must be fitted into the smaller opening Use your thumb to switch on the unit When you have finished mixing or if you wish to interrupt the operation switch off first before...

Page 6: ...the base support on a flat steady surface Press the arm tilt button and at the same time lift the arm on the support upwards Place the bowl in the special space inserting it perfectly over the pin in...

Page 7: ...f the appliance Remove the attachments as described previously and then remove the bowl NOTE In case of space problems or for use with different bowls it is possible to use the hand mixer separately f...

Page 8: ...the European directive 2012 19 EU on Waste Electrical and Electronic Equipment WEEE By ensuring this product is disposed of correctly you will help prevent potential negative consequences for the envi...

Page 9: ...ge thus attributable to falls blows spill exposure to extreme environmental conditions or deterioration caused by normal use of plastic parts or keyboards as well as by the use of batteries other than...

Page 10: ...orrecta O aparelho foi concebido SOMENTE PARA USO DOM STICO e n o deve ser utilizado para fins comerciais ou industriais Instru es gerais de seguran a Antes da instala o de qualquer electrodom stico d...

Page 11: ...rvisionadas de modo a garantir que n o brincam com o aparelho Instru es especiais de seguran a Certifique se que a voltagem el ctrica do aparelho corresponda voltagem de sua rede el ctrica Nunca deixe...

Page 12: ...ertura menor Use o polegar para ligar o aparelho Quando terminar de mistura ou se quiser interromper a opera o desligue primeiro o aparelho antes de levantar as p s para fora P s batedoras Para mistur...

Page 13: ...AS CORRECTAMENTE Coloque o suporte sobre uma superf cie plana e est vel Prima o bot o de inclina o do bra o e simultaneamente levante o bra o do suporte Monte a ta a encaixando a perfeitamente no eixo...

Page 14: ...ire a ta a ATEN O Caso a ta a seja pequena para a receita e se pretende utilizar outra ta a poss vel usar o corpo do motor separado do suporte Limpeza Antes de limpar qualquer uma das partes da batede...

Page 15: ...acordo com a Directiva Europeia 2012 19 EU sobre Res duos de equipamento el ctrico e electr nico CEE Ao garantir a elimina o adequada deste produto estar a ajudar a evitar potenciais consequ ncias ne...

Page 16: ...arelho ou por causas estranhas ao mesmo A garantia n o cobre assim danos atribu veis a quedas pancadas derrame de l quidos exposi o a condi es extremas do meio ambiente ou deteriora o provocada pelo u...

Page 17: ...derivados por un uso no conforme al previsto El aparato ha sido proyectado S LO PARA EMPLEO DOM STICO y no tiene que ser destinado a uso comercial o industrial Indicaciones generales de seguridad Ant...

Page 18: ...caciones especiales de seguridad Cerciorarse que el voltaje el ctrico del aparato corresponda al de vuestra red el ctrica No dejar nunca el aparato sin vigilar cuando est conectado a la red el ctrica...

Page 19: ...a m s peque a Utilice el pulgar para poner la unidad en marcha Al terminar la mezcla o si desea interrumpir la operaci n apague el aparato antes de sacar los accesorios de la mezcla Los accesorios par...

Page 20: ...retar el pulsador de inclinaci n brazo y contempor neamente levantar el brazo del soporte hacia arriba Colocar el recipiente en el correspondiente espacio introduci ndolo perfectamente sobre el corres...

Page 21: ...de inclinaci n brazo y quitar el cuerpo motor con las varillas mediante la correspondiente tecla de desenganche trasero Extraer las varillas como se ha descrito precedentemente y quitar el recipiente...

Page 22: ...o deje el material de embalaje bolsas de pl stico trozos de poliestireno etc al alcance de los ni os puede ser peligroso Eliminaci n Este aparato lleva el marcado CE en conformidad con la Directiva 20...

Page 23: ...da descargas el ctricas el da o intencional de los equipos o la misma causa extra a La garant a no cubre los da os imputables a ca das golpes derrame de l quidos exposici n a condiciones extremas del...

Page 24: ...n conforme et comporte d importants risques d accident Le fabricant n endosse aucune responsabilit pour des dommages caus s r sultant d une utilisation non conforme L appareil a t con u EXCLUSIVEMENT...

Page 25: ...en de l appareil sauf si elles sont de 8 ans ou plus et sous surveillance Les enfants de moins de 8 ans doivent tre tenus l cart de l appareil et de son alimentation Il est n cessaire de surveiller le...

Page 26: ...er le bras Utilisation Informations g n rales Nettoyez touts les accessoires avant de les utiliser pour la premi re fois Enclenchez les fouets dans les orifices d entrainement du batteur Le fouet muni...

Page 27: ...age battre la chantilly etc Turbo cette touche vous permet d acc der imm diatement toute la performance de votre appareil Comment utiliser ATTENTION AVANT D UTILISER L APPAREIL CONTROLER QUE LES FOUE...

Page 28: ...he de la prise de courant Soulever le bras du support en appuyant sur le poussoir d inclinaison du bras et retirer le corps moteur muni des fouets en agissant sur la touche de blocage arri re Extraire...

Page 29: ...tuent une source potentielle de danger Mise au rebut Cet appareil porte le symbole du recyclage conform ment la Directive Europ enne 2012 19 EU concernant les D chets d quipements lectriques et lectro...

Page 30: ...arges lectriques dommage intentionnel de l appareil ou les causes de l trange m me La garantie ne couvre pas les dommages attribuables des chutes ainsi les bosses les d versements l exposition des con...

Page 31: ......

Page 32: ...idade de Londres 1 Tel 351 21 949 83 00 Geral Parque Industrial do Arneiro Tel 351 21 949 83 20 Sup T c 2660 456 S Juli o do Tojal Fax 351 21 949 83 25 PORTUGAL e mail suporte tec haeger pt http www h...

Reviews: