3
www.hacker-model.eu
P
ř
i p
ř
íprav
ě
k letu zkontrolujte stav vašeho RC vybavení. Postupujte podle
pokyn
ů
, které byly dodány s vaší RC soupravou. Vždy byste m
ě
li nabíjet
vysíla
č
ové baterie ve
č
er p
ř
ed plánovaným létáním, nebo podle
doporu
č
ení výrobce RC soupravy.
P
ř
ed létáním pe
č
liv
ě
vyvažte vrtuli a náhradní vrtule. Zkontrolujte
zda nemáte ohnutou h
ř
ídel na motoru. Nevyvážená vrtule nebo
ohnutá h
ř
ídel jsou jednou z nej
č
ast
ě
jších p
ř
í
č
in vibrací, které mohou
poškodit váš model. Vibracemi se mohou uvolnit šroubované spoje,
m
ů
že dojít také k poškození motorového lože s katastrofálními
ú
č
inky pro letadlo.
Vibrace mohou poškodit
také elektroniku,
kterou máte v modelu (p
ř
ijíma
č
, baterie, serva atd.).
P
ř
edletová kontrola
Než budete létat je t
ř
eba provést poslední celkovou kontrolu, abyste se
ujistili, že model je opravdu p
ř
ipraven k letu a že jste
nep
ř
ehlédli. Pokud
nejste d
ů
kladn
ě
obeznámeni s provozem RC model
ů
, požádejte
zkušeného modelá
ř
e o provedení kontroly. Zkontrolujte, zda máte
nainstalován p
ř
ijíma
č
a zda jsou všechny ovládací prvky správn
ě
p
ř
ipojeny. Zkontrolujte, že se vrtule to
č
í ve správném sm
ě
ru a motor
dosahuje plného výkonu. Zajist
ě
te, aby všechny ovládací plochy
(výškovka, sm
ě
rovka, k
ř
idélka) byly bezpe
č
n
ě
spojeny táhly. Ovládací
prvky se musí pohybovat ve správném sm
ě
ru a t
ě
žišt
ě
musí být ve
správném míst
ě
.
nic
správn
ě
Kontrola dosahu
Zkontrolujte dosah vašeho vysíla
č
e p
ř
ed prvním letem. Test dosahu
prove
ď
te dle návodu pro váš vysíla
č
. Pokud ovládané plochy nereagují
správn
ě
, nelétejte! Najd
ě
te a opravte problém. Podívejte se zda nejsou
uvoln
ě
ná serva, poškozené kabely, staré servo konektory, špatné
kontakty ve vašem akumulátoru.
P
Ř
EDLETOVÁ KONTROLA
BEZPE
Č
NOSTNÍ OPAT
Ř
ENÍ
Nedodržení t
ě
chto bezpe
č
nostních opat
ř
ení m
ů
že mít za následek
vážné zran
ě
ní vás nebo p
ř
ihlížejících.
Když se u
č
te ovl dat motor, požádejte o pomoc zkušeného pilota.
Použijte ochranné br le p
ř
i spoušt
ě
ní nebo chodu motoru. Nespoušt
ě
jte
motor v oblasti volného št
ě
rku nebo písku, vrtule m
ů
že takový materiál
nasát a vrhnout vám ho do obli
č
eje a o
č
í. Držte sebe a také všechny diváky
mimo rovinu rotace vrtule. M
ě
jte mimo dosah vrtule volné oble
č
ení, rukávy
košile, kravaty, šály, dlouhé vlasy nebo volné p
ř
edm
ě
ty, jako jsou tužky
nebo šroubováky, které mohou vypadnout z kapsy košile nebo bundy do
vrtule. Motor se p
ř
i b
ě
hu zah
ř
ívá! Nedotýkejte se ho v pr
ů
b
ě
hu nebo
bezprost
ř
edn
ě
po zastavení.
í
á
ý
Elektromotor a baterie používa
v
jsou velmi
a
to
č
c se vrtule m zna
č
nou
když se
to
č
, m
ů
žete si zp
ů
sobit vážná zran
ě
ní. M
ě
jte respekt p
ř
ed to
č
ící se
vrtulí a zajist
ě
te veškerá nezbytná opat
ř
ení, abyste zabránili zran
ě
ní.
Pokud nelétáte vždy odpojte pohonnou baterii.
né
modelu
výkonné
energii. Pokud se dotknete vrtule
í í
á
í
LÉTÁNÍ
Tento akrobat je skv
ě
le létající model, které letí plynule a p
ř
edvídateln
ě
a
p
ř
esn
ě
reaguje na vaše povely. Model ale nedisponuje stabilizací letu
charakteristickou pro za
č
áte
č
nické školní RC modely. Proto musí být
neustále
ř
ízen pilotem.
Vzlet
Startujte z ruky nebo ze zem
ě
. Až budete p
ř
ipraveni, rozje
ď
te model
rovn
ě
, sm
ě
rovkou udržujte p
ř
ímý sm
ě
r, postupn
ě
p
ř
idávejte plyn a p
ř
i
dosažení správné rychlosti mírn
ě
p
ř
itáhn
ě
te výškovku až se model odlepí
od zem
ě
. Mírným p
ř
itažením výškovky udržujte model v rovnom
ě
rném
stoupání až do bezpe
č
né výšky. Model je velmi stabilní, ale p
ř
i dostate
č
n
ě
velkých výchylkách
ř
ídících ploch zvládne prvky extrémní akrobacie. Po
seznámení se s letovými vlastnostmi a chováním modelu m
ů
žete už
startovat na plný plyn.
L
P
ř
istání
et
Udržujte si p
ř
ehled o pohybu ostatních model
ů
ve vzduchu. Po startu
model srovnejte do vodorovného letu a vytrimujte tak, aby let
ě
l rovn
ě
.
Postupn
ě
si vyzkoušejte r
ů
zné režimy letu a obraty. Pozor na kapacitu
baterie, abyste s modelem stihli bezpe
č
n
ě
p
ř
istát.
Zkuste experimentovat s polohou t
ě
žišt
ě
a velikostí výchylek.
Chcete-li zahájit p
ř
istání, uberte plyn. Nechte nos modelu mírn
ě
dol
ů
a
pomalu snižujte výšku letu a udržujte sníženou rychlost. Ud
ě
lejte poslední
zatá
č
ku sm
ě
rem k místu p
ř
istání, udržujte sestupovou rovinu a rychlost
letu. Postupn
ě
ubírejte plyn a mírn
ě
p
ř
itahujte výškovku až se model
dotkne zem
ě
. Stáhn
ě
te plyn.
Take-off
Flight
Landing
Takeoff from ground or from your hand.
As the model gains speed decrease up elevator
allowing the tail to come off the ground.
model
T
l
To initiate a landing, lower the throttle
lower the throttle
Keep straight during take-off and
add throttle slowly.
Gently pull the elevator to keep the
model in a steady climb to the safe height. This is a stable model, but it can
handle extreme acrobatics when there are enough large deflections of
control surfaces. After familiarizing yourself with the flight characteristics
and behavior of the model, you can already start full throttle.
ry
different flight modes and aerobatic maneuvers.
. Let the model's nose slightly down
and slowly lower the height of the flight and maintain a reduced speed.
Take the last turn towards the landing, keep the glide path and the speed of
the flight. Gradually
and gently pull the elevator up until
the model touches the ground. Turn throttle off.
For reassurance and to keep an eye on other traffic. Take it easy with the
for the first flight, gradually getting acquainted with it as you gain
confidence. Adjust the trims to maintain straight and level flight.
Add power to see how
she c imbs as well. Continue to fly around, executing various maneuvers
and making mental notes (or having your assistant write them down) of
what trim or C.G. changes may be required to fine tune the model so it flies
the way you like. Mind your battery charge, but use this first flight to
become familiar with your model before landing.
Get help from an experienced pilot when learning to operate motors. Use
safety glasses when starting or running motors.
The motor gets hot! Do not touch it
during or right after operation.
y
f
ha
Do not run the motor in an
area of loose gravel or sand; the propeller may throw such material in your
face or eyes. Keep your face and body as well as all spectators away from
the plane of rotation of the propeller as ou start and run the motor. Keep
these items away from the prop: loose clothing, shirt sleeves, ties, scar s,
long
ir or loose objects such as pencils or screwdrivers that may fall out
of shirt or jacket pockets into the prop.
Failure to follow these safety precautions may result in severe injury
to yourself and others
.
Range Check
Ground check the operational range of your radio before the first flight of
the da .
efer to the instruction manual supplied
If the control sur aces do not respond correctly,
do not fly! Find and correct the problem first. Look for loose servo
connections or broken wires, corroded wires on old servo connectors,
poor solder joints in your battery pack or a defective cell
y To check the range r
with
your RC set (transmiter).
f
.
Ground Check
Before ou fly ou should per orm one last overall inspection to make sure
the model is truly ready to fly and that ou haven't overlooked anything. If
ou are not thoroughly familiar with the operation of R/C models, ask an
experienced modeler to per orm the inspection. Check to see that ou
have the radio installed correctly and that all the controls are connected
properly. The motor must also be checked by confirming that the prop is
rotating in the correct direction and the motor sounds Iike it is reaching full
power. Make certain all control surfaces (elevators, rudder, ailerons) are
secure, the pushrods are connected, the controls respond in the correct
direction, radio components are securely mounted and the C.G. is correct.
y
y
f
y
y
f
y
Carefully balance your propeller
and spare propellers before ou fly.
heck if the shaft is
bent An unbalanced prop
can be the
single most significant cause of vibration that can damage your model. Not
only will motor mounting screws and bolts loosen, possibly with disastrous
effect, but vibration may also damage your radio receiver and battery.
y
C
not
.
or bent shaft
Follow the instructions that came with your radio to charge the batteries
the evening before ou plan to fly.
ou should always charge the
transmitter batteries before flying and at other times as recommended by
the radio manufacturer.
y
Y
PREFLIGHT
MOTOR SAFETY PRECAUTIONS
The
a great-flying model that fl
smoothly and
predictably. The
does not, however, possess the self-recovery
characteristics of a primary R/C trainer and should be flown only by
experienced R/C pilots. If you are an inexperienced modeler we strongly
urge you to seek the assistance of a competent, experienced R/C pilot to
check your model for airworthiness
to teach you how to fly.
and
aerobatic plane is
y
model
FLYING
The electric motor and battery used in your are very powerful and the
spinning propeller has a lot of momentum; therefore, if you touch the
propeller while it is spinning it may inflict severe injury. Respect the
motor and propeller for the damage it is capable of and take whatever
precautions are necessary to avoid injury. Always disconnect and
remove the battery until you are ready to fly again and always make
sure the switches are turned off before connecting the battery.
Summary of Contents for HC 1710A
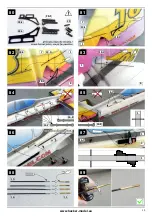
Page 9: ...4mm 4mm 2x 2x S S 40 40 www hacker model eu 9 40 40 17 17 10 27 21 23 25 28 20 22 24 26 29 ...
Page 10: ...3 3 3 3 33 3 4 5 www hacker model eu 10 16 6 16 6 16 6 10 3 39 31 33 35 37 30 32 34 36 38 ...
Page 13: ...2 8 3 www hacker model eu 13 3 69 61 63 65 67 60 62 64 66 68 ...
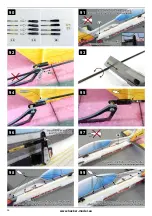
Page 16: ...31 30 www hacker model eu 16 30 36 36 96 98 90 92 94 97 99 91 93 95 ...
Page 17: ...27 27 9 www hacker model eu 17 106 108 100 102 104 107 109 101 103 105 ...
Page 18: ...www hacker model eu 18 16 1 16 1 35 35 116 118 110 112 114 117 119 111 113 115 ...
Page 19: ...www hacker model eu 34 34 10 33 33 19 1 6 2 1 8 2 120 122 124 1 7 2 1 9 2 121 123 125 ...
Page 20: ...D D 275 285mm www hacker model eu 22 22 20 130 132 134 131 133 135 ...

