Hach Ultra ORBISPHERE 3658 Operator'S Quick Manual Download Page 5

Page 5

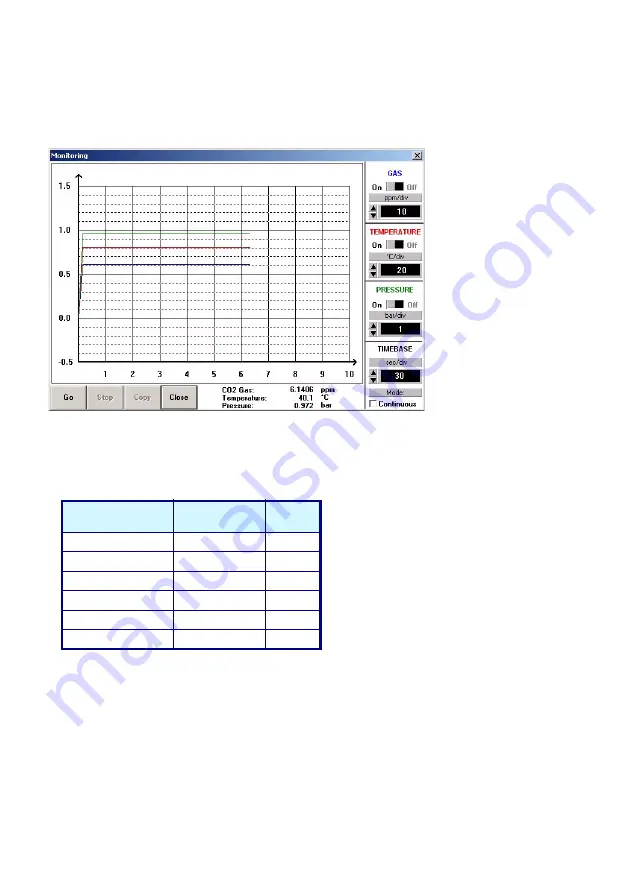
Monitor Measurements in Real-Time

You may wish to analyze a particular sampling point via the Hach Ultra 3658 program's 

Monitoring

menu. To use this Monitoring chart, the analyzer must be connected to your PC.

Choose 

Monitoring

 from

the Hach Ultra 3658 menu
to bring up a chart display.
The chart shows the gas
concentration (in blue),
temperature (in red), and
pressure (in green) as the
sample is being measured
by the 3658 instrument.
T h e   c h a r t   i s   u p d a t e d
directly from instrument
measurements, at a rate
determined by the time
scale set in the 

TIMEBASE

b o x   a t   t h e   l o w e r   r i g h t
corner of the chart.
Click the 

TIMEBASE

 up/

down pointers to change
t h e   t i m e   s c a l e   o f   t h e

divisions of the chart. Each division mark along the baseline (1, 2, ...10) can be made to represent from
30 seconds to 2½ hours, providing from 5 minutes to 25 hours of continuously displayed samples (as
illustrated in the table).

Click on the 

Continuous

 box to enable or

disable continuous charting. When this box is
checked, the chart scrolls continuously after
reaching the 

10

 division, and the oldest

samples are lost off the left of the chart. 
When 

Continuous

 is not checked, the chart

stops displaying new results after reaching
t h e  

1 0

  d i v i s i o n ,   a n d   a l l   s u b s e q u e n t

measurements are lost.
C l i c k   t h e   u p / d o w n   p o i n t e r s  f o r   e a c h
m e a s u r e m e n t   v a r i a b l e   (

G A S

,

TEMPERATURE

 and  

PRE SSURE

)   t o

change the scaling of that value on the chart. The display of each measurement variable may be turned
on or off by choosing the appropriate 

On

 or 

Off

 switch.

A running display of latest sample 

Gas

Temperature

 and 

Pressure

 is also shown in the bottom-right

corner of the chart.
Use the buttons at the bottom of the chart to control real-time monitoring. Choose 

Go

 to clear the chart

and start real-time monitoring, 

Stop

 to stop monitoring and 

Copy

 to copy the data from the chart as text

information to the Windows Clipboard. This information can be pasted from the clipboard into any
Windows application, such as a spreadsheet or word processor. 
Choose 

Close

 to close the Monitoring window.

Measurement (cont)

Timebase

Updating Rate

Max. 

Samples

30 Seconds/Division

5 Secs/Sample

60

1 Minute/Division

5 Secs/Sample

120

10 Minutes/Division

5 Secs/Sample

1,200

30 Minutes/Division

9 Secs/Sample

2,000

1 Hour/Division

18 Secs/Sample

2,000

2.5 Hours/Division

45 Secs/Sample

2,000

Summary of Contents for ORBISPHERE 3658

Page 1: ...Operator Quick Guide ORBISPHERE 3658 Revision A 28 04 2008 ...

Page 2: ... performs a series of start up tests before switching to measurement mode MEAS places the instrument in measurement mode CAL calibrates the analyzer against a reference sample This button can be locked out from the Hach Ultra 3658 PC program STO stores a measurement value into memory The Ø keys toggle between gas concentration and temperature measurement displays in measurement mode increases or d...

Page 3: ...hing the instrument back ON The LCD displays the message Sto for about one second Gas concentration measurements are displayed for about two minutes After two minutes the instrument displays the sample number starting at 000 then the gas concentration measurement value followed by to indicate the measurement is being stored This storage sequence repeats automatically at the rate specified To end a...

Page 4: ...time stamp and a sample description Altering Sample Point Description For help in identifying the locations of various sampling points that are stored you may choose the Sampling Point Description command from the Logger menu The measurement values to be placed in positions 0 through 499 can be described however you wish Double click on a particular position or click Modify then type a description...

Page 5: ... oldest samples are lost off the left of the chart When Continuous is not checked the chart stops displaying new results after reaching the 10 division and all subsequent measurements are lost Click the up down pointers for each measurement variable GAS TEMPERATURE and PRESSURE to change the scaling of that value on the chart The display of each measurement variable may be turned on or off by choo...

Page 6: ...e valid for CO2 gas measurement with this analyzer To ensure the analyzer is correctly configured choose Membrane to bring up the box which reveals the membrane models available Membrane 29561A should be the only membrane available for selection SETTING SAMPLING INTERVALS The analyzer can perform as a standalone data acquisition device automatically recording gas measurements with the date and tim...

Page 7: ...tion AUTOMATIC SHUTDOWN Choose Automatic Shutdown Status from the Configuration menu to activate the Automatic Shutdown feature If you select Enable the instrument switches off automatically after 10 minutes of inactivity thereby economizing battery power MEASUREMENT MODE Choose Measurement Mode to enable maximum measurement mode for sampling in bottles and cans In Maximum measurement mode the ins...

Page 8: ... same temperature as the calibration sample Therefore allow some sample to pass through the flow chamber for 3 minutes before calibrating If calibrating in gas ensure that the flow chamber and sensor components are completely dry Remove and blow dry the flow chamber and dry the sensor head surface with a clean soft tissue Ensure that the purge cycle is running correctly by placing the purge gas ex...

Page 9: ... of pure CO2 gas to the inlet of the flow chamber and adjust the gas flow to one bubble per second when the exit tube is immersed in water Press the CAL button A brief clearing message appears Press CAL again within a 3 second period Calibration is successful or in error as defined earlier Calibration in CO2 at Elevated Pressure This method requires an accurate pressure gauge connected to the exit...

Page 10: ... should darken DISPLAY TEST Choosing the Display Test option lets you perform a one way communication between computer and instrument Type a number in the Number box you may also select one of three units positions for the LCD s rightmost indicator bar as well Then choose Send The number and indicator bar placement should appear on your instrument LCD CLOCK SETTINGS Choose the Clock settings optio...

Page 11: ... Membrane not clean Clean system Incorrect solubility curve Change solubility Incorrect calibration Recalibrate High readings Membrane is not at sample temperature Allow sample to flow past the membrane to make sure the membrane is at sample temperature before mak ing measurements Incorrect solubility curve Change solubility Incorrect calibration Recalibrate Message Meaning Pur This message appear...

Page 12: ...nsor Maintenance It is recommended to leave the sensor in place in the instrument when changing the membrane To remove the membrane follow the steps below To avoid any liquid coming into contact with the TC sensor chip via the purge path check that the flow chamber is completely empty of any liquid sample Then remove the flow chamber from the sensor by turning the flow chamber locking nut counter ...

Page 13: ...downwards Take a few membranes out of the storage box Using tweezers included in the kit pick up one membrane from the stack and gently place it on the sensor tip Make sure it is centered If a sensor mask is used place it directly on top of the membrane Note Distinguish the membrane from the protection paper The membrane is transparent translucent The protection paper is opaque The membrane diamet...

Page 14: ...the protection cap with a new one Tighten the protection cap finger tight Then complete the process using the tool provided in the maintenance kit Insert into each of the four holes in turn and tighten as far as possible Tighten each hole only once Note The grille inside the protection cap should be free to move during tightening Therefore and to avoid damage to the membrane do not touch the grill...

Page 15: ...Page 15 ...

Page 16: ......

Reviews: