background image


Copyright © 2011-2012, Hangzhou H3C Technologies Co., Ltd. and its licensors 


All rights reserved 

No part of this manual may be reproduced or transmitted in any form or by any means without prior 

written consent of Hangzhou H3C Technologies Co., Ltd. 

Trademarks 

H3C, 

, Aolynk, 

, H

3

Care, 

, TOP G, 

, IRF, NetPilot, Neocean, NeoVTL, 

SecPro, SecPoint, SecEngine, SecPath, Comware, Secware, Storware, NQA, VVG, V

2

G, V

n

G, PSPT, 

XGbus, N-Bus, TiGem, InnoVision and HUASAN are trademarks of Hangzhou H3C Technologies Co., 

Ltd. 
All other trademarks that may be mentioned in this manual are the property of their respective owners 

Notice 

The information in this document is subject to change without notice. Every effort has been made in the 
preparation of this document to ensure accuracy of the contents, but all statements, information, and 

recommendations in this document do not constitute the warranty of any kind, express or implied. 

Environmental protection 

This product has been designed to comply with the environmental protection requirements. The storage, 
use, and disposal of this product must meet the applicable national laws and regulations. 


Summary of Contents for S12500 Series

Page 1: ...H3C S12500 Routing Switch Series Quick Start Guide Hangzhou H3C Technologies Co Ltd http www h3c com Document version 6PW101 20120508...

Page 2: ...gzhou H3C Technologies Co Ltd All other trademarks that may be mentioned in this manual are the property of their respective owners Notice The information in this document is subject to change without...

Page 3: ...ries 2 Installing the switch 2 Installing the switch in a rack 2 Grounding the switch 5 Installing the power modules 6 Installing a fan tray 8 Installing a card 9 Connecting power cords 12 Verifying t...

Page 4: ...components from being damaged by the electrostatic discharge ESD always wear an ESD preventive wrist strap when you touch the switch cards or ICs and make sure that the wrist strap is well grounded Fi...

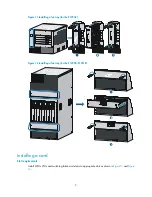
Page 5: ...flow Installing the switch in a rack Check before installation Before installation make sure that the bottom edge of the slide rails or rack shelf aligns with the middle of the narrower metal area be...

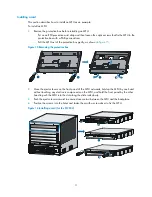
Page 6: ...ositions of the cage nuts on the rack post according to the installation holes on the mounting bracket each installation hole on the mounting bracket corresponds to one cage nut 2 Insert one edge of a...

Page 7: ...brackets for the S12508 S12518 Mounting the switch in the rack 1 Use several people to place the switch on the slide rails or rack shelf and slide the switch into the rack until the mounting brackets...

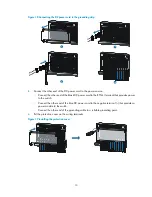
Page 8: ...Grounding the switch 1 Remove the two grounding screws from the switch chassis 2 Use the grounding screws to attach one end of the grounding cable to the chassis 3 Connect the other end of the groundi...

Page 9: ...ower module 1 Rotate the power frame cover up with both hands 2 Pull the clip at the bottom left corner of the power module to the left to open the power module panel 3 Insert the power module slowly...

Page 10: ...odule To install a PEM 1 Loosen the screws on the filler panel of the PEM slot with a Phillips screwdriver to remove the filler panel 2 Insert a PEM slowly along the slide rails until it touches the b...

Page 11: ...module Installing a fan tray NOTE The S12504 has one fan tray Each of the S12508 and the S12518 has two fan trays They are installed in the same way To install a fan tray 1 Remove the blank panel fro...

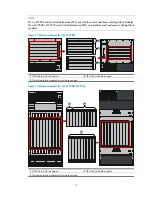
Page 12: ...a fan tray for the S12504 Figure 12 Installing a fan tray for the S12508 S12518 Installing a card Slot requirements Install MPUs LPUs and switching fabric modules into appropriate slots as shown in F...

Page 13: ...U one interface card and seven switching fabric modules Figure 13 Slot requirements for the S12504 1 MPU slots with red edges 2 LPU slots with blue edges 3 Switching fabric module slots with grey edge...

Page 14: ...ly as shown in Figure 15 Figure 15 Removing the protective box 2 Move the ejector levers on the front panel of the MPU outwards hold up the MPU by one hand without touching any electronic components o...

Page 15: ...ction cover in time To connect a DC power cord 1 Remove the protection cover from the power module 2 Loosen the fastening screw on the wiring terminal marked with RTN with an M6 wrench and remove the...

Page 16: ...black DC power cord to the RTN terminal that provides power to the switch Connect the other end of the blue DC power cord to the negative terminal that provides a power module to the switch Connect t...

Page 17: ...different countries or regions see H3C S12500 Routing Switch Series Installation Guide To connect AC power cords 1 Remove the strain relief screws of the power cord retention clip and remove the reten...

Page 18: ...e backplane Power modules are correctly installed and have close contact with the frames The power switch is off the power switch is at the OFF position Power cords are correctly connected MPUs are co...

Page 19: ...operating properly Module LED Status MPU SFC red green Flashing green LC red green Flashing green FAN red green Flashing green PWR red green Flashing green RUN red green Flashing green Ethernet inter...

Page 20: ...on about the LEDs see H3C S12500 Routing Switch Series Installation Guide Obtaining documentation Take the following steps to get related documents from the H3C website at www h3c com 1 Go to http www...

Page 21: ...ch 5 I Installation tools and accessories 2 Installing a card 9 Installing a fan tray 8 Installing the power modules 6 Installing the switch in a rack 2 P Powering on the switch 16 V Verifying the ins...

Reviews: