background image

                                                 Basic Call Features 


   91 


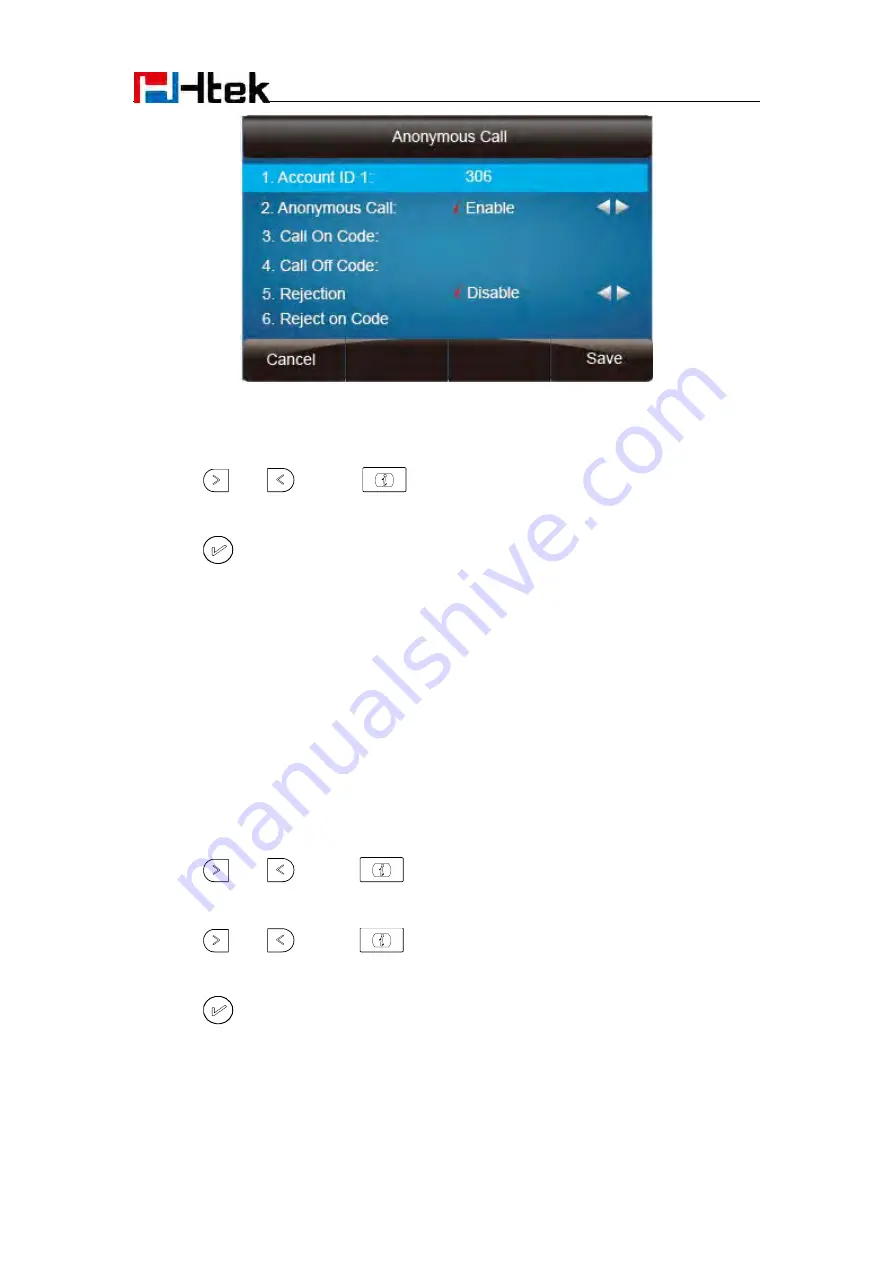
To cancel anonymous call feature 

1.


Press Menu 

Features 

Anonymous Call 

2.


Press 

  and 

  or press 

  key to select the disable choice  in Anonymous Call 

filed.   

3.


Press 

  or Save soft key to save the configuration. 


Reject Anonymous 

If you do not want to be disturb by anonymous  calls, you can set the reject anonymous call 

features, so you will not hear the unknown calls 


To configure rejecting anonymous call 


1.


Press Menu 

Features 

Anonymous Call 


2.


Press 

  and 

  or press 

  key to change the Line ID   


3.


Press 

  and 

  or press 

  key to select the enable choice in Rejection filed.   


4.


Press 

  or Save soft key to save the configuration 

Summary of Contents for UC842

Page 1: ...86 5 8 UC842 Version 1 0 3 82 GIGABITCOLORIPPHONE support h tek com Hanlong Technology Nanjing Co Ltd 86 25 84658050 www h tek com...

Page 2: ...vate use as a user manual No parts shall have the right to alter modify or use as commercial means without the express written permission of Nanjing Hanlong Technology Co LTD Safety cautions To use th...

Page 3: ...Notices Information 2 Cleaning To clean the device use an anti static cloth Please avoid cleaning liquids as they might damage the surface or internal electronics of the phone...

Page 4: ...16 Getting Familiar with Your Phone 17 Hardware Components Preview 17 Icon Preview 19 LED Instruction 24 Power Indicator LED 24 Line LED Line Key set as Line 24 BLF or BLF List Key LED Line Key set a...

Page 5: ...URL 70 Softkey Layout 71 Programmable Key 72 Ext Key 73 Basic Call Features 73 Place a Call 73 End a Call 75 Redial a Call 76 Receive a Call 76 Incoming Call Show Mode 77 Auto Answer 77 Call Hold 78 C...

Page 6: ...20 Send SMS 120 Set SMS Line Key 121 Record 121 URL Record 122 Paging 123 Shared Line 124 Public Hold 125 Private Hold 126 Share line 126 Hot Desking 127 ACD Pending 129 Zero Touch 130 Upgrade 131 Fac...

Page 7: ...te 139 How to use Vlan 139 How to use LLDP 139 How to Set LCD and Web GUI 139 How to Upgrade via FTP 140 How to make Ringtone 140 How to use Open VPN 140 Provisioning Guide on Free PBX 140 Failover No...

Page 8: ...Getting Started 7 Getting Started Packing List The package contains the following parts please check if all the items are not missed 1 The phone device 2 The footstand 3 Handset...

Page 9: ...Getting Started 8 4 Headset cord 5 Power adapter 6 Ethernet cable...

Page 10: ...Getting Started 9 7 Quick installation reference Phone Installation 1 Attach the Foot stand...

Page 11: ...Getting Started 10 2 Connect the Handset and optional Headset...

Page 12: ...ialization After your phone has been powered up the system boots up and performs the following steps Automatic Phone Initialization The phone finishes the initialization process by loading the saved c...

Page 13: ...ult gateway DNS server Status You can view the system status of your phone via phone user interface or web user interface The information of phone status includes Information e g Model IP MAC Firmware...

Page 14: ...Getting Started 13 3 Press Menu Status Account To view the phone status via Web interface Login webpage For How to login please refer to Web Login View the information of Version Account and Network...

Page 15: ...sword admin Accounts Select the desired account Select Enable for Account active Filled the SIP Server Filled the Failover SIP server if need Optional Filled the Outbound Proxy Optional Filled the SIP...

Page 16: ...egister via web interface 1 Login webpage and Click Account Basic 2 Select the desired Account 3 Select Yes for Account Active 4 Filled the Primary SIP SERVER and other account information 5 Click to...

Page 17: ...ce It shows the phone features status More see Icon Preview 3 Line Keys This area shows the four line key labels Line keys are also can be used as other function keys For more information you can refe...

Page 18: ...nts soft keys messages calls and other some information Power Indicator LED To indicate the power status Line keys The phone supported up to 3 accounts 1 Steady green idle interface during a call 2 Bl...

Page 19: ...ll on the screen Mute key 1 To mute the voice during the call green light 2 To un mute the call Conference To place a conference call Line Keys To be configured as different function as 1 Line 2 Speed...

Page 20: ...ecrease the volume To increase the volume Hold To hold or to resume a call during a conversation Information To show the accounts status and some other relevant information Transfer To transfer a call...

Page 21: ...Getting Familiar with Your Phone 20 Line Unregistered Line Ringing Speed Dial BLF BLF Ringing BLF Talking Speakerphone mode Handset mode Headset mode Voice messages...

Page 22: ...Getting Familiar with Your Phone 21 Text message Mute Do Not Disturb Volume is 0 SRTP Hold Dialed calls Received calls Missed calls Forward calls Conference Keypad locked Keypad unlocked Pick up...

Page 23: ...Getting Familiar with Your Phone 22 Call Park Intercom Paging DTMF Prefix XML Group Local Group XML Browser LDAP Broadsoft Group Conference Forward Transfer Hold Line on Hold DND Redial...

Page 24: ...Getting Familiar with Your Phone 23 Call Return SMS Record...

Page 25: ...us setting please refer to LED Status Setting Power Indicator LED Line LED Line Key set as Line Recording Group Listening Shared Line Other Functions LED Status Description Blinked green Ringing or ha...

Page 26: ...Line Key LED Line Key set as Shared Line Other Key Led LED Status Description Stay green Idle status Stay red The line is busy Blinked green Ring Back Private hold Blinked red The line is ringing Stea...

Page 27: ...rmation page 2 Get the full information of the item with When the item with it means the information is not full display or there more options for the item Press info key you can get the complete cont...

Page 28: ...ts keypad and LCD screen constitute the phone user interface which allows the user to execute all call operation tasks and basic configuration changes directly on the phone In addition you can use the...

Page 29: ...Key Overview Key as Send Hot Line Anonymous Call DND History Setting Basic Settings Language Time Date Time Date Format DHCP Time Ring tone Advanced Settings Account Network Factory Reset Auto provis...

Page 30: ...r with Your Phone 29 Pcap Feature Line Key Function Overview Line Speed Dial BLF BLF List Voice Mail Direct Pick Up Group Pick Up Call Park Intercom DTMF Prefix Local Group XML group LDAP XML Browser...

Page 31: ...Forward Transfer Hold Group Listening DND Redial Call Return SMS Record URL Record Paging Shared Line Public Hold Private Hold Basic Features Configuration This part will mainly introduce the basic co...

Page 32: ...the web browser 3 Input the user name default is admin password default is admin 4 Login successfully Note The PC and phone should be in the same segment When register the accounts in web and the serv...

Page 33: ...e administrator is admin To change to password via Phone Interface 1 Press Menu setting Advanced settings password default admin Phone Setting Set Password 2 Enter the current PWD password new passwor...

Page 34: ...phone cannot contact a DHCP server for any reason you need to configure a static IP address manually When switch DHCP Static IP and PPPoE to each other or change the Static IP on webpage it will show...

Page 35: ...o the Internet via PPPoE mode You can set a WAN port to be a PPPoE port The PPPoE port will perform a PPP negotiation to obtain the IP address Contact your system administrator for the PPPoE user name...

Page 36: ...tting Advanced Settings password admin Network WANPort DHCP mode 2 Click Save and restart the phone To configure Network via web interface 1 Click Network Basic 2 Select the desired Type DHCP Static o...

Page 37: ...administrator PC Port Three modes for PC port bridge connect to Expansion Module and router To configure PC Bridge via Phone interface 1 Press Menu Setting Advanced Settings password admin Network PC...

Page 38: ...admin Network PC Port Connect to Expansion Module 2 Enter the IP Netmask and DHCP server 3 Click Save 4 Back to Idle interface and Click the OK button then the phone will reboot To configure Bridge v...

Page 39: ...ansion Module via web interface 1 Click Network Basic 2 Select As Connect to Expansion Module 3 Click and the phone will reboot automatically Display Mode This phone support two Display mode Text and...

Page 40: ...Select Text or Icon 3 Press Save soft key to save the configuration To Configure Display mode via web interface 1 Login web interface and click Setting Preference 2 Select Icon Mode or Text Mode for...

Page 41: ...Basic Features Configuration 40 2 Press or Save soft key to save the configuration To change the language via Web Interface...

Page 42: ...urrently loaded to the IP phone Time and Date The time and date show on the idle page and it can be set and change by SNTP server automatically or manual setting To configure the time and Date by SNTP...

Page 43: ...e manually via phone interface 1 To press Menu Setting Basic setting Time Date Manual Settings 2 Press and or change the right time or you can input the right time 3 Press or Save soft key to save the...

Page 44: ...or Save soft key to save the configuration To configure the DHCP time via phone interface 1 To press Menu Setting Basic setting DHCP time 2 Press and or press to change between Disable and Enable 3 Pr...

Page 45: ...guration 44 2 Setting Date Time NTP Server 3 Fill the value in the blank To change the Time Zone and Date Display Format via web interface 1 Setting Date Time 2 Select the necessary one 3 Press to sav...

Page 46: ...ormation Ring Tone You can adjust the type and volume of the ring tone To adjust the Ring Tone Type via Phone interface 1 Press Menu Setting Basic Settings Ring Tone 2 Press and to select the aimed on...

Page 47: ...tory 2 Select the target contact 3 Press Detail soft key to edit the contact 4 Press and to select the wanted Ring Tone for the contact 5 Press Save soft key to save the contact To configure Distincti...

Page 48: ...Basic Features Configuration 47 3 Click to save the configuration Click Ring tone for more information Volume You can adjust the volume for the phone by the volume keys and...

Page 49: ...ace 1 Option 1 To press and on the idle page 2 Option 2 To press and during the call is ringing To adjust the handset volume via phone interface To press and during a call in handset mode To adjust th...

Page 50: ...speaker mode Wallpaper To change the preferred one picture for you by the following steps To change the wallpaper via phone interface 1 To press Menu Display wallpaper 2 Press and or press Switch sof...

Page 51: ...Preference 2 Select the desired wallpaper picture to upload 3 Click to save the setting To delete the wallpaper via web interface 1 Click Setting Preference 2 Select the desired wallpaper to delete 3...

Page 52: ...play the time and the entered value in turns To enable screen saver via Phone interface 1 To press Menu Display Screensaver 2 Press and or press Switch soft key to Choose the Time out as 1 min or 2 5...

Page 53: ...interface 1 Setting Preference 2 Choose the picture wanted to use as screen saver 3 Click to save the upload picture To delete upload screen saver phone via Web interface 1 Setting Preference 2 Selec...

Page 54: ...to save the configuration To wake up screen saver via Web interface 1 Click Setting Preference 2 Choose Dial First Digit Screensaver Wakes up or Screensaver Wakes up and Dial Note 1 The upload Photo...

Page 55: ...tions for managing contacts The topics include Local Directory Blacklist Remote Phonebook Call History LDAP BroadSoft Phonebook CallLog Local Directory In the directory you can add or delete your frie...

Page 56: ...the contacts successfully To add contacts from history via phone interface 1 Press History soft key or press Menu History Local history 2 Press and to select the targeted one Press and switched among...

Page 57: ...Basic Features Configuration 56 To add contacts via web interface 1 Click Directory Directory 2 Enter the name number and some other information 3 Press and then press button...

Page 58: ...cts successfully To add blacklist from history via phone interface 1 Press History soft key or press Menu History Local History 2 Press and to select the targeted one 3 Press Option soft key Add to Bl...

Page 59: ...show the contact photo Note The format of the photo supported is jpg or bmp and the size shoud be less than 128 128 To import or export the contact list You can manage your phone s local directory via...

Page 60: ...act list To import a CSV file of contact list via web interface 1 Click on Directory 2 Click Browse to select a contact list file file format must be csv from your local system 3 Click Import Csv to i...

Page 61: ...m Note Every remote contact only support 1000 contacts Call History This phone maintains call history lists of Dialed Calls Received Calls Missed Calls and Forwarded Calls The call history list suppor...

Page 62: ...eft Key to switch among All Calls Missed Calls Received Calls Dialed Calls and Forwarded Calls 3 Press to select the desired entry 4 Press the Option soft key and then select Detail from the prompt li...

Page 63: ...1 Press the History soft key 2 Press Right or Left Key to switch among All Calls Missed Calls Received Calls Dialed Calls and Forwarded Calls 3 Press the Option soft key and then select Delete All fro...

Page 64: ...soft key or or or the corresponding line key LDAP Phonebook When use the LDAP feature you can get the LDAP Phonebook directly To configure LDAP via web interface 1 Login webpage and click Directory L...

Page 65: ...aximum number of the search results to be returned by the LDAP server 7 LDAP Display Name the display name of the contact record displayed on the LCD screen 8 Filled the relative value and then click...

Page 66: ...1 Press Menu Feature Function Keys Line Keys as Function Keys Memory Key 1 2 Select LDAP in the Type field 3 Press save or OK key to save the configuration When press the LDAP Key the LCD will display...

Page 67: ...roadsoft 2 Select the desired Broadsoft Item 3 Enter the Display name 4 Enter the Server port User and password 5 Click to save the configuration Call log You can access the call log of the BroadSoft...

Page 68: ...rver port User and password 5 Click to save the configuration Other features settings Dial Plan Dial plan is a string of characters that governs the way this phone processes the inputs received from y...

Page 69: ...1 replace digit 2 with 011 when dialing To configure dial plan via web interface 1 Click Account Advanced Dial Plan 2 Filled the value in dial plan field 3 Click SaveSet to save the configuration Note...

Page 70: ...be easily remembered and dialed quickly Some countries have a different emergency number for each of the different emergency services You can specify the emergency telephone numbers on the IP phone fo...

Page 71: ...e Message Status 3 Click for the setting For the LED status description see LED Instruction Power Indicator LED Action URL To configure action url via web interface 1 Click Setting Action URL 2 Filled...

Page 72: ...or talking To configure Soft key via web interface 1 Click Setting Soft key Layout 2 Select Enable for Custom Soft key 3 Select call States 4 Select the feature form the disable key to enable key fie...

Page 73: ...ck by press more Programmable Key For the default keys as Soft keys Navigation keys and so on you can define them as some specific feature and it works only on the idle page To configure Programmable...

Page 74: ...40 User manual Basic Call Features Place a Call There are three ways to dialing a call Handset Headset and Hands free speakerphone To place a call by Handset 1 Pick up the handset or press a line key...

Page 75: ...Preference 2 HeadSet Priority Enable 3 Ring Device For HeadSet User Headset 4 Press Placing a call by hands free speakerphone 1 Press the or press the Line key then you can hear the dial tone 2 Press...

Page 76: ...count 1 Press a line key and dial one phone number then make a call 2 Press the corresponding line key 3 Dial another phone number 4 Press the Send soft key or then make the second call End a Call Her...

Page 77: ...eceive a call by headset Press and now the conversation is built To receive a call by hands free speaker 1 Option 1 Press directly 2 Option 2 Press Answer soft key 3 Option 3 Press the Line key flashe...

Page 78: ...incoming call and the account which is connecting To set incoming call show mode via web interface 1 Click setting preference 2 Select the desire mode for the incoming call show mode 3 Click to save t...

Page 79: ...ration To Disable Auto Answer via Webpage 1 To Click Account Advanced 2 To choose No for the Auto Answer 3 To click Saveset to save the configuration Call Hold When use hold feature the Hold icon will...

Page 80: ...Resume soft key or to resume the call on hold Call Transfer This phone supports blind attended and Semi Attended Transfer Blind Transfer When you use this feature you can transfer 1 Press or Transfer...

Page 81: ...ation the call is on hold now 2 Enter the number transfer to and then press then you can here the ring tone 3 Press or the Tran soft key and now the Semi attended transfer completed BLF Transfer 1 Set...

Page 82: ...nd B in the same call and the transfer is successful Transfer to New Call via web interface 1 Click Setting Feature 2 Select Transfer Mode via DSS key New Call 3 Select the desired Line and select Tra...

Page 83: ...red the coming call could use this function Call Conference This IP Phone supports up to 5 way conference 5 way conference 1 Assuming that call party A and B are in conversation A wants to bring C D a...

Page 84: ...of D and then press send soft key or 8 D answering the call 9 A press or the conference soft key then A B C and D are now in a conference and now this is 4 way conference 10 A press line 4 key the ca...

Page 85: ...r 4 To realize the 5 way conference the line should be all available 5 Press to get all parties information Call Forward This phone supports static forward always forward busy forward and no answer fo...

Page 86: ...e the incoming calls are immediately forwarded if the phone is busy 1 Press Menu Features Call forward Busy forward 2 Press and or press to select the enable choice 3 Enter the forward to number and o...

Page 87: ...ures Call forward No answer forward 2 Press and or press to select the enable choice 3 Enter the forward to number and on code optional off code optional 4 Press or Save soft key to save the configura...

Page 88: ...ancel the forward feature via Phone Interface 1 Option 1 To press the key to disable the forward feature 2 Option 2 Press Menu Features Call forward Always Busy No answer Forward Press and or press to...

Page 89: ...he call is forwarded Note If the Programmable Key or line key is set as BLF when an incoming call ringing press this BLF key directly to realize the dynamic forward Call Return This feature allows you...

Page 90: ...the Call Return via Web interface 1 Click Function keys Line key 2 Select the desired Line key and select Call Return in the Type 3 Click the to save the configuration Call Waiting Tone 1 Click Setti...

Page 91: ...r ID do not appear on the other phone that you called To configure anonymous call 1 Press Menu Features Anonymous Call 2 Press and or press to change the Line ID 3 Press and or press to select the ena...

Page 92: ...figuration Reject Anonymous If you do not want to be disturb by anonymous calls you can set the reject anonymous call features so you will not hear the unknown calls To configure rejecting anonymous c...

Page 93: ...ress and or press key to select the disable choice in Rejection filed 3 Press or Save soft key to save the configuration Call Mute When you use the Mute feature the other parties will not hear your vo...

Page 94: ...en you use the DND feature the phone is to reject all incoming calls automatically and you can see the mute icon shown on the Top of the LCD on idle page To enable DND feature Press the DND soft key w...

Page 95: ...ble choice 3 Press or Save soft key to save the configuration No Key Entry Timeout No Key Entry Timeout means that when you entry the number it will dial out automatically after some time when you sto...

Page 96: ...change choose lock type All Keys Menu Key Function Key Lock Answer 3 Press Save or OK key to save the configuration To enable Keypad Lock via Phone 1 Press Menu Settings Advanced Setting Phone Setting...

Page 97: ...mber can be sent 5 To click to save the configuration To Disable Keypad Lock via Webpage 1 Click Webpage Setting Features 2 To choose Disable for the Phone Lock 3 To click to save the configuration Ho...

Page 98: ...on To configure Hotline auto dial via Web Interface 1 Setting Features 2 Fill the number in the Hotline Number and the Hotline Time out 3 Click to save the configuration Delete the hotline number and...

Page 99: ...ey and set as Line 3 Select the Account 4 Click the to save the configuration Speed Dial With this feature you can dial one directory by press the definite key To configure Speed Dial feature via phon...

Page 100: ...Select the Account ID 5 Click the to save the configuration BLF You can use the BLF Busy Lamp Field feature to monitor a specific one whether his phone is busy or free 1 When the monitored line is id...

Page 101: ...Code 7 Press or Save soft key to save the configuration To configure a BLF key by web 1 Click Function keys Line key 2 Select the desired Line key and select BLF in the Type 3 Enter the monitored pho...

Page 102: ...y Features Settings 101 After setting the BLF key do not need to restart the phone BLF List To configure BLF List via web interface 1 Login and click Account 2 Click Advanced and then fill the Eventli...

Page 103: ...elect Account 3 4 Click Saveset to save the configuration and then restart the Phone For more information please check BLF list Note on www h tek com Voice Message This phone supports Voicemail and wh...

Page 104: ...onfigure Voice Mail Line Key via Web Interface 1 Click Function keys Line Key 2 Select the wanted Key 3 Enter the desired voicemail feature codes in the Value field 4 Filled the Label displayed on LCD...

Page 105: ...p the set line when it ringing To configure Direct Pickup feature via phone interface 1 Press Menu Features Function Keys Line keys as Function Keys Line key1 for example 2 Press and or press key to s...

Page 106: ...ys Line key1 for example 2 Select the wanted Line key 3 Press and or press key to select the Group Pickup in the type field 4 Enter pickup code and followed the desired group number 5 Press or Save so...

Page 107: ...or example 2 Select the wanted Line key 3 Press and or press Switch soft key to select the Key Event in the type field 4 Press and or press Switch soft key to select the Call Park 5 Press or Save soft...

Page 108: ...tion Keys Line keys as Function Keys Line key1 for example 2 Press and or press key to select the intercom in the type field 3 Enter the intercom codes followed by desired number 4 Press or Save soft...

Page 109: ...advanced 4 Enable the Allow Auto Answer By Call Info 5 Click the button to save the configuration Note This feature is not available on all servers For more information contact your system administra...

Page 110: ...Select the wanted Line key 3 Press and or press key to select the DTMF in the type field 4 Enter the value with the Desired DTMF number 5 Press or Save soft key to save the configuration To configure...

Page 111: ...keys as Function Keys Line key1 for example 2 Select the wanted Line key 3 Press and or press key to select the Prefix in the type field 4 Enter the value with with number that you want to set as pref...

Page 112: ...Press and or press key to select the Local group in the type field 4 Press or Save soft key to save the configuration To configure the Local Group via Web interface 1 Click Function key Line Key 2 Sel...

Page 113: ...oup in the type field 4 Press or Save soft key to save the configuration To configure the XML Group via Web interface 1 Click Function key Line Key 2 Select the desired Key and select XML group in the...

Page 114: ...nfiguration XML Browser You can use this key feature to access the Xml browser quickly The Xml browser allows you to create custom services which meet your functional requirements on the server You ca...

Page 115: ...r e g http 192 168 0 240 8080 xmlbrowser text xml 4 Click the button to save the configuration Broadsoft Group When use the BroadSoft Group feature press the key and enter the Remote Contacts interfac...

Page 116: ...ammable key to be used as a conference key This key works same as To configure the Conference via Phone Interface 1 Press Menu Features Function Keys Line keys as Function Keys Line key1 for example 2...

Page 117: ...ple 2 Select the wanted Line key 3 Press and or press key to select the Forward in the type field 4 Enter the Number that to forward 5 Press or Save soft key to save the configuration To configure For...

Page 118: ...and select Transfer in the Type 3 Enter the Value with the number that wanted transfer to 4 Click the button to save the configuration Hold The key can be configured as a hold key You can use this ke...

Page 119: ...nu Features Function Keys Line keys as Function Keys Line key1 for example 2 Select the wanted Line key 3 Press and or press key to select the group listening in the type field 4 Press or Save soft ke...

Page 120: ...mory Key 2 Select the desired Key and select DND in the Type 3 Click the button to save the configuration To enable DND feature Press the DND soft key when the phone is idle status and then DND icon s...

Page 121: ...ccount from which account the SMS sent 3 Enter the target number 4 Input the content of SMS and click Send To send SMS via phone interface 1 Click Menu Message Text Message Set SMS 2 Enter the content...

Page 122: ...Press or Save soft key to save the configuration To configure SMS via Web Interface 1 Click Function keys Line Key 2 Select the desired Key and select SMS in the Type 3 Click the to save the configura...

Page 123: ...ction keys Line key 2 Select the desired Line or Memory key and select Record in the Type 3 Click the button to save the configuration Note Please contact the system administrator whether support this...

Page 124: ...Line key 2 Select the desired Line or Line key and select URL Record in the Type 3 Click the button to save the configuration Paging With this feature you can call a paging group directly To configur...

Page 125: ...ared line via phone interface 1 Press Menu Features Function Keys Line keys as Function Keys Line key1 for example 2 Select the wanted Line key 3 Press and or press key to select the Shared Line in th...

Page 126: ...onging to that particular SLA group can use this key to hold or resume a call To configure the Public hold via phone interface 1 Press Menu Features Function Keys Line keys as Function Keys Line key1...

Page 127: ...the Private Hold 4 Press or Save soft key to save the configuration To configure private hold via Web Interface 1 Click Function keys Line Key 2 Select the desired Key and select Private hold in the...

Page 128: ...er in the value field 5 Select the desired account in the Account field 6 Press or Save soft key to save the configuration To configure the share line feature via web interface 1 Click Function keys l...

Page 129: ...rface 1 Press Menu Features Function Keys Line or Memory keys as Function Keys Memory key1 for example 2 Select the wanted Line or Memory key 3 Press and or press key to select the hot desking 4 Enter...

Page 130: ...o require assistance from any of multiple persons at the earliest opportunity The ACD feature on the Htek IP Phone allows the ACD system to distribute calls from large volumes of incoming calls to the...

Page 131: ...rator Zero Touch You can use this key feature to configure auto provision and network parameters quickly This feature is supported on the version 1 0 3 82 or later To configure the zero touch via phon...

Page 132: ...the Next softkey again you can configure auto provision information 5 When you finish the setting you can press the OK to accept the changes Note This feature is not available on all servers For more...

Page 133: ...2 Pcap Feature To use pcap via web interface 1 Click Management Tools 2 Click Start and then operation the phone 3 When finish the operation click stop and then click Export 4 Then you ll get the Pacp...

Page 134: ...irmware mycompany com 5688 Hanlong e g www mycompany com 5688 fm Hanlong e g 218 2 83 110 Instructions for firmware upgrade via HTTP 1 End users can choose to download the free HTTP server from http h...

Page 135: ...erver is found and a new code image is available the UC8xx will attempt to retrieve the new image files by downloading them into the UC8xx s SDRAM During this stage the UC8xx s LEDs will blink fastly...

Page 136: ...pgrade firmware locally in a controlled LAN environment To upgrade manually via the Web configuration interface 1 Click Management Upgrade 2 Click Brower or the blank 3 Select the firmware fw8xx rom a...

Page 137: ...Upgrade 136 To Restore a configuration file 1 Click Management Configuration Restore configuration 2 Select the xxx bin or xxx xml file and then Click the then IP Phone will reboot...

Page 138: ...he phone and the Ethernet cable is not loose Ensure that the switch or hub in your network is operational Contact your system administrator for more information Why can t I get a dial tone Check for a...

Page 139: ...Troubleshooting 138 How to download XML Configuration Click Management Configuration How to Import Trusted CA certificate Click Management Trusted CA...

Page 140: ...ease click VLAN Note VLAN Notes including 1 Voice VLAN 2 Major Benefits of Using VLANs 3 VLAN discovery method on Htek ip phones 4 LLDP Feature on Htek IP Phones 5 Supported TLVS of IP Phones 6 Config...

Page 141: ...w to use Open VPN Click Open VPN note Provisioning Guide on Free PBX Click Set Auto Provision on FreePBX Failover Notes Click Failover Note How to Upload Wallpaper Click Wallpaper Upload Notes How to...

Page 142: ...Troubleshooting 141...

Reviews: