H-Star HP-66 Owner'S Manual Download Page 27

27

AUTO ACCOMPANIMENT

AUTO BASS CHORD FINGERING continued

FINGERED MODE

 - The fingered mode is ideal if you already know how

to play chords on the keyboard.  It allows you to play the chords in
the auto accompaniment section of the keyboard that produce the
selected auto accompaniment pattern.

Please note

, if a chord played cannot be recognized (fingered

beyond the table), the previous chord will keep playing.  An unrec-
ognized chord cannot start a bass chord in the straight start mode,
and cannot start the auto accompaniment in the synchronized start
mode.  The 

Fingering Guide

 table below lists all of the 31 play-

able chords of this mode.
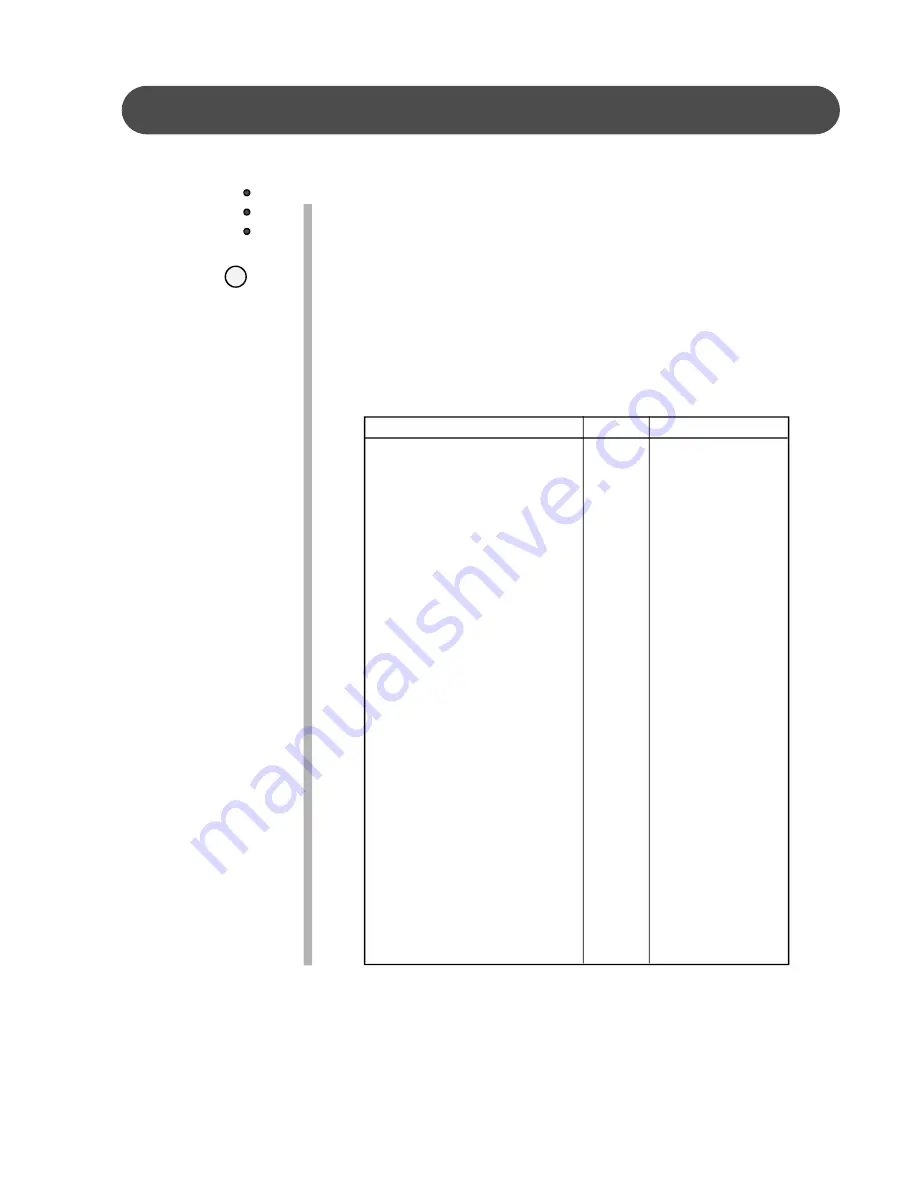
FINGERING GUIDE

Chord

Mark

Fingering

Major

M

1-3-5

Major sixth

M6

1-3-5-6

Major seventh

M7

1-3-(5)-7

Major seventh sharp eleventh

M7 #11

1-(2)-3-#4-(5)-7

Major add ninth

M 9

1-2-3-5

Major seventh ninth

M7 9

1-2-3-(5)-7

Major sixth add ninth

M6 9

1-2-3-(5)-6

Augmented

Aug

1-3-#5

Minor

m

1-b3-5

Minor sixth

m6

1-b3-5-6

Minor seventh

m7

1-b3-(5)-b7

Minor seventh flatten fifth

m7b5

1-b3-b5-b7

Minor add ninth

m 9

1-2-b3-5

Minor seventh add ninth

m7 9

1-2-b3-(5)-b7

Minor seventh add eleventh

m7 11

1-(2)-b3-4-5-(b7)

Minor major seventh

mM7

1-b3-(5)-7

Minor major seventh add ninth

mM7 9

1-2-b3-(5)-7

Diminished

Dim

1-b3-b5

Diminished seventh

Dim7

1-b3-b5-6

Seventh

7

1-3-(5)-b7

Seventh suspend fourth

7sus4

1-4-5-b7

Seventh add ninth

7 9

1-2-3-(5)-b7

Seventh sharp eleventh

7 #11

1-(2)-3#4-(5)-b7

Seventh thirteenth

7 13

1-3-(5)-6-b7

Seventh flatted fifth

7 b5

1-3-b5-b7

Seventh flatted ninth

7 b9

1-b2-3-(5)-b7

Seventh flatted thirteenth

7 b13

1-3-5-b6-b7

Seventh sharp ninth

7 #9

1-#2-3-(5)-b7

Major seventh augmented

M7aug

1-3-#5-7

Seventh augmented

7aug

1-3-#5-b7

Suspended fourth

Sus4

1-4-5

Please note

, the notes listed in parentheses can be omitted.

 The listed chord fingerings are all in root note position, other inversions can be used with the exception of:

1.  The M6 chords are only recognized in root note position.  All other inversions are interpreted as m7.
2.  The 6 9 chords are only recognized in root note position.  All other inversions are interpreted as minor
chords.
3.  The m6 chords are only recognized in root note position.  All other inversions are interpreted as m7b5.
4.  With aug and dim7 chords the lowest note played is assumed to be the root.
5.  With 7#11 chords the lowest note played is assumed to be the root or b7.

ACCOMP

SINGLE

FINGERED

PIANO

Summary of Contents for HP-66

Page 1: ...1 HP 66 OWNER S MANUAL DIGITAL PIANO...

Page 2: ...2 IMPORTANT SAFETY INSTRUCTION...

Page 3: ...allation This equipment generates uses and can radiate radio frequency energy and if not installed and used in accordance with the instructions may cause harmful interference to radio communications H...

Page 4: ...Lacquer Finish Furniture may be used on the cabinet Do not use paint thinner or petrochemical based polishes LOCATION Do not expose the instrument to the following conditions to avoid deformation dis...

Page 5: ...Manual Bass Chord 28 Auto Harmony 28 FUNCTION 29 Drum Kit Selecting Keyboard Percussion 30 Reverb Level 30 Chorus Level 31 Touch Response 31 Split Point for Lower Voice 32 Split Point for Auto Accompa...

Page 6: ...side then insert the cover 2 CROSS BAR INSTALLATION Attach the pedal cross bar to the leg with the screw 1 ASSEMBLY You have hardware for installation in the accessory bag listed below 1 Screw M6X20 1...

Page 7: ...LLATION Attache the back board to the legs with the screw 3 Headphone Holder 5 POWER SUPPLY CONNECTION Plug the power cord into the receptacle located on the bottom of the piano Plug the 3 pin plug in...

Page 8: ...nal amplification such as a home stereo PA system or other stand alone amplifiers 4 MIDI IN MIDI OUT This piano contains MIDI in and MIDI output ports MIDI jacks allow communication with other product...

Page 9: ...MPO buttons or the YES and NO buttons simultaneously to recall the default tempo setting for the selected rhythm style After three seconds the display will revert to the selected voice There is a four...

Page 10: ...hand section a different voice can be assigned To select a new Lower instrument voice use the Yes or No buttons within 4 seconds after the Lower button has been pressed 7 SYNC START Synchronized Star...

Page 11: ...ttern of one or two measures for each style Press the FILL IN button at any time while the accompaniment is playing to add a fill in If you hold down the FILL IN button the fill in pattern will repeat...

Page 12: ...e is active The selected voice name and its number will be shown on the display Please see the Key board Voices section of this manual for more information 15 QUICK SELECT STYLE BUTTONS There are ten...

Page 13: ...ect an instrument voice by pressing one of the voice select buttons Or press the VOICE button to engage the voice selection mode While its indicator light is lit you can use the number pad to select a...

Page 14: ...the manual for more information 23 NUMERIC PAD Use the YES NO or the numeric pad to input numbers directly while using the voice style or function settings These buttons are also used to access or alt...

Page 15: ...anged in the function menu Reverb Level Please see the Function Section for more information 26 CHORUS The Chorus effect adds depth and spaciousness to the selected keyboard voice Press the CHORUS but...

Page 16: ...ormation 29 ACCOMP PLAY ALL This is a dual function button for Record and USB Flash Drive modes In the Record mode this button is used to select the auto accom paniment track of a song for recording o...

Page 17: ...ecording In the Card mode it functions as utility access button which in cludes solo mute and delete for a selected song in the USB Flash Drive Please see the Record and USB Flash Drive sections of th...

Page 18: ...dly until you press the demo button again to stop There are 50 songs for the musical training course that can also be played back for demonstration Please see the Training section of this manual for m...

Page 19: ...ave selected The voice name and its number will show on the display SELECTING ONE OF THE 138 VOICES 1 If the Instrument Voice Button is not already lit press the VOICE button to engage the voice selec...

Page 20: ...he indicator does not blink for store mode the new voice will become the active voice When User mode exits the User indicator turns Off 5 User Key assignments will be saved after Power Off LAYER DUAL...

Page 21: ...plit Point can play a different instrument voice 2 Use the YES NO buttons or the numeric pad to select the desired voice The display will show the lower voice number and name 3 Press the SPLIT button...

Page 22: ...ECTING ONE OF THE 100 STYLES 1 Press the STYLE button to engage the style selection mode the indicator will light up 2 Use the numeric pad or the YES NO buttons to select a style number while the indi...

Page 23: ...e will be assigned to this button to be available for quick selection If another style is selected while User Key is ON but the indicator does not blink for store mode the new voice will become the ac...

Page 24: ...e ending pattern is engaged SYNCHRONIZED START Synchronized Start engages the accompa niment in standby mode Press the SYNC START button the beat indicator dots above the TEMPO buttons will blink at t...

Page 25: ...t point for the auto accompaniment can be assigned in the Function menu Auto A Split Please see the Function section of this manual for more information VARIATION FILL IN FUNCTION METRONOME If the rhy...

Page 26: ...press the INTRO ENDING button to stop with an ending SINGLE INTELLIGENT MODE Single fingering mode makes it simple to produce four types of orchestrated accompaniment chords using a minimum of finger...

Page 27: ...5 b7 Minor seventh add eleventh m7 11 1 2 b3 4 5 b7 Minor major seventh mM7 1 b3 5 7 Minor major seventh add ninth mM7 9 1 2 b3 5 7 Diminished Dim 1 b3 b5 Diminished seventh Dim7 1 b3 b5 6 Seventh 7...

Page 28: ...keyboard determines the root key of the harmony If more than one note is played only the highest note will add harmony Please note auto harmony is only available when the auto accompaniment is engaged...

Page 29: ...eously will recall the default setting 5 To exit the setup mode press any control button except the YES NO or the FUNCTION button FUNCTION YES 0 NO SONG FUNCTION USER REG PAGE PAGE Equalization PAGE P...

Page 30: ...l another kit is selected 5 To exit the setup mode press any control button except the YES NO or the FUNCTION button If a kit is selected the display will show Percussion ON Use the YES NO buttons to...

Page 31: ...e FUNCTION button TOUCH RESPONSE SETTING The piano offers four types of keyboard touch sensitivity settings soft normal hard and fixed These are also known as velocity settings and are designed to sui...

Page 32: ...the keyboard to the right and the NO button to shift the split point down the keyboard to the left The number pad can also be used to enter the split point directly by key number from G2 C7 Press the...

Page 33: ...ess the YES button to confirm your selection The current har mony type will be shown 4 Use the YES or NO buttons to select a harmony type FUNCTION Harmony Type HARMONY MASTER TUNE The pitch of this pi...

Page 34: ...PAGE t buttons until the Reverb Type menu appears 3 Press the YES button the current reverb type will be shown 4 Press the YES or the NO buttons to select type listed below 1 Small Hall 2 large Hall 3...

Page 35: ...alled Local On If you desire you could mute the piano but simply send out the MIDI messages This mode is called Local Off 1 Press the FUNCTION button 2 Press the PAGE s or the PAGE t buttons until the...

Page 36: ...are two tracks available for recording the melody these are assigned by pressing the MELODY 1 or the MELODY 2 button Auto Accompaniment will record all the auto accompaniment events just as they are p...

Page 37: ...e recorded in the ACCOMP track An unrecognized chord in the fingered mode cannot start the recording Record the Auto Accompaniment and a Melody Track If you want to record a melody and the accompanime...

Page 38: ...ing the TEMPO buttons You may also play on the keyboard while the recording is playing back 4 Press the PLAY STOP button again to stop the playback Playback will stop automatically when the recording...

Page 39: ...er parameters that you wish to save 2 Hold down the REG button 3 Press one of the number pads 1 9 The display will show the current registration memory number with a b prefix Your panel setting will b...

Page 40: ...ect a song The song number will appear on the display 2 Listen to the demonstration Press the START STOP button to listen to the selected song The chord playing from the auto accompaniment and the tem...

Page 41: ...he START STOP button after the metro nome sound you can play the entire section with both hands with the percussive rhythm or metronome track You may use METRONOME TEMPO button as described above 3 Ch...

Page 42: ...left side panel of the piano 1 MIDI In This terminal receives MIDI data from an external MIDI device 2 MIDI Out This terminal transmits data from this instrument to other MIDI devices The transmitted...

Page 43: ...on this keyboard are fixed as follows Channel 1 Master voice Channel 2 Layer voice Channel 3 Split voice Channel 4 Bass in manual bass chord mode Channel 7 Chord in manual bass chord mode Channel 10 P...

Page 44: ...Sustain 66 Yes Yes Sostenuto 67 Yes Yes Soft pedal 65 X Yes Portamento yes no 80 Yes Yes Reverb 81 Yes Yes chorus program 91 Yes Yes Reverb 92 Yes Yes chorus send level 98 X Yes NRPNL 99 X Yes NRPNH 1...

Page 45: ...AcousticBass 034 Electric Bass finger Finger Bass 035 Electric Bass pick Pick Bass 036 Fretless Bass FretlessBass 037 Slap Bass 1 SlapBass1 038 Slap Bass 2 SlapBass2 039 Synth Bass 1 Synth Bass1 040...

Page 46: ...hoes Echoes 104 FX 8 sci fi Sci Fi ETHNIC 105 Sitar Sitar 106 Banjo Banjo 107 Shamisen Shamisen 108 Koto Koto 109 Kalimba Kalimba 110 Bagpipe Bagpipe 111 Fiddle Fiddle 112 Shanai Shanai PERCUSSIVE 113...

Page 47: ...u Yangqin ErhuYangqin2 7 1 138 Dizi Zheng DiziZheng2 11 1 Please note When the touch sensitivity is in the Soft Normal or Hard mode voice No 137 will sound as Erhu when a key is struck softly and as Y...

Page 48: ...Dance Pop 2 43 80 s Dance 44 Dance 2 45 Techno 46 Rap ROCK 47 Rock1 48 Rock2 49 Slow Rock 50 Rock n Roll 1 51 Rock n Roll 2 52 Surf Rock 53 Jerry BOSSA 54 Bossa Nova 55 Bossa Nova 2 56 Pop Bossa 1 57...

Page 49: ...l Kick Drum 2 Power Kick Drum Side Stick Power Snare Drum 2 Hand Clap Power Snare Drum 1 Low Floor Tom 2 Close Hi hat Low Floor Tom 1 Pedal Hi hat Low Tom Open Hi hat Low mid Tom Hi mid Tom Crash Cymb...

Page 50: ...sa Shaker Belltree Castanets Mute Surdo Open Surdo Orchestra 48 P 8 Orchestra Close Hi hat Pedal Hi hat Open Hi ha Ride Cymbal Stick Square Click Metronome Click Metronome Bell Orche Bass Drum 2 Orche...

Page 51: ...itle row the number in the bracket after the kit name is the MIDI program number The Drum kits name and number that are shown on the LCD display are listed in the second title row The No refers to MID...

Page 52: ...trigger various events such as start stop and Fill In Pedal functions are assigned in the setup menu Pedal Assign Please see the Setup section of this manual for more information 3 SUSTAIN PEDAL When...

Page 53: ...AUTO ACCOMPANIMENT STYLE 100 Auto accompaniment styles 5 quick select style buttons A B select ACCOMPANIMENTCONTROL Sync start Start Stop Introduction Ending Fill In Variation Metronome Auto harmony...

Page 54: ...Rev 3 1 HP 66 OWNER S MANUAL DIGITAL PIANO...

Reviews: