background image

Testing VF-PCM Multiplexers 

LT51 User Manual 

17 

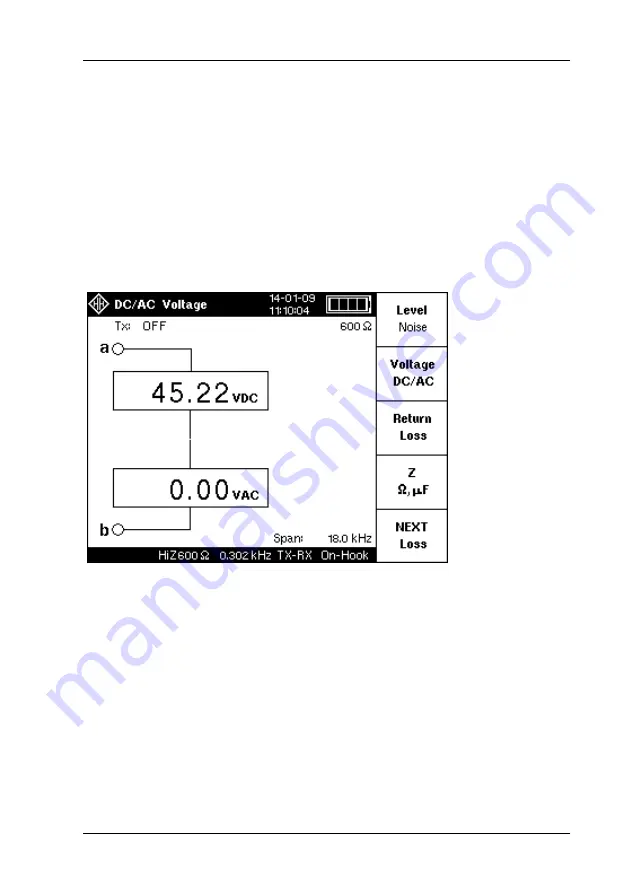
Ring Detect VAC / VDC when on-hook * 

1.  Make the connections between the Test circuit and the LT51 as in Fig. 3.1. 

2.  Turn the LT51 ON. [after Reset: Ztx = 600

, Zrtx = HiZ 600

, TX Source = 

OFF, TX Freq =10 kHz, Mode = TX-RX (4W)] 

3.  Press the [f2] soft-

key to select the ‘Voltage DC/AC’ measurement.  

4.  The DC voltage of the line is displayed. 

5.  Apply ring signal to the RTXab terminals of the LT51. 

6.  You will hear an audible tone indicating the presence of the ring signal. 

When the ring signal is present, the AC (rms) voltage of the signal is 
displayed. 


*Ring voltage cannot be measured when the protection voltage is 60V. See 
specifications. 


Summary of Contents for LT51

Page 1: ...1A LINE TESTER LT51 200 Hz 2 2 MHz H HEUER INSTRUMENTS PTY LTD 766 Pennant Hills Road Carlingford NSW 2118 Sydney Australia Web www heuer com au Tel 61 2 9871 8207 Fax 61 2 9872 5985 Rev 9 1 April 2021 50 75 600 Option ...

Page 2: ...igation is limited at H Heuer Instruments option to refund of the purchase price free of charge repair or replacement of a defective product which is returned to H Heuer Instruments within the warranty period To obtain warranty service the customer must notify H Heuer Instruments of the defect before the expiration of the warranty period and make suitable arrangements for the performance of servic...

Page 3: ...Earth of any RTX a b g terminal is 60 V dc 30 V rms 42 V peak and either TX a b terminal is 60 V dc Never connect the LT51 to an outdoor circuit during lightning storms Disconnect all external cables before accessing the battery compartment There are no operator serviceable parts inside Do not open the case Should the LCD become damaged the liquid crystal material can leak Avoid all contact with t...

Page 4: ... are used in this guide DANGER Risk of electric shock ATTENTION Refer to Manual Equipment is protected by reinforced insulation to protect the user against electric shock Functional Earth Ground Terminal Symbol for Waste Electrical and Electronic Equipment WEEE Recycling according to EU directive ...

Page 5: ... Use Alkaline cells only when the NiMH cells are discharged and the AC adaptor is not available Always replace Alkaline cells with NiMH when available Remove NiMH batteries if the LT51 is going to be stored without use for 6 months or more Always remove Alkaline batteries from the LT51 during storage To change the cells 1 Disconnect all cables from the LT51 2 Turn battery tube cap way anti clockwi...

Page 6: ... is approximately 6 hours for 2100mAh cells When the battery is charging the Red charging LED illuminates When charging is complete the Red LED goes off and the Green DC LED will illuminate WARNING Do not charge Alkaline cells as there is no protection against accidental charging Level of Charge The battery icon in the upper right of every screen indicates the battery charge Four black bars in the...

Page 7: ...ustralia 61 2 9871 8207 Visit our website for the latest list of phone numbers If the LT51 requires repair service centre personnel will provide you with shipping information and repair prices If the LT51 is covered under warranty it will be promptly repaired or replaced at H Heuer Instruments option and returned to you postage paid at no charge If the warranty has lapsed H Heuer Instruments will ...

Page 8: ...ustralia Declare under our own responsibility that Product Name LT51 Line Tester Product Type Test and Measurement Equipment to which this declaration refers conforms with the following relevant standards IEC 61326 2 1 2005 IEC 61010 1 2010 According to the regulations in European EMC directive 2004 108 EC European LVD directive 2006 95 EC Place of Issuance Carlingford NSW Date of Issuance 17 Sept...

Page 9: ...description 1 2 Controls and connections 3 Welcome screen 4 LCD 5 Keypad 6 Test lead connectors 8 Balanced Interfaces 8 Unbalanced Interfaces 8 USB port 9 DC power jack 9 Microphone and speaker 9 Knob 9 LEDs 9 Battery cover 10 Numerical Keypad 10 3 Testing VF PCM Multiplexers 11 Idle Channel Noise 11 Audio Level Setting 12 Frequency Response 13 Variation of Gain with input level 14 Signal to Quant...

Page 10: ...51 Frequency Bandwidth 31 Frequency span 31 Centre Frequency Selective Level Meter 31 Bandwidth Selective Level Meter 32 AFC Automatic Frequency Control 32 Averaging Peak Hold 32 POTS Connection 33 Going Off Hook 33 Auto Answer 33 Dialling 34 Redial 34 Speaker Phone 34 Marker functions 35 Marker to peak 35 Peak tracking 35 Next peak 35 Zero offset 35 Vertical offset 35 Volume control 36 Adjusting ...

Page 11: ... Factor 60 Cable 61 Pulse width 62 Adjusting the TDR display 62 Cursor 62 Vertical zoom 62 Horizontal zoom 63 Horizontal offset 63 Vertical offset 63 Peak Events 64 Dip Events 65 Blind spot 65 Saving measurements 66 Recalling saved measurements 67 Recorder Mode 68 7 PC interface 69 USB drivers 69 LT51View application program 70 Up loading saved measurements 70 Up loading Recorder results 70 Contro...

Page 12: ...NEXT Near End CossTalk 84 DC Voltage Measurement 85 AC Voltage Measurement 85 AC Impedance Measurement 85 10 Specifications 87 Physical 87 Power supply 87 Interfaces 87 Standards compliance 87 Regulatory compliance 87 Sine signal generator transmitter 88 Level meter receiver 88 Selectivity 88 Spectrum analyser 89 Distortion 89 Loss NEXT FEXT measurements 89 Return Loss measurement 89 TDR 89 Voltag...

Page 13: ...corrosion and X Talk are easily located with the LT51 Great care has been taken to achieve easy operation of this instrument Most functions are accessed by a single button press or one further soft key selection Measurement results can be displayed graphically or numerically in DMM mode and can be saved into non volatile memory for later recall or up load to a PC for further evaluation and printin...

Page 14: ...al or Numerical measurement display Marker functions for navigating graphical displays using cursor Remote control of LT51 by PC via serial port over opto isolated USB link Easy test result storage and recall up load to PC for further evaluation End to end testing utilising pair under test to second remote LT51 dial up or dedicated pair Automated Self test sequence ...

Page 15: ...Controls and connections LT51 User Manual 3 2 Controls and connections Figure 2 1 LT51 front panel Knob Microphone Measurement keys Configuration keys Soft keys Speaker On Off key LEDs LCD ...

Page 16: ...clear the LT51 tester has a problem An incompatible version of firmware for the LT51 hardware will cause the screen to hang and display an error message Obtain the correct version of the firmware and down load it now Otherwise the LT51 must be returned to H Heuer Instruments for service This screen can be accessed at any time by the following procedure press the key followed by the f1 Saved Result...

Page 17: ...cy level and Ztx Results displays the test results in DMM graphical format or as lists The current marker position and value are displayed during graphical displays The active RTX terminals filter and range indication are also displayed Configuration Bar displays averaging setting Zrtx Res BW TX interface mode and hook status or cable information during RFL Five softkey labels These labels identif...

Page 18: ...xt Loss Causes the LT51 to go off hook on the RTXa b test leads and function as a telephone dial set Hangs up returns to on hook when this key is pressed again Perform a TDR measurement on the pair connected to the RTXa b terminals Table 2 2 LT51 measurement keys Configure the LT51 receiver parameters at the RTXa b terminals such as Zrtx terminated HiZ range setting and RTX 2 Wire or TX RX 4 Wire ...

Page 19: ...ted directly beside the LCD These are software defined keys called soft keys that carry out commands related to the currently displayed screen To locate the function of a key look on the LCD directly beside the key Table 2 5 Soft keys Provide a 12 key telephone pad so that you can enter numbers the asterisk and pound sign In the correct context such as entering a Save string ID alphabetic characte...

Page 20: ...alance or RFL measurements only not available in this model TX a black and b red The LT51 output TX signals appear at the TXa b terminals See RTX terminal description above when the LT51 is configured in RTX mode Balanced Interfaces The RTXab and TXab terminal pairs are electronically balanced interfaces They are electrically isolated from each other Earth or any external references when the g ter...

Page 21: ...ilt in microphone and speaker is provided for voice conversation when the LT51 is acting as a telephone Line activity and tone reception on the RTXa b terminals can also be monitored with the speaker Knob The knob is used for the following functions setting transmit level and frequency information moving the marker around the spectral display adjusting the speaker volume setting the level meter fr...

Page 22: ...ency it is possible to set the value using the knob or directly via the keypad Once the first digit is entered via the keypad a selection of units appears in the menu next to the soft keys When the desired value has been entered choose the appropriate units to complete the entry of the value If an incorrect digit is entered press the key to erase the last entered digit and then continue ...

Page 23: ...o Term The LT51 RTX input impedance is now 600 terminated 4 Press the key followed by the f1 soft key to set the frequency Span Use the knob to set the span to 4 5 kHz 5 Press the f3 soft key to set BW to PSOPH to make psophometric weighted measurements 6 With TX Source set to OFF a 600 termination is provided by the LT51 TXab terminals 7 The display will show the idle channel noise weighted by th...

Page 24: ...wed by the f4 soft key to set the TX Freq to 1000 Hz using the Knob or Keypad and press the button to clear the Dialog box or appropriate fx soft key if using keypad 6 Press the f2 soft key to set the TX Level This will automatically change TX Source to SINE and output a 0 dBm 1000 Hz signal from the TXab outputs Set the desired TX level using the Knob or Keypad and press the button to clear the D...

Page 25: ... Keypad and press the button to clear the Dialog box or appropriate fx soft key if using keypad 6 Press the key followed the f4 soft key to set the Zero Offset for the level measured at 1000 Hz 7 Press the key followed by the f4 soft key to set the next TX Freq using the Knob or Keypad and press the button to clear the Dialog box or appropriate fx soft key if using keypad Repeat for all frequencie...

Page 26: ... Keypad and press the button to clear the Dialog box or appropriate fx soft key if using keypad 5 Press the key followed by the f1 soft key to set the frequency Span Use the knob to set the span to 4 5 kHz Press the f2 soft key to set Centre Frq to 1014 Hz using the Knob or Keypad and press the button to clear the Dialog box or appropriate fx soft key if using keypad 6 Press the key followed the f...

Page 27: ...SOPH to make psophometric weighted measurements 6 Press the key followed by the f3 soft key to set the TX Source to SINE Press the f4 soft key to set the TX Freq to 1014 Hz using the Knob or Keypad and press the button to clear the Dialog box or appropriate fx soft key if using keypad 7 Press the key followed by the f1 soft key to set Level to make a S ND Signal to Noise and Distortion measurement...

Page 28: ...ted measurements 6 Press the key followed the f3 soft key to set the Source to G227 TEL to transmit the 0 dBm Telephone Noise signal on the TXab terminals 7 The display will show the received level and frequency over the 4 5 kHz BW at the RTXa b input terminals Press Spectral or Numerical to toggle between displays of the signal 8 For NEXT measurements the RTXab terminals should be connected to th...

Page 29: ... Freq 10 kHz Mode TX RX 4W 3 Press the f2 soft key to select the Voltage DC AC measurement 4 The DC voltage of the line is displayed 5 Apply ring signal to the RTXab terminals of the LT51 6 You will hear an audible tone indicating the presence of the ring signal When the ring signal is present the AC rms voltage of the signal is displayed Ring voltage cannot be measured when the protection voltage...

Page 30: ...ge and current through the 600 termination is displayed 5 If connected to the PSTN dial DTMF digits using the keypad to make a connection 6 While TX displays TALK use the hands free telephone to transmit receive speech from the line connected to the RTXab terminals 7 Press the key followed by the f3 soft key to set TX source to SINE and transmit a tone to the line connected to RTXab during Loop ho...

Page 31: ...ystem unit 2 Press the key followed by the f2 Meas Settings soft key Press the f2 Reset LT51 soft key 3 Press the button then the f1 soft key to set ZRTX to 75 Ω HiZ 4 Press f3 RxRange soft key and turn the knob to set the range to 0dB 5 Connect the RF signal to the LT51 RTXab terminals USING the 40dB attenuator VOICE DATA Fc1 Carrier AF VF input 600 Ω RF output 75 Ω terminated Fc2 Carrier PLC 40 ...

Page 32: ... the TXa b outputs Set the desired TX level using the Knob or Keypad and press the button to clear the Dialog box or appropriate fx soft key if using keypad Press the f4 soft key to set the TX Frequency to 3800 Hz using the Knob or Keypad and then press the button to clear the Dialog box or appropriate fx soft key if using the keypad 3 Press the key then the f2 soft key and set the centre frequenc...

Page 33: ...enuator Example Measurement results for 3 frequencies Frequency Hz Theoretical level Measured levels with 40 dB attenuator Tx pilot 499820 26 dBm 14 00 40 26 dBm Rx pilot 500180 0 2 dBm 40 00 40 0 dBm External tone 3800 Hz 496200 32 dBm 7 98 40 32 dBm reception level is attenuated by 28dB 2 dB Press to display the frequency spectrum Press to display the level at different centre frequencies 499 82...

Page 34: ...Testing PLC Systems LT51 User Manual 22 ...

Page 35: ...the button then the f1 soft key to set ZRTX to 75 Ω to make the return loss measurement against a 75 reference 6 Press the key followed by the f4 soft key to set the desired TX Frequency using the Knob or Keypad and then press the button to clear the Dialog box or appropriate fx soft key if using the keypad 7 To set the frequency span manually press the key followed by the f1 soft key Or to make t...

Page 36: ...ncy by pressing the key followed by the f4 TX Freq soft key Use the Knob or Keypad and then press the button to clear the Dialog box or appropriate fx soft key if using keypad OR Press the key to show a graph of the Impedance Magnitude vs Frequency over the selected frequency span Press the key followed by the f1 Span soft key to set the desired frequency span To Disconnector in OPEN position PLC ...

Page 37: ... structures Following are the LT51 configuration keys Configure the LT51 receiver parameters at the RTXa b terminals such as Zrtx terminated HiZ range setting and RTX 2 Wire or TX RX 4 Wire interface Configure the LT51 transmitter parameters at the TXa b terminals such as Ztx output level frequency OFF ON mode sweep mode Controls operation of the marker during graphical display modes Functions inc...

Page 38: ...TE When the transmitter interface is set to RTX any change in the output impedance is reflected back to the input impedance and vice versa Transmit source It is possible to mute the TX output and simultaneously provide a terminated impedance at the TX terminals by setting the Source to OFF Press the key and then f3 to toggle Source between OFF SINE and G227 TEL if fitted The current setting for TX...

Page 39: ...esolution Repeat this process to a resolution of 1 Hz or until the desired frequency is obtained Press the key or any key to clear the dialog box The current setting for TX frequency only if Source is SINE is displayed on the LCD under the current date time in the TXSTATUS area NOTE If the sweeping setting is set to ON the TX frequency is swept over the current frequency span Sweeping Press the ke...

Page 40: ...eas Settings then f4 Sweep Step to show the possible settings for the Sweep Step parameter The Sweeping Step parameter controls the step size between successive sweep frequencies The parameter can be set from 15 pts to 240 pts Selecting 240 pts will result in a fine and accurate sweep at each possible marker frequency at the expense of time while 15 pts will give a coarse but fast sweep over the c...

Page 41: ...dged except in the off hook condition when it is terminated to sink loop current and hold the loop see POTS section a special hybrid is used to ensure the selected AC impedance is provided for making POTS measurements it is only valid for selected TX levels and RX ranges The current setting for Zrtx is displayed in the CONFIG bar along the bottom of the LCD Input bridging To select whether the inp...

Page 42: ...disabled although the setting is not changed during AutoTest mode when sweeping is active when connected to a slave LT51 If any filter is set If the centre frequency is 0 Hz Interface The transmitter can be selected to output a signal only at the TX terminals TX RX interface mode or 4 Wire or also at the RTX terminals RTX interface mode or 2 Wire Ztx and Zrtx can only be set independently when the...

Page 43: ...the LT51 Transmitter is ON sourcing a tone eg Return Loss NEXT Loss Balance etc the span will be automatically set to receive the current Transmit Frequency This does not apply when making selective measurements or when sweeping The following table describes the relationship between frequency spans marker resolution and bandwidths used to measure signals in the LT51 The Res BW is displayed in the ...

Page 44: ...current setting for BW is displayed below the frequency axis or under the frequency result in DMM mode AFC Automatic Frequency Control Press the key and then toggle f4 to set AFC ON or OFF With a centre frequency set and the BW set to 25Hz 1 74 kHz or 3 1 kHz the LT51 will automatically track small changes in the received signal s frequency close to the centre frequency The Centre frequency value ...

Page 45: ...mpedance is terminated to sink loop current and thereby seize the line To ensure the correct AC impedance is presented at the RTX terminals a special hybrid circuit is deployed providing accurate TX levels over the selected frequency span The following restrictions apply when Off Hook PSD modes are not available the RTX terminals are fixed on a b Auto Answer To aid in automatic testing the LT51 ca...

Page 46: ...digits stored in the Redial buffer To view the contents of the Redial Buffer on the LCD press the f2 key Speaker Phone The Hands free Speaker Phone becomes active indicated by Tx Talk in the TxStatus bar when the Line Status changes to Off Hook or a DTMF digit has been pressed It remains active until the Transmitter Source is set to SINE Tx SINE This feature is useful to test the voice quality of ...

Page 47: ...eak The marker moves to the location of the next peak value on the waveform either left or right of the current marker position that is lower than the current marker value Zero offset Press the f4 key Zero Offset to set the current value of the displayed waveform at the marker location as the reference point for any future marker values As the marker is moved along the waveform or the waveform cha...

Page 48: ...e key followed by the f3 LT51 Settings soft key Press the f5 Contrast soft key Turn the knob clockwise to increase or anti clockwise to reduce the contrast of the LCD This value is permanently stored in the LT51 s non volatile memory Turning the backlight on and off When you use the LT51 in low ambient light conditions you can turn on the white LED backlight To toggle the backlight on and off pres...

Page 49: ... press the f1 Date soft key Enter the current date using the keypad digits Pressing the key will advance the cursor to the next digit When the date is correct press any non digit key to exit To modify the time press the f2 Time soft key Enter the current time using the keypad digits Pressing the key will advance the cursor to the next digit When the date is correct press any non digit key to exit ...

Page 50: ......

Page 51: ...tting Softkeys allow selection of various measurements such as Level Noise DCV ACV Return Loss Impedance Next Loss Causes the LT51 to go off hook on the RTXa b test leads and function as a telephone dial set Hangs up returns to on hook when this key is pressed again Perform a TDR measurement on the pair connected to the RTXa b terminals Most measurements made by the LT51 can be displayed either in...

Page 52: ... then f1 twice to select Level Noise The RMS value is the total signal power across the frequency span The following settings are relevant to Level Noise measurements and should be set according to requirements select the frequency span centre frequency select the filter to apply for noise measurements Transmitter interface is either TX RX or RTX select the Input impedance use a terminated TERM im...

Page 53: ...e following example where there are two tones close to 1 000 kHz illustrates this feature Examining the spectrum from baseband with a span of 1 200 kHz it is clear there are two peaks close to 1 000 kHz but they cannot be resolved easily Setting the Centre frequency to 1 000 kHz and the frequency span to 75 kHz zooms in on the peaks and reveals peaks at 991 kHz and 1 009 kHz ...

Page 54: ...value displayed represents the total RMS signal level for the measurement selected across the current frequency span BW and the frequency displayed is that of the signal with the maximum peak The signal to be measured must be connected to the RTXa b terminals The RMS value displayed in volts is not affected when a Zero Offset is set To return back to the spectrum display press the key ...

Page 55: ...1 kHz Selective measurements are made at the current centre frequency by pressing the key followed by the f3 soft key and then choosing the BW Alternatively the desired Centre Frequency can be entered directly in which case the 25 Hz BW is selected by default The level displayed is the RMS value over the BW at the selected centre frequency To cancel the selective level mode press the key followed ...

Page 56: ...or keys toggles between the spectral and numerical format displays When a Distortion function is active during spectrum displays the marker is automatically set to the highest peak displayed or for SFR the peak spurious signal Distortion Spectrum measurements Press the key followed by the f1 key to display Distortion spectrum measurements Press the f1 soft key again to cancel any active distortion...

Page 57: ...RMS value of the sum of all other spectral components excluding all harmonics in the current frequency span Press the f4 key to measure the Signal to Noise and Distortion ratio S ND The ratio of the RMS signal amplitude to the RMS value of the sum of all other spectral components in the current frequency span including harmonics Also known as SINAD ...

Page 58: ...the desired number of harmonics to include in the calculation To view the harmonics or noise in more detail use the VertOffset setting found by pressing the key If the AutoRange setting is LVL BW the LT51 will automatically set the frequency span to 4x the frequency of the fundamental signal or largest current input signal Note The Distortion functions can be affected by the noise at the low end o...

Page 59: ...n function and return to displaying just the level and frequency of the signal select Noise To view the spectrum display of the distortion press the key See the preceding section on Distortion Spectrum Measurements for more information on each distortion measurement If the AutoRange setting is LVL BW the LT51 will automatically set the frequency span to 4x the frequency of the fundamental signal o...

Page 60: ... Simultaneously the LT51 measures the level at each sweep frequency at RTX and displays the results press the key and then f3 to select Return Loss The following settings are relevant to Return Loss measurements and should be set according to requirements select the frequency span centre frequency Adjust the input level range or use the auto range feature set Sweeping configuration for swept or si...

Page 61: ...t displays the cross talk measured at the near end of the pair connected to the RTX terminals The LT51 transmits either a single tone or sweeps over the selected frequency span at 0 dBm on an adjacent pair that is connected to the TX terminals Simultaneously the LT51 measures the level at each sweep frequency at the RTX terminals and displays the results This measurement mode is also used to measu...

Page 62: ...the impedance always terminated set Sweeping configuration for swept or single SINE measurements The following settings are fixed for the test and cannot be altered the impedance is always terminated Transmitter interface is set to TX RX TX level is set to 0 dBm Use the marker to determine NEXT Loss at a particular frequency see Marker functions NOTE The far end of both pairs should be terminated ...

Page 63: ...e RTXa b terminals is continuously monitored and displayed on the LCD The AC voltage displayed is the true RMS value of the signal detected at the selected RTX terminals It does not include any DC component of the signal A high impedance 1 M is always used to make the Voltage measurements and the Measurement Interface is always set to TX RX DC voltages less than 0 5V are displayed as 0 00V ...

Page 64: ...T51 is configured as Off Hook the loop voltage measurement is made across the selected Zrtx termination and the loop current is calculated and displayed Otherwise no loop current measurement is made NOTE Other equipment may use a 430 shunt to measure loop current ...

Page 65: ... the RTXa b connector terminals in The internal bridge network with a reference of 75 is always used to measure the impedance and provides adequate accuracy for all frequencies from 1 kHz to 500 kHz press the key and then f4 to select Mag Z press the key to see a plot of the impedance over the frequency span ...

Page 66: ...iates a hand shaking sequence to connect to a remote LT51 tester The pair to be tested must be connected between the RTXa b terminals of the local and remote LT51 testers After successfully connecting to a remote LT51 the inverse text message Master appears in the TXSTATUS area of the LCD of the local LT51 Simultaneously the message Slave appears in the TXSTATUS area of the remote LT51 If unsucces...

Page 67: ...or when pressed TX or Centre frequency non zero centre frequency is not supported The following events will close down the connection to the remote LT51 pressing the Telephone or keys timeout waiting for a command acknowledgment from the remote LT51 eg after removing the physical pair connection To re establish the connection press the key again The following table describes the termination condit...

Page 68: ...ossible to enable crude remote debugging of performance issues if required For this version of the LT51 the Service parameter is limited to the Custom type only To start the Self Test sequence Press f2 to Start Stop the auto testing As the tests progress they are displayed on the LCD with the suffix A appended to the measurement description in the Title bar To stop the self test at any time press ...

Page 69: ...y saved in the LT51 non volatile memory for later up load to a PC Following completion of the self test a summary of the results are displayed in the final column of each test Column 1 Name of test to be performed Column 2 Tx frequency in kHz Column 3 Tx Level in dBm Column 4 System impedance for AC Voltage Zin HiZ Column 5 Result of test in dBm kHz Vac dB as appropriate ...

Page 70: ...impedance always terminated adjust the input level range or use the auto range feature set Sweeping configuration for swept or single tone measurements set the TX frequency on the local LT51 The remote LT51 will transmit this frequency at 0dBm back to the local LT51 The following settings are fixed for the test and cannot be altered Transmitter interface is set to TX RX Use the marker to determine...

Page 71: ...pair connected to the TX terminals by setting its Transmitter Source to OFF press the key and then f4 to select FE X Talk The following settings on the local LT51 are relevant to Far End X talk measurements and should be set according to requirements select the frequency span centre frequency select the impedance always terminated set Sweeping configuration for swept or single tone measurements se...

Page 72: ...rt bridged tap upto 3km PVF 67 and place the marker at the start of the event displaying the distance to the event It will automatically search all ranges from the lowest to the highest and zoom the waveform to show all features in the display Zo Impedance An impedance of 50 or 75 can be set via or keys for TDR TDR Range The TDR Range needs to be set to cover the expected length of the cable being...

Page 73: ... fault from both ends of the cable add the distances together and either adjust the PVF or use a ratio calculation to find the position Some commonly used cables and there PVFs are listed below Cable PVF Coaxial 50 RG58C U PE RG178 U PTFE 69 Coaxial 75 RG59B U PE RG179 U PTFE 67 Coaxial 50 LMR 200 HDF 200 CFD 200 PF 83 Coaxial 92 RG 62 U PF 84 UTP Polyethylene PE 67 UTP Air PIC 19 AWG 0 90mm 69 UT...

Page 74: ...he knob to move the cursor across the screen ensure that any dialog boxes are cleared by pressing the key The distance from the LT51 RTXab terminals to the event marked by the cursor is always shown next to the Mkr text Always place the cursor to the left side of an event to determine the distance to the event NOTE Always subtract the length of the test leads from the distance measurement for high...

Page 75: ...ether to enable sections of the displayed waveform to be examined in greater detail over the whole TDR range Toggle the f5 soft key to set Offset to Horizontal A dialog box appears with the text Horizontal Offset Turn the knob anti clockwise to decrease increase the horizontal offset Press the key or any key to clear the dialog box NOTE The horizontal offset can only be changed when the horizontal...

Page 76: ...length of the test leads Open A clean or partial open will show up as a peak on the screen The cleaner the open the taller the peak A complete open will be the tallest peak other than the launch pulse You can not see events past a complete open Load Coil A load coil looks very similar to an open If you think there is a load coil on the pair use the LT51 Load Coil function to verify its presence Yo...

Page 77: ...e a dip followed by a peak you might suspect a bridge tap Also for a bridged tap the absolute value of the dip is always greater than the absolute value of the peak Blind spot Reflections due to faults that are located very close to the LT51 RTXa b terminals and hence occur before the TDR pulse has been completed can still be measured if the cable has an impedance close to 100 This is due to hybri...

Page 78: ...tedly press the key until the desired position is reached To store the ID string and save the measurement press the Key If you no longer want to save the measurement press any menu or soft key The waveform and or text results on the screen at the time the key is pressed are automatically saved to the instrument memory together with the LT51 time date stamp All relevant LT51 configuration informati...

Page 79: ...est move the highlight bar to the desired test by turning the knob clockwise or anti clockwise When the desired test is selected press the f3 Show Detail soft key to display the details saved for the measurement When the saved measurement is displayed on the LCD the text S appears next to the measurement title This distinguishes the display from a real time measurement For saved measurements that ...

Page 80: ...rval enables measurements to be recorded over weeks Before starting the Recorder select the sampling interval by pressing the f2 soft key The options are 1s 2s 5s 10s 60s To start the Recorder press the f1 soft key to display RUNNING While the Recorder is running the current measurement is continuously displayed together with the maximum and minimum values that have been recorded The start time of...

Page 81: ...vailable LT51View Application on a PC with a Windows 98 2000 XP Vista or 7 OS The USB drivers may also be installed manually by downloading the required files according to your OS from the FDTI website http www ftdi com or using the Windows Update feature during the Found New Hardware Wizard for Windows OSs One driver is required to support the USB interface while a second Virtual COM Port VCP dri...

Page 82: ...load tab in the main window of the application In the displayed combo box choose either Graph Results or DMM Results The list of saved measurements is displayed beneath the combo box To view a particular saved measurement select the measurement from the list For graphical displays the cursor can be updated by clicking the mouse on the graph pressing the displayed buttons or selecting a pair of val...

Page 83: ...bytes CMD D1 D2 D3 D4 Upon successful reception of the 5 byte command the LT51 will respond by returning an ACK 0x99 byte OR data byte s NOTE The LT51 will wait until it receives 5 bytes This can lead to synchronisation issues if an incorrect number of bytes is transmitted for a command To ensure the PC LT51 control link is correctly synchronised the PC can repeatedly transmit the ACK byte 0x99 un...

Page 84: ...MEASMODE 0x00 0x20 LEVSPCTM 0x21 PSD 0x23 IPNOISE 0x26 TDR 0x28 OSB 0x30 NEXT Loss 0x31 FEXT 0x32 ILOSS 0x34 RLOSS 0x38 LCL 0x41 VOLTAGE 0x43 TRACETONE 0x47 R C 0x73 MAGZ TERMINALS 0x02 0x00 a b 0x01 a g 0x02 b g RXRANGE 0x03 0x00 30 dB 0x01 20 dB 0x02 10 dB 0x03 0 dB 0x04 10 dB 0x05 20 dB 0x06 30 dB BW 0x04 0x00 Max Span to 0x0A Min Span SWEEPING 0x05 0x00 OFF 0x01 ON ZRTX 0x06 0x00 50 0x01 75 0x...

Page 85: ...0x04 3 1 kHz GAUGE 0x0E 0x00 19AWG 0 9mm 0x04 Custom AUTORANGE 0x11 0x00 OFF 0x01 LVL only 0x02 LVL BW AVERAGING 0x1C 0x00 OFF 0x01 Averaging ON 0x02 Peak Hold ON PEAKTRK 0x1E 0x00 OFF 0x01 ON DISTORTION 0x1F 0x00 LEVEL 0x01 SNR 0x02 THD 0x03 SINAD 0x04 SFDR NUMOFAVGS 0x20 0x00 No Averaging 0x01 2 Samples TO 0x04 16 Samples SWEEPSTEP 0x22 0x01 240 pts TO 0x04 15 pts IPNTHRES 0x24 0xC4 60 dBm TO 0x...

Page 86: ...1 Freq2 Freq3 Freq4 LT51 returns 0x99 The TX Frequency is set to TxFreq Freq1 16 777 215 Freq2 65 536 Freq3 256 Freq4 Hz Example For TxFreq 2 000 000 Hz Freq1 0x00 Freq2 0x1E Freq3 0x84 Freq4 0x80 CONFIGCENTREFREQ Syntax 0xB0 Freq1 Freq2 Freq3 Freq4 LT51 returns 0x99 The Centre Frequency is set to CentreFreq Freq1 16 777 215 Freq2 65 536 Freq3 256 Freq4 Hz Example For CentreFreq 1 000 000 Hz Freq1...

Page 87: ...cted terminals READDATA2 the AG terminals READDATA3 the BG terminals depending on the following current measurement mode Command Mode Data READDATA1 READDATA2 READDATA3 R C R D3 256 D2 C D1 256 D0 nF If R 500 R C are in series Else R C are in parallel VOLTAGE DCV D1 256 D0 100 V NB signed ACV D3 256 D2 100 V READDATA1 MAGZ 32 bit Data READDATA1 Others 32 bit Data 100 dB dBm none READDATA2 Others 3...

Page 88: ... resume operation with the existing software 4 Start the LT51View application program and select the Download Tab on the main displayed form Manually select the a43 file by pressing the Browse File button to locate the file When ready press the Program button to begin the download NOTE During the download the behaviour of the LT51 can be unpredictable eg the screen may go completely blank or audib...

Page 89: ...ansmit a tone at 10 kHz 0 dBm for a period equal to the automatic switchoff time for the LT51 Thereafter the LT51 should be turned back on and the adjustment or calibration commenced Required test equipment Description Requirement Digital Multimeter ACV 100 k 10 kHz 0 dBm 0 02 dB FREQ 100 000 0 Hz 0 1 Hz 50V DC Standard 50 0 0 05 V 50 75 600 0 1 The LT51 can be fully adjusted without opening the i...

Page 90: ... LT51 to adjust the level displayed on the DMM to 0 00 dBm and then press the key NOTE The knob must be turned even if the default TxLevel is correct to zero the calibration constant before pressing the key to save the new value If the knob is turned without saving the value power cycle the LT51 before continuing When the 600 Tx Level has been adjusted press the f1 softkey to adjust the Tx Level f...

Page 91: ... Voltage Source of 50 00 V 0 05 to the RTXa b terminals with the ve terminal to the RTXb red terminal When the LT51 measurement has stabilised press the key to record the 50 0 Vdc value Connect a DC Voltage Source of 50 00 V 0 05 to the RTXa b terminals with the ve terminal to the RTXa black terminal When the LT51 measurement has stabilised press the key to record the 50 0 Vdc value ...

Page 92: ...ed to any loads Use the knob press to move the cursor on the LT51 to adjust the TX Frequency constant so that the frequency displayed on the DMM is 100 000 0 Hz Press the key when the reading has stabilised The LT51will then automatically calculate the adjustment required for the RX frequency at 1 MHz Bridge O C To adjust the Bridge function of the LT51 press the f4 Bridge O C key The message box ...

Page 93: ...tter the LT51 should be configured to transmit a tone at 10 kHz 0 dBm for a period equal to the automatic switchoff time for the LT51 Thereafter the LT51 should be turned back on and the adjustment or calibration commenced Required test equipment Description Requirement Digital Multimeter ACV 100 k 10 kHz 50 dBm to 10 dBm 0 02 dB Oscillator 600 10 kHz 50 dBm to 10 dBm 0 02 dB 50 1kHz 2 MHz 0 dBm 0...

Page 94: ...30 dBm 600 30 dBr 0 30 dB 40 dBm 600 40 dBr 0 30 dB 50 dBm 600 50 dBr 0 30 dB Table 8 1 Transmitter Level Response a Set the LT51 to TX RX interface mode Set the TX level to 0 0 dBm b Set the LT51 Ztx impedance and TX frequency as indicated in Table 8 2 c Connect a terminated DMM Thermal Voltage Converter to the LT51 using a short low capacitance cable to the TXa b terminals d With the TX Frequenc...

Page 95: ... 10 dBr 0 20 dB 20 dBm 600 20 dBr 0 20 dB 30 dBm 600 30 dBr 0 30 dB 40 dBm 600 40 dBr 0 30 dB 50 dBm 600 50 dBr 0 30 dB Table 8 3 Receiver Level Response a Set the LT51 to Level Spectrum and TX RX interface mode b Set the LT51 Zrtx impedance to 50 terminated c Connect a 50 Level Oscillator to the LT51 using a short low capacitance cable to the RTXa b terminals d Set the Oscillator level to 0 dBm a...

Page 96: ...oss mode b Set the LT51 TX frequency to 10 kHz and TX level to 10 dBm c Set the LT51 RTX impedance as indicated in Table 8 6 and connect the load impedance to the RTX terminals d Check that the readings are within the ranges specified RTX Impedance Load Impedance LT51 reading 50 100 9 54 dB 1 dB 75 100 16 90 dB 1 dB 600 590 41 5 2 dB Table 8 6 NOTE For other value resistors Rm at a Zrtx ref calcul...

Page 97: ...age Measurement a Set the LT51 to DMM AC DC Voltage mode b Ensure that the Terminals are set to AB c Connect a 30 V 50 Hz AC Source to the LT51 RTXa b terminals d Check that the LT51 displays the AC voltage as 30 0 0 8 V e Ensure that the Ringing tone is present during the application of the AC voltage f Select the a g and b g terminals and ensure that the LT51 displays the AC voltage as 0V AC Imp...

Page 98: ......

Page 99: ...x H Weight 700g Power supply Battery Type 3 AA NiMH NiCd or Alkaline Battery Life 8 hours typical 2100mAh NiMH Battery Recharge Time 5 hours in LT51 AC Operation charging Ext adaptor 240Vac to 5 or 6 Vdc 1 A Auto Power Off 12 mins after last button press Interfaces RTX a b g 3 balanced 4mm sockets ab 19mm pitch Rated Voltage RTXa b 60 V RTXa or RTXb to g 30 V TX a b 2 balanced 4mm sockets ab 19mm ...

Page 100: ... Level Range TX RX mode 120 to 30 dBm 600 75 50 Term auto ranging or manual range setting BWs see Selectivity below 25 Hz 1 74 kHz 3 1 kHz Psoph ITU 0 41 Impedance balanced Terminated 600 75 50 Bridged 47 k Attenuator accuracy 30 dBm to 30 dBm 0 2 dB ref 0dBm 10kHz 600 30 dBm to 60 dBm 0 3 dB less than 60 dBm 0 5 dB Frequency Response 600 200 Hz to 20 kHz 0 25 dB ref 0dBm 10kHz 600 200 kHz 0 5 dB ...

Page 101: ...NEXT FEXT measurements Impedance 600 75 50 Frequency Range 200 Hz to 2 2 MHz Level range 90 to 10 dB Accuracy 1 dB Intrinsic NEXT 75 1 MHz 80 dB 2 2 MHz 70 dB Return Loss measurement Impedance 600 75 50 Tx level 10 dBm Range 0 to 40 dB Accuracy 0 5 dB 5 of reading for reference impedance Intrinsic Return Loss 75 200 kHz 50 dB 2 2 MHz 40 dB TDR Impedance 75 50 Pulse Velocity Factor PVF 0 01 to 0 99...

Page 102: ... 75 ref 1000 10 5 Signalling Voice Communication Dial Method DTMF Redial Up to last 16 digits Talk Listen built in Speaker Microphone 600 Shunt 0 to 90 mA 1 0 5 mA Ring Detector Range Meas 40 to 100 Vrms 15 70 Hz Maximum values capped by protection to Rated Voltage at inputs Data subject to alterations without notice ...

Page 103: ......

Page 104: ......

Reviews: