background image

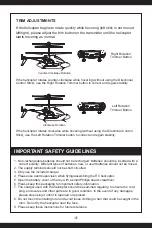
1. Use a small Phillips screwdriver to 

     carefully remove the screws.

2. Please ensure the blades are attached 

     to the correct motors; B-labeled blades

     should be on the upper motor,

     A-labeled blades should be on the

     lower motor.

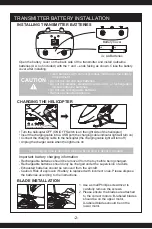
CHARGING THE HELICOPTER

BLADE INSTALLATION

INSTALLING TRANSMITTER BATTERIES

The charging time is about 60 minutes; flying time is about 5 minutes.

• Turn the helicopter OFF. (ON/OFF Switch is on the right side of the helicopter)

• Insert the charging cable into a USB port (the charging cable indicator light will turn on)

• Connect the charging cable to the helicopter (the charging cable light will turn off)

• Unplug the charger cable when the light turns on

Open the battery cover on the back side of the transmitter and install 4 alkaline

batteries (AA, not included) with the + and – ends facing as shown. Close the battery

cover after installing.

TRANSMITTER BATTERY INSTALLATION

Battery Cover

4 x AA Batteries

Make sure the equipment is switched 

OFF before charging.

• Insert batteries with correct polarities matched to the battery

    compartment

• Do not mix old and new batteries

• Do not mix alkaline, standard (carbon-zinc), or rechargeable

    (nickel-cadmium) batteries

• Do not use rechargeable batteries

• Remove exhausted batteries

CAUTION

Important: battery charging information

- Rechargeable batteries should be removed from the toy before being charged.

- Rechargeable batteries should only be charged under the supervision of adults.

- Exhausted batteries should be removed from the aircraft.

- Caution: Risk of explosion if battery is replaced with incorrect ones. Please dispose 

  the batteries according to the instructions.

-2-

Summary of Contents for SYMA S107H Wind Hawk

Page 1: ...p flashing the remote transmitter is paired 1 Key Lift Land Single Press and Single Beep Emergency Stop Press and hold for 3 Seconds High Low Speed Press button to change speed modes A double beep response indicates high speed a single beep indicates low speed Left Rotation Trimmer Right Rotation Trimmer ON OFF Button It is strongly recommended to read the manual carefully before flying Inapropria...

Page 2: ...de of the transmitter and install 4 alkaline batteries AA not included with the and ends facing as shown Close the battery cover after installing TRANSMITTER BATTERY INSTALLATION Battery Cover 4 x AA Batteries Make sure the equipment is switched OFF before charging Insert batteries with correct polarities matched to the battery compartment Do not mix old and new batteries Do not mix alkaline stand...

Page 3: ...ieve the desired altitude then release the stick The helicopter will maintain this altitude while allowing forward backward and yaw to be controlled normally PAIRING PROCEDURE Turn on the helicopter ON OFF Switch is on the right side of the helicopter Turn on the transmitter the power indicator light will flash rapidly Push the Throttle Left Stick fully up then fully down see diagram The indicator...

Page 4: ...erent types of batteries new or used batteries should not be mixed 2 The supply terminals should not be short circuited 3 Only use the included charger 4 Please use adult supervision when flying assembling the RC helicopter 5 Open the battery cover of the toy with a small Phillips head screwdriver 6 Please keep this packaging for important safety information 7 The charger used with the helicopter ...

Page 5: ...l interference to radio or television reception which can be determined by turning the equipment off and on the user is encouraged to try to correct the interference by one or more of the following measures Reorient or relocate the receiving antenna Increase the separation between the equipment and receiver Connect the equipment into an outlet on a circuit different from that to which the receiver...

Page 6: ... Areas It is strongly recommended to fly in areas without air flows Do not fly in areas with air conditioner electric fans or table lamps or other electric equipment which may be easy damaged Canopy A Canopy B Tail Stabilizers A Tail Stabilizers B The Main Motor Blade A The Main Motor Blade B Tail Motor Blade Main Seat Balance Beam Connective Parts Landing Skids Drive Gears Blade Clips Main Rotor ...

Page 7: ...erpretation of this instruction manual statement Manufacturer Guangdong Syma Model Aircraft Industrial Co Ltd The Crossing of No 2 West Xingye Road and North Xingye Road Laimei Industrial Park Chenghai District Shantou City Guangdong China ...

Reviews: