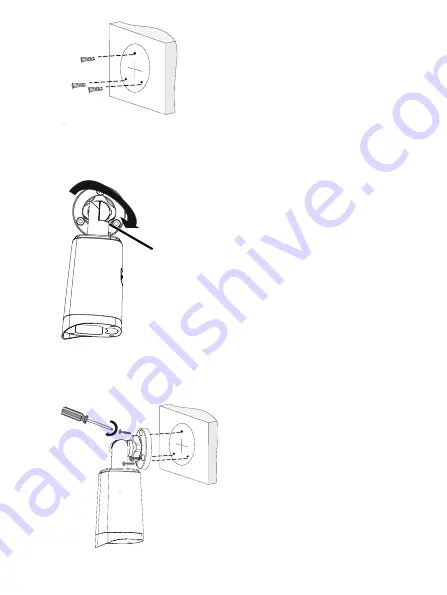
Gyration CYBERVIEW 410B-TAA Quick Start Manual Download Page 8


4.


Screw the locknut to loosen the universal joint before attaching your camera to 

the wall. 


5.


Mount your camera onto the wall and connect all cables. 

Lead tapping screws through the guide holes in the base and fix them on the wall by 
using a screwdriver. 


Locknut

Summary of Contents for CYBERVIEW 410B-TAA

Page 1: ...Quick Start Guide CYBERVIEW 410B TAA 4 MP Outdoor Intelligent Fixed Bullet Camera Other Language www gyration com...

Page 2: ...the cables Use waterproof components to protect the network cable Waterproof the power cable separately if you don t use it The video cable does not need waterproof treatment 1 Use insulation tape not...

Page 3: ...lug into the interface 5 Optional After the waterproof treatment is completed put the cables into a waterproof junction box purchased separately CAUTION The cable connector must not be exposed and mus...

Page 4: ...nd removal of the unit and its accessories must be carried out by qualified personnel You must read all of the safety instructions before installation and operation 2 1 Precautions Use a power adapter...

Page 5: ...sponsibility for problems caused by unauthorized repair or maintenance 2 2 Maintenance If there is dust on the front glass surface remove the dust gently using an oil free brush or a rubber dust blowi...

Page 6: ...hot plug the Micro SD card after it is inserted Otherwise the camera or the SD card might be damaged For recommended SD card specifications please contact your dealer or technical support 4 2 Wall Mo...

Page 7: ...ositioning sticker on the wall and align the cross center to the hole in the wall 2 Lead the cables across the hole on the wall 2 Drill holes on the wall 1 Use a 6 6 5mm drill bit 2 Drill 30 mm depth...

Page 8: ...the universal joint before attaching your camera to the wall 5 Mount your camera onto the wall and connect all cables Lead tapping screws through the guide holes in the base and fix them on the wall...

Page 9: ...cables are penetrated into the wall If open installation is adopted cables are not penetrated into the wall but threaded out from the outlet on one side of the base 5 Startup After you have installed...

Page 10: ...plug in at your first login Please follow the on screen instructions to complete the installation and then open the browser again to log in The default password is intended only for your first login T...

Page 11: ...y involve the collection of personal information such as face fingerprint license plate number email phone number GPS Please abide by your local laws and regulations while using the product About This...

Page 12: ...extent allowed by applicable law in no event shall our total liability to you for all damages for the product described in this manual other than as may be required by applicable law in cases involvi...

Page 13: ...installed serviced and maintained by a trained professional with necessary safety knowledge and skills Before you start using the device please read through this guide carefully and make sure all app...

Page 14: ...rrectement Mauvaise utilisation de la batterie comme celles mentionn es ici peut entra ner des risques d incendie d explosion ou de fuite liquide de gaz inflammables Remplacer la batterie par un type...

Page 15: ...and EMC Directive 2014 30 EU WEEE Directive 2012 19 EU The product this manual refers to is covered by the Waste Electrical Electronic Equipment WEEE Directive and must be disposed of in a responsibl...

Reviews: