background image

10

VAPOR BIKE 10.0

RECOVERY

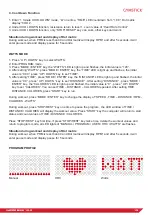
After exercising for a period of time, keep holding on handgrip until “PULSE“ displays heart rate, press “   

RECOVERY” button, then holding on handrail for 60 seconds. All function display will stop except “TIME” 

starts counting down from 00:60 to 00:00. Screen will display your heart rate recovery status with the

F1,F2….to F6. Press the RECOVERY button again to return the main display. F1 is the best.

P1~P12 PROGRAM QUICK-KEY

On computer, there are separate keys for P1~P12 program. Press the key into the program mode directly.

PROGRAMS

P1 ~ P12 PROGRAM

1. Press ” UP / DOWN “ key to select P1~P12 PROGRAM

2. Enter PROGRAM mode to select the operate mode.

3. Press ”MODE / ENTER” key. The “TIME” LED is light up and flashes, the initial value is ”0:00”, press     

    ”UP / DOWN“ key to set ”TIME”.

4. After setting “TIME”, press ”MODE / ENTER” key, the ”DISTANCE” LED is light up and flashed, the initial  

    value is “0.0”. Press ”UP / DOWN“ key to set “DISTANCE” .

5. After setting “DISTANCE”. Press ”MODE / ENTER” key, the ”CALORIES” LED is light up and flashed, the  

    initial value is “0”, press ”UP / DOWN“ key to set “CALORIES”.

6. You can set TIME – DISTANCE – CALORIES repeated. After setting TIME, DISTANCE, CALORIES,      

    press “START” key to run.

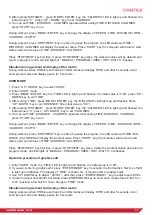
Use quick key to set P1~P12 PROGRAM :

1. After start the computer, setting the USER of U1~U4, the value of Weight, then press ”MODE / ENTER”  

    key to enter each mode status.

2. When select each mode status, press separate keys for P1~P12 program, enter the program mode 

    directly.

3. After enter it, the method of setting TIME – DISTANCE – CALORIES is same as the above method (3~6).

During workout, press ”MODE / ENTER” key to change the display of “SPEED - TIME – DISTANCE / RPM   

- CALORIES - WATTS“

During workout, press “STOP/REST” key one time to pause the program, the LED window of TIME /       

DISTANCE / CALORIES will display the workout value. Press “START” key the computer will return to start 

status and count values of TIME / DISTANCE / CALORIES.

Press “STOP/REST” key first time, if press “STOP/REST” key twice, delete the workout values and return to 

program mode, all LED lights of ”MANUAL / PROGRAM / USER / HRC / WATTS “ are flashes.

Situation during workout and display of Dot matrix

During workout, when PRM is less than 40 and Dot matrix will display RPM↑ and after 5 seconds, it will     

enter pause mode and display pause for 5 seconds.

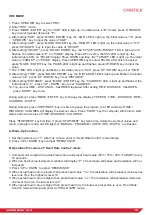
MANUAL MODE

1. Press ”UP / DOWN“ key to select “MANUAL” .

2. Enter “MANUAL” mode.

3. Press ”MODE / ENTER” key, the “TIME” LED is light up and flashes, the initial value is”0:00”, press            

    ”UP / DOWN“ key to set ”TIME”.

4. After setting “TIME”, press ”MODE / ENTER” key, the ”DISTANCE” LED is light up and flashed, the initial  

    value is “0.0”, press ” UP / DOWN “ key to set “DISTANCE”.

Summary of Contents for VAPOR BIKE 10.0

Page 1: ...ER MANUAL IMPORTANT Read all instructions carefully before using this product Retain this owner s manual for future reference The specifications of this product may vary from this photo subject to cha...

Page 2: ...exercise to make you feel better look better and enjoy life to its fullest TABLE OF CONTENT 1 SAFETY INSTRUCTIONS 3 2 ASSEMBLY PARTS 4 3 SCREW KIT 5 4 ASSEMBLY INSTRUCTION 6 5 COMPUTER OPERATION INST...

Page 3: ...by the manufacturer 7 Assemble the machine exactly as the descriptions in the instruction manual 8 Check all bolts and other connections before using the machine for the first time and ensure that the...

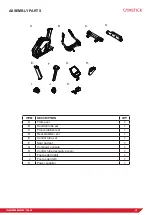
Page 4: ...rame set 1 B Handrail tube set 1 C Front stabilizer set 1 D Rear stabilizer set 1 E Control tube set 1 F Seat pad set 1 G Computer console 1 H Control tube decorative cover 1 I Foot pedal right 1 J Fo...

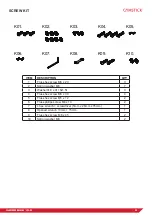
Page 5: ...asher M8 7 3 Washer 8 x 16x1 5t 3 4 Truss hex screw M8 x 30 4 5 Truss hex screw M5 x 12 2 6 Truss philips screw M4 x 10 2 7 L hex wrench screwdriver 5mm x 26mm x 76mm 1 8 Opened wrench 13mm 15mm 1 9 T...

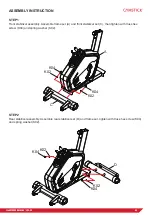
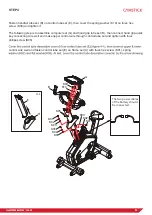
Page 6: ...emble frame set A and front stabilizer set C then tighten with truss hex screw K04 and spring washer K02 STEP 2 Rear stabilizer assembly Assemble rear stabilizer set D and frame set tighten with truss...

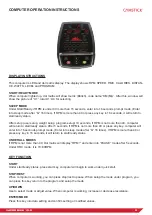
Page 7: ...assembly Pull the POPIN puller insert seat pad set F into frame then assemble left right foot pedal J an I When assemble foot pedal please attention on left right side the bottom of foot pedal have b...

Page 8: ...then cover the spring washer K10 on truss hex screw K09 and tighten it The following step is to assemble computer set G and hand grip tube set B then connect hand grip quick key connecting wire well...

Page 9: ...computer will return to start ready status After 5 seconds if RPM is not more than 40 or press any key computer will enter into 16 seconds prompt mode Enter into sleep mode after bi 16 times If RPM is...

Page 10: ...to set P1 P12 PROGRAM 1 After start the computer setting the USER of U1 U4 the value of Weight then press MODE ENTER key to enter each mode status 2 When select each mode status press separate keys fo...

Page 11: ...r setting DISTANCE press MODE ENTER key the CALORIES LED is light up and flashed the initial value is 0 press UP DOWN key to set CALORIES 6 You can set TIME DISTANCE CALORIES repeated After setting TI...

Page 12: ...10 You can set TIME DISTANCE CALORIES repeated After setting TIME DISTANCE CALORIES press START key to run During workout press MODE ENTER key to change the display of SPEED TIME DISTANCE RPM CALIROE...

Page 13: ...and flashed the initial value is 0 0 press UP DOWN key to set DISTANCE After setting DISTANCE press MODE ENTER key the CALORIES LED is light up and flashed the initial value is 0 press UP DOWN key to...

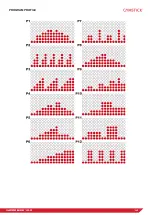
Page 14: ...14 VAPOR BIKE 10 0 PROGRAM PROFILE...

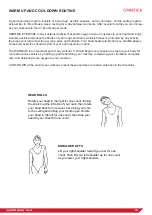
Page 15: ...be part of your entire exercise routine The WARM UP is an important part of any workout It should begin every session to prepare your body for more strenuous exercise by heating up and stretching you...

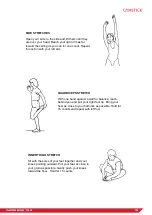
Page 16: ...arm QUADRICEPS STRETCH With one hand against a wall for balance reach behind you and pull your right foot up Bring your heel as close to your buttocks as possible Hold for 15 counts and repeat with l...

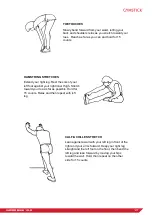
Page 17: ...RETCH Lean against a wall with your left leg in front of the right and your arms forward Keep your right leg straight and the left foot on the floor then bend the left leg and lean forward by moving y...

Page 18: ...arts as far as included in the scope of delivery frame electronic devices wheels foot straps and pedal set The guarantee does not cover Damage effected by outer force Intervention by unauthorized part...

Reviews: