
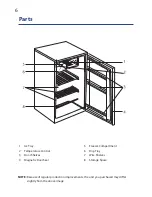


11
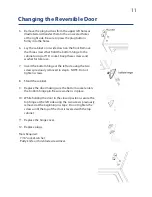
5. Remove the plug buttons from the upper left holes as
illustrated and transfer them to the uncovered holes
at the right side. Be sure to press the plug buttons
firmly into the holes.
6. Lay the cabinet on its side down on the floor. Remove
the three screws that hold the bottom hinge to the
cabinet using a 7/16” socket. Keep these screws and
washer for later use.
7. Insert the bottom hinge at the left side using the two
screws previously removed in step 6. NOTE: Do not
tighten screws.
8. Stand the cabinet.
9. Replace the door making sure the bottom socket enters
the bottom hinge pin. Be sure washer is in place.
10. While holding the door in the closed position, secure the
top hinge at the left side using the two screws previously
removed at the beginning in step 2. Do not tighten the
screws until the top of the door is leveled with the top
cabinet.
11. Replace the hinge cover.
12. Replace plugs.
Tools Required:
- 7/16” socket-ratchet.
- Putty knife or thin-blade screwdriver.
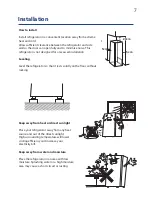
Changing the Reversible Door
Page 8 of 9
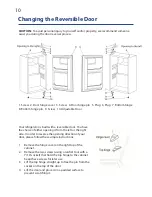
Your refrigerator is built with a reversible door. You have the choice of either opening it from the left or the
right side. In order to reserve the opening direction of your door, please follow these simple instructions:
1. Remove the hinge cover on the right top of the
cabinet.
2. Remove the two screws (using a ratchet tool
with a 7/16” socket) that hold the t
op hinge to
the cabinet. Keep these screws for later use.
3. Lift the top hinge straight up to free the pin from
the socket on the top of the door.
4. Lift the door and place it on a padded surface to
prevent scratching it.
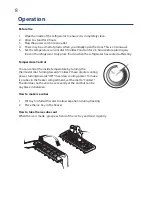
5. Remove the plug buttons from the upper left
holes as illustrated and transfer them to the
uncovered holes at the right side. Be sure to
press the plug buttons firmly into the holes.
Page 9 of 9
6. Lay the cabinet on its side down on the floor.
Remove the three screws that hold the bottom
hinge to
the cabinet using a 7/16” socket. Keep
these screws and washer for later use.
7. Insert the bottom hinge at the left side using the
two screws previously removed in step 6.
NOTE: Do not tighten screws.
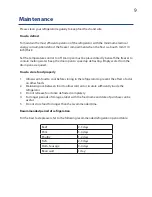
8. Stand the cabinet.
9. Replace the door making sure the bottom
socket enters the bottom hinge pin. Be sure
washer is in place.
10. While holding the door in the closed position,
secure the top hinge at the left side using the
two screws previously removed at the beginning
in step 2. Do not tighten the screws until the top
of the door is leveled with the top cabinet.
11. Replace the hinge cover.
12. Replace plugs.
13. Tools Required:
-
7/16” socket
-ratchet.
- Putty knife or thin-blade screwdriver.
Page 9 of 9
6. Lay the cabinet on its side down on the floor.
Remove the three screws that hold the bottom
hinge to
the cabinet using a 7/16” socket. Keep
these screws and washer for later use.
7. Insert the bottom hinge at the left side using the
two screws previously removed in step 6.
NOTE: Do not tighten screws.
8. Stand the cabinet.
9. Replace the door making sure the bottom
socket enters the bottom hinge pin. Be sure
washer is in place.
10. While holding the door in the closed position,
secure the top hinge at the left side using the
two screws previously removed at the beginning
in step 2. Do not tighten the screws until the top
of the door is leveled with the top cabinet.
11. Replace the hinge cover.
12. Replace plugs.
13. Tools Required:
-
7/16” socket
-ratchet.
- Putty knife or thin-blade screwdriver.


