background image

16

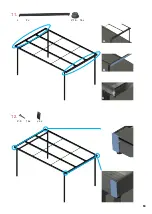
15.

H 1x

Z.19 11x

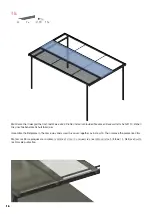
Montieren Sie in der gleichen Art und Weise die 2. Platte und verschrauben Sie diesen Deckel wie im Schritt 14. Ziehen 
Sie anschließend die Schutzfolien ab.

Assemble the 2rd plates in the same way and screw this cover together as in step 14. Then remove the protective films.

Monter les 2ème plaques de la même manière et visser ce couvercle ensemble comme à l‘étape 14. Retirez ensuite 
les films de protection.

16

Summary of Contents for 4296203 - 4296215

Page 1: ...Premium Carport 5 62 x 3 09 m Art Nr 4296203 4296215 Art Nr 4296203 4296215 4296303 4296315 4296303 4296315 Montageanleitung Assembly instructions Instructions de montage D GB F Artikel 9219124...

Page 2: ...nvoll ber dem Carport ein Schneefanggitter anzubringen Halten Sie die Dachrinne frei von Laub Schmutz und Schnee Der Carport Bausatzes muss auf einem ebenen festen Untergrund z Beton Betonplatten mont...

Page 3: ...load 100 kg m It makes sense to install a snow guard above the carport Keep the gutter free of leaves dirt and snow The carport kit must be installed on a flat solid surface for example concrete conc...

Page 4: ...t e 100 kg m2 Nous conseillons de fixer une grille pare neige au dessus du Carport Garder la goutti re exempte de feuilles salet s et neige Le Carport doit etre assembl sur une surface plane et solide...

Page 5: ...egenrinne Rain gutter Goutti re 2x M Regenablauf Rain drainage Ecoulement d eau pluvi ale 1x Z 1 4295896 Abdeckkappe SW 19 4295896 Cover cap SW 19 Cache crou Cover cap SW 19 4x Z 5 9210480 4 8x25 ISO...

Page 6: ...Floor slab Dalle de plancher 4x Z 21 9210488 M8 x 12 ISO 7380 2 10 9 9210488 M8 x 12 ISO 7380 2 10 9 9210488 M8 x 12 ISO 7380 2 10 9 8x Z 22 Betonanker Concrete anchors Ancrages en b ton 16x Z 23 Z 2...

Page 7: ...nsions des fondations 400 x 400 x 800 mm 2 B 2x 2300 mm B 2x 2000 mm Z 21 8x Z 24 4x Z 26 4x b e r e i t s v o r m o n t i e r t b e r e i t s v o r m o n t i e r t a l r e a d y p r e a s s e m b l e...

Page 8: ...8 C 2x 3 B 2x 2300 mm B 2x 2000 mm Z 14 16x 8...

Page 9: ...i re 200 mm 750 mm vorne at the Front L avant 100 mm 750 mm 1x links left gauche 1x rechts right correctes 2x mitte middle milieu 4a D 2x K 2x Z 10 4x Z 11 4x 100 750 mm 200 750 mm 450 mm 480 mm hinte...

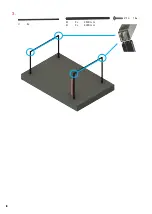
Page 10: ...10 5 F 2x G 2x Z 14 12x Z 15 12x 6 E 1x Z 6 2x Z 8 2x Z 7 2x I 2x bereits vormontiert bereits vormontiert already pre assembled already pre assembled d j pr assembl d j pr assembl 10...

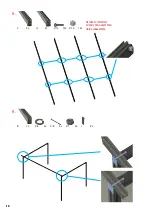
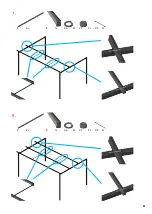
Page 11: ...11 7 F 2x E 1x Z 6 2x Z 9 2x Z 7 2x 8 F 2x E 1x Z 6 2x Z 9 2x Z 7 2x 11...

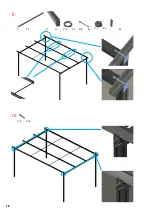
Page 12: ...12 10 Z 5 16x 9 F 2x E 1x Z 6 2x Z 8 2x Z 7 2x I 2x 12...

Page 13: ...13 11 L 2x Z 16 16x A B C 12 Z 5 16x J 4x 13...

Page 14: ...Band ohne Membran am First Our recommendation Polycarbonate sheets eaves and ridge with membrane tape Acrylic panels Band with membrane at the eaves and band without membrane at the ridge Notre recom...

Page 15: ...also make sure that the protective foils are aligned correctly Pre drill the upper part of the profile in the middle every 40 cm 7 mm the first hole is drilled after 6 cm Then place it on the surface...

Page 16: ...wie im Schritt 14 Ziehen Sie anschlie end die Schutzfolien ab Assemble the 2rd plates in the same way and screw this cover together as in step 14 Then remove the protective films Monter les 2 me plaqu...

Page 17: ...wie im Schritt 14 Ziehen Sie anschlie end die Schutzfolien ab Assemble the 3rd plates in the same way and screw this cover together as in step 14 Then remove the protective films Monter les 3 me plaqu...

Page 18: ...18 17 Z 1 4x 18 Z 6 8x Z 7 8x Z 27 4x Z 12 8x 18...

Page 19: ...ar L arri re Regenablauf kann wahlweise links rechts oder vorne montiert werden Rain drain can be either left right or can be mounted at the front L vacuation de l eau de pluie peut tre mont e gauche...

Page 20: ...0 Telefax 09367 984429 kuernach scobalit de Scobalitwerk Wagner GmbH Hermann Ilgen Stra e 7 D 04808 Wurzen Telefon 03425 814708 Telefax 03425 814709 wurzen scobalit de Scobalitwerk Wagner GmbH Buchens...

Reviews: