Gunter & Hauer EOM 973 TL Instruction Manual Download Page 15

For the sake of a good appearance and reliability, keep the unit clean. The modern design of the unit
facilitates maintenance to a minimum. The parts of the unit which come into contact with food have to
be cleaned regularly.

Before any maintenance and cleaning, disconnect the power.
Set all controls in the OFF position.
Wait until the inside of the unit is not hot but only slightly warm- cleaning is easier than when warm.
Clean the surface of the unit with a damp cloth, soft brush or fine sponge and then wipe dry.
In case of heavy soiling, use hot water with non- abrasive cleaning product.
For cleaning the glass of the oven door,do not use abrasive cleaners or sharp metal scrapers, these
can scratch the surface or lead to the glass being damaged.
Never leave acidic substances (lemon juice, vinegar) on stainless steel parts.
Do not use a high pressure cleaner for cleaning the unit. The baking pans may be washed in mild
detergent.

This appliance is marked according to the European directive 2012/19/EU on Waste Electrical and
Electronic Equipment(WEEE).
By ensuring this product is disposed correctly, you will help prevent potential negative consequences for
the environment and human health,which could otherwise be caused by inappropriate waste handling
of this product. The symbol on the product indicates that this product may not be treated as household
 waste. Instead it shall be handed over to the applicable collection point for the recycling of electrical
and electronic equipment. Disposal must be carried out in accordance with local environmental
regulations for waste dispoasl.For more detailed information about treatment, recovery and recycling of
this product, please contact your local city office, your household waste disposal service or the shop
where you purchased the product.

CLEANING AND MAINTENANCE

1

5

Summary of Contents for EOM 973 TL

Page 1: ...Gunter Hauer Instruction Manual BUILT IN ELECTRIC OVEN EOM 973 TL...

Page 2: ......

Page 3: ...Content Warning 4 Product Description 8 Operation Instructions 10 Accessories 12 Installation 14 Cleaning and Maintenance 15...

Page 4: ...have wait for the smell to clear before putting food into the oven Please use the product under the open environment The appliance and its accessible parts become hot during use Care should be taken...

Page 5: ...p to avoid the possibility of electric shock The means for disconnection must be incorporated in the fixed wiring in accordance with the wiring specifications Children should be supervised to ensure t...

Page 6: ...o clean the oven door glass since they can scratch the surface which may result in shattering of the glass A steam cleaner is not to be used The appliances are not intended to be operated by means of...

Page 7: ...te the fixing holes open the oven door and look inside To allow adequate ventilation the measurements and distances adhered to when fixing the oven IMPORTANT If the oven is to work properly the kitche...

Page 8: ...PRODUCT DESCRIPTION 8 Symbol Function description Child lock Reservation Temperature Time Increase Decrease Confirm or start Cancel or stop Breathing light...

Page 9: ...e temperature can be set within the range of 50 250 The default temperature is 220 Defrost The circulation of air at room temperature enables quicker thawing of frozen food without the use of any heat...

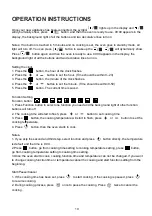
Page 10: ...he background light of all the buttons and two decorative lines turn on Setting the clock 1 Press the button the hour of the clock flashes 2 Press the or button to set the hour Time should be within 0...

Page 11: ...ss you can use inquiring function after 3 seconds return to the current working state 1 During cooking mode press button to see the clock time 2 If the reservation function is set press button to see...

Page 12: ...akes pastries frozen food etc or for collecting fat spillage and meat juices Telescopic runner Some of models might with telescopic runners to facilitate the use of oven cleaning by unscrew the screws...

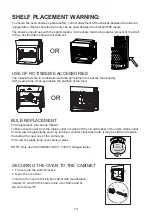
Page 13: ...or 3 Secure the oven to the kitchen cabint with two distance holders A which fit the holes in the oven frame and fit the two screws B USE OF ROTISSERIE ACCESSORIES The rotisserie works in combination...

Page 14: ...imension 2 The cabinet is not include the power switch or socket CONNECTION OF THE OVEN L N VENTILATING OPENINGS When cooking is finished or in pause state or in waiting state if the oven s center tem...

Page 15: ...steel parts Do not use a high pressure cleaner for cleaning the unit The baking pans may be washed in mild detergent This appliance is marked according to the European directive 2012 19 EU on Waste El...

Page 16: ...M hlenstrasse 8a Berlin 14167 Germany www gunter hauer eu e mail info gunter hauer de...

Reviews: