background image

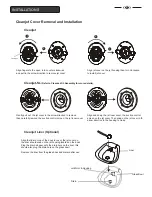
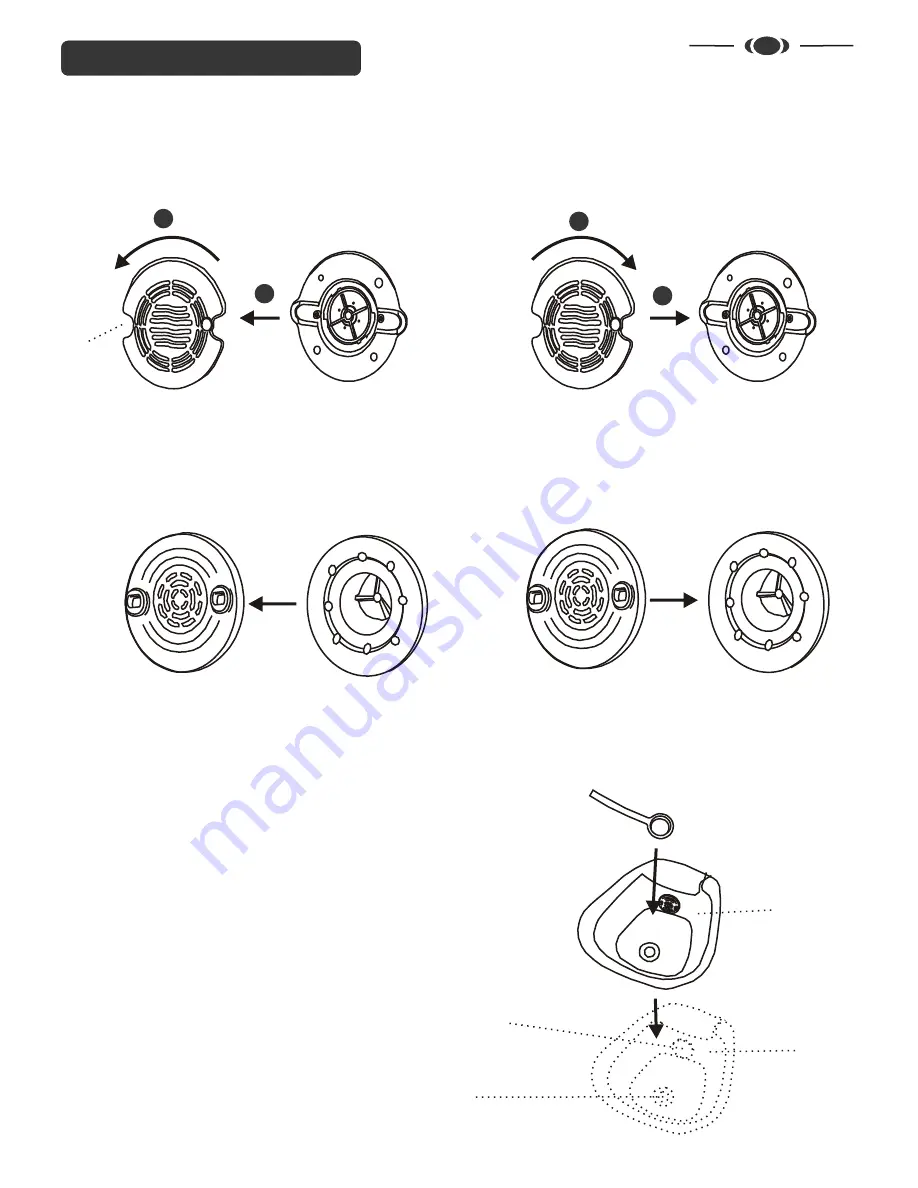
Gently pull out  the jet cover in the arrow direction to remove
then carefully remove the suction control screen, the jet inner cover

Align and snap  the jet inner cover, the suction control
screen on the jet cover. Then snap on the jet cover in th
arrow direction to the housing to close

Cleanjet-SL

 (Refer to CleanJet-SL Assembly for more details)


Cleanjet Cover Removal and Installation

 6

INSTALLATIONS

Align fingers to the open, turn counter-clockwise
and pull in the arrow direction to remove jet cover

Align jet cover on the jet housing then turn clockwise
to install jet cover

1

2

2

1

The Open

Cleanjet 

Cleanjet Liner (Optional) 

Align the liner on top of the bowl to cover, the jet cover on 
the liner should snap on the jet housing located on the bowl.
Plug the drain stopper onto the drain hole on the liner, this
should also plug the drain hole on the glass bowl

Remove the liner from the glass bowl and discard after use

Glass Bowl

Jet Motor & Housing

Drain

Liner

Summary of Contents for Camelia

Page 1: ...FOOT SPA PLEASE SAVE THIS MANUAL FOR FUTURE REFERENCE OWNER MANUAL Manufactured by Gulfstream Plastics Ltd For distribution by Yes Nails Productions Inc TM ...

Page 2: ...f Contents Safety and Precautions INSTALLATIONS Attaching Seat Jet Assembly Plumbing Connections 1 Identifying Parts 2 3 5 6 7 Warranty Service 12 4 Owner Manual Operations and Use Cleaning Maintenance 8 10 11 ...

Page 3: ...order for the warranty to be in effect and to insure the utmost in safety Chair and spa have a maximum seating capacity of 350 pounds BASIC PRECAUTIONS SHOULD ALWAYS BE OBSERVED INCLUDING THE FOLLOWING 1 Read and follow all instructions 2 DANGER To reduce the risk of injury do not permit children to use this unit unless they are supervised at all times 3 Use this unit only for its intended use as ...

Page 4: ...2 Water Filler 3 Back Cushion Massage 4 Headrest Cushion with Logo 5 Wooden Armrest 6 Flip out Manicure Tray 7 Seat Cushion 8 Adjustable Footrest 9 Front Control Panel 10 Jet 11 Drain 12 Water Control 13 Drain Control 14 Hand Spray 15 Jet Control 9 Control Panel Front Back ...

Page 5: ...3 IDENTIFY YOUR FOOT SPA 1 2 3 Armrest can be raised up down Reclining Sliding 55 27 32 43 15 SEAT OPERATION SPA DIMENSION ...

Page 6: ...ALLATIONS Align the seat with the pre drilled holes on the base then tightly secure with the nuts and bolts provided Attach trays or remote stand to armrest with screws provided Attaching The Seat to The Base ...

Page 7: ...anjet SL Components Suction Control Screen Optional Jet Cover Inner Cover Jet Motor Housing Cleanjet Components Jet Cover Jet Motor Housing Cleanjet SL Liner Optional Drain Stopper Drain Hole Cleanjet SL Cover Bowl Liner ...

Page 8: ...tion 6 INSTALLATIONS Align fingers to the open turn counter clockwise and pull in the arrow direction to remove jet cover Align jet cover on the jet housing then turn clockwise to install jet cover 1 2 2 1 The Open Cleanjet Cleanjet Liner Optional Align the liner on top of the bowl to cover the jet cover on the liner should snap on the jet housing located on the bowl Plug the drain stopper onto th...

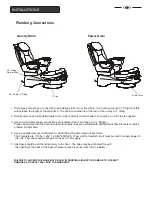
Page 9: ...h optional back flow Preventers unless ordered at initial sale 4 Have a qualified licensed electrician to install the wiring according to local codes The Cleanjets are 1 10 hp 120V 1 2 AMP 60OHZ A 15 amp GFI protected circuit must be used to supply power to the unit The roller back massage chair uses a 115V supply 5 Spa base should be anchored securely to the floor The base may be anchored through...

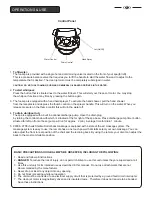
Page 10: ...rge pump timer button situated far left on front of base pump will run for approx 2 min Average time for drain 1 minute 5 9600 9700 chairs Shiatsu Roller back massage is equipped with a state of the art massage system The massage system is easy to use the remote has a one touch power that starts select your own massage You can also adjust the front to rear position of the chair and the reclining b...

Page 11: ...lease refer to instruction manual for operations LCD Timing Auto Neck Shoulder Power Pause Kneading Knocking Width Lower Adjustment Incline Seat Forward Seat Backward Recline Intensity Air On Off Back Waist Kneading Upper Adjustment Speed Knocking ...

Page 12: ...ease refer to instruction manual for operations Timing Upper Body Knead Flap Knead Flap Neck Shoulder Press Knock Back Waist Back Stretching Speed Width Seat On Off Intensity Mode Seat Forward Seat Backward Seat Incline Seat Recline Power LCD TT960 Manual ...

Page 13: ...ool for 15 minutes drain and then wipe dry with clean soft cloth NOTE Cleaning or sanitizing is NOT disinfecting According to the Centers for Disease Control and Prevention CDC and the US Environmental Protection Agency EPA disinfecting occurs only when there is a reduction of pathogenic microbes at 99 999 Sanitizing is only a reduction of 99 9 Cleaning of whirlpool pedicure spas requires surfacta...

Page 14: ...e and or the use of harmful cleaning agents or Chemicals 3 Staining fading or discoloration caused by improper or poor water additives not related to the maintenance of Proper water are not covered by this warranty 4 Staining fading or discoloration of the seat armrests or footrests 5 Freight damage misuse neglect accident natural disaster and abuse 6 Unauthorized repairs Exclusions No dealer or o...

Reviews:

Related manuals for Camelia