background image


 20

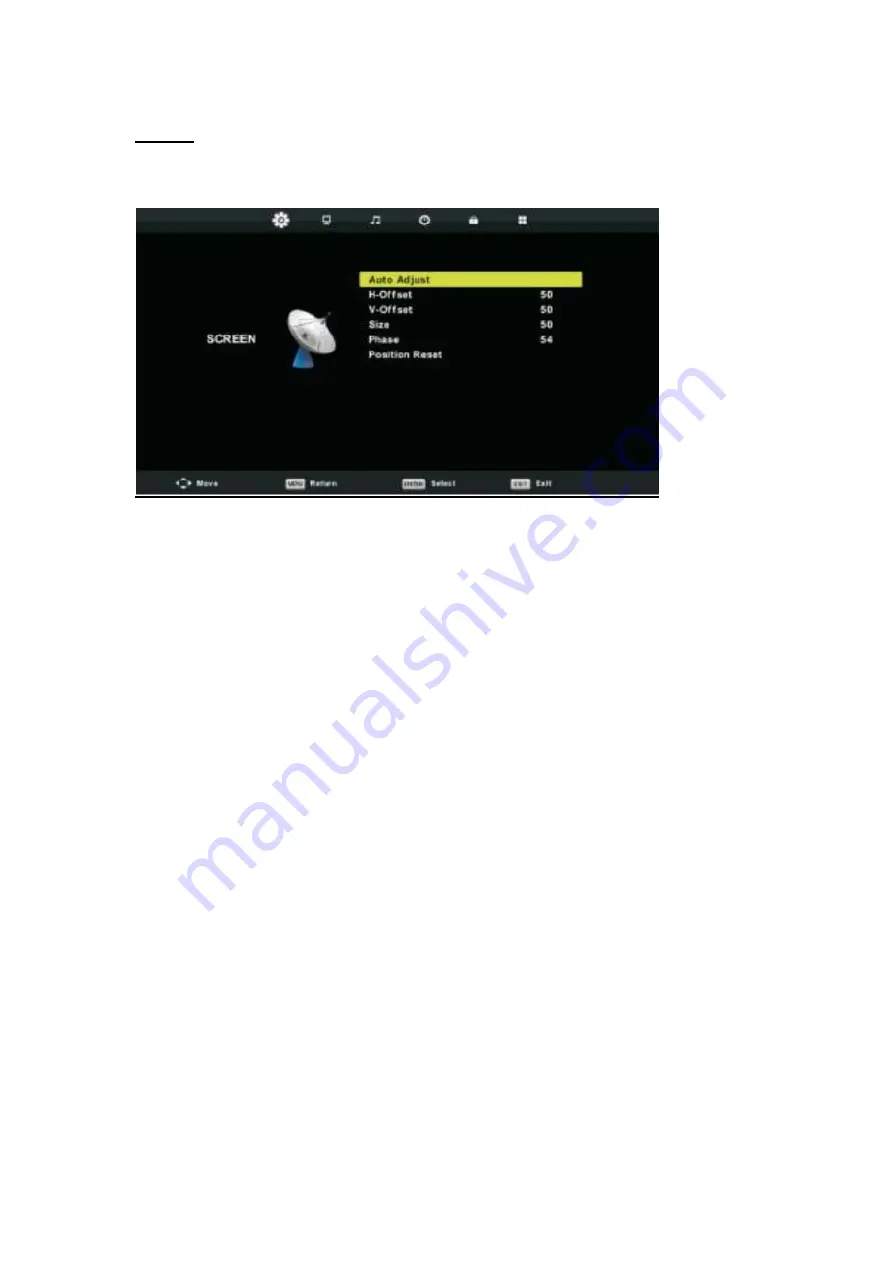
ECRà

Premir a tecla “MENU” para aceder ao menu OSD. Prima então a tecla “

e

/

f

” para selecionar o 

menu “SCREEN” (ecrã) (apenas disponível no modo PC). 


1. Prima a tecla “

c

/

d

” para selecionar “Auto Adjust” (ajustar auto) e prima “ENTER” para ajustar. 

2. Prima a tecla “

c

/

d

” para selecionar “H-Offset” (desvio horizontal) e prima “

e

/

f

” para ajustar. 

3. Prima a tecla “

c

/

d

” para selecionar “V-Offset” (desvio vertical) e prima “

e

/

f

” para ajustar. 

4. Prima a tecla “

c

/

d

” para selecionar “Size” (tamanho) e prima “ENTER” para ajustar. 

5. Prima a tecla “

c

/

d

” para selecionar “Phase” (fase) e prima “ENTER” para ajustar. 

6. Prima a tecla “

c

/

d

” para selecionar “Position Reset” (repor posição) e prima “ENTER” para 

ajustar.


Summary of Contents for LED-20H FHDT2

Page 1: ...MANUAL DEL USUARIO Televisor LED LED 20H FHDT2 ...

Page 2: ...ntenido Introducción Advertencia Precaución Descripción de la unidad principal Control remoto OSD ajuste básico Funciones DTV Características de USB Operación de PVR Especificaciones Solución de Problemas ...

Page 3: ...alización Deje suficiente espacio entre el receptor y la pared para permitir ventilación Evite lugares extremadamente cálidos para evitar posibles daños al gabinete o falla prematura de los componentes Este televisor se puede conectar a 100 240V 50 60HZ No instale el televisor en un lugar cerca de fuentes de calor tales como radiador conductos de aire la luz solar directa o en un lugar como compar...

Page 4: ...mantenimiento importantes en la documentación que acompaña al equipo Las estructuras de Clase I del equipo deben conectarse a una salida de alimentación con conexión de protección puesta a tierra en la toma corriente La clavija de alimentación debe ser fácil de operar PRECAUCIÓN PARA EVITAR RIESGOS DE ELECTROCUCIÓN NO RETIRE LA TAPA NI LA CUBIERTA POSTERIOR NO HAY PIEZAS REPARABLES POR EL USUARIO ...

Page 5: ...os en el armario de la televisión en orificios o aberturas Nunca derrame ningún tipo de líquido sobre el receptor de televisión Precaución Evite exponer la unidad principal a la luz directa del sol y a otras fuentes de calor No coloque el receptor de televisión directamente sobre otros productos que dan calor Por ejemplo reproductores de video casetes amplificadores de audio No bloquee los orifici...

Page 6: ...a la televisión podrían suceder si se cae Precaución Cuando el producto no se utiliza durante un período prolongado de tiempo es recomendable desconectar la alimentación de CA por medio del cable de la toma de CA Precaución El panel LED utilizado en este producto está hecho de vidrio Por lo tanto se puede romper cuando deje caer el producto o sufra algún impacto Tenga cuidado de no lesionarse con ...

Page 7: ...e control Conexiones de terminal de la televisión VOL Subir el volumen VOL Bajar el volumen CH Subir el canal de televisión CH Bajar el canal de televisión MENU Pulse para seleccionar el menú principal SOURCE Seleccione la señal de entrada POWER Enciende o apaga el TV ...

Page 8: ...cione bien HD móvil debe usar otra fuente de alimentación para HD móvil No use al mismo tiempo la toma de USB Es compatible con HD móvil mediante la conexión de la toma USB debe ser más de 2 GB Las particiones de HD móvil no pueden ser superiores a 4 particiones La partición máx es de 2 TB Es compatible con el documento FAT FAT32 El máximo de documentos FAT es de 4 GB y el máximo de documentos FAT...

Page 9: ...H 17 5 QWUD D OD RSFLÖQ VHOHFFLRQDGD R HMHFXWH OD RSHUDFLÖQ VHOHFFLRQDGD 127 㸸 3UHVLRQH HO ERWÖQ SDUD DEULU OD OLVWD GH FDQDOHV HQ DO XHQWH GHO 0 18 3UHVLRQH HVWH ERWÖQ SDUD HQWUDU DO PHQÝ SULQFLSDO SDUD YDULRV DMXVWHV RSFLRQDOHV 7 6DOLU GHO 26 2Q VFUHHQ GLVSOD ź Ÿ DPELH ORV FDQDOHV DUULED DEDMR 92 ź 92 Ÿ MXVWD HO YROXPHQ 68 7 7 QFLHQGH R DSDJD ORV VXEWÐWXORV 8VDGR SDU PRGHORV FRQ IXQFLÖQ VROR GH ...

Page 10: ...OR SDUD PRGHORV FRQ IXQFLÖQ GH 0 6 3 VWDEOHFHU OD IXQFLÖQ 68 2 HQ HO WH WR PLHQWUDV HQWUD DO PRGR GH WH WR HQ SDQWDOOD 㸸6DOWDU DO VLJXLHQWH FDSLWXOR 8VDGR VROR FRQ PRGHORV FRQ IXQFLÖQ 0 7 7 3UHVLRQH SDUD HQWUDU DO PRGR 7HOHWH WR 9 DPELDU HQWUH 0RGR FOLHQWH LVWD DYRULWD 8 2 3UHVLRQH SDUD VHOHFFLRQDU HO DXGLR 79 8VDGR VROR FRQ PRGHORV FRQ IXQFLÖQ 79 79㸸3UHVLRQH SDUD FDPELDU HO PRGR 79 LJLWDO 79 127 ...

Page 11: ... el menú de la Guía de instalación aparecerá en la pantalla 1 Pulse el botón c d e f para seleccionar el idioma 2 Presione el botón c d e f para seleccionar el país local en donde se encuentra 3 Pulse el botón c d e f para seleccionar el modo de energía Nota La búsqueda de la plataforma tomará un largo período de tiempo por favor sea paciente ...

Page 12: ...ra seleccionar Escaneo automático Auto Scan Pulse el botón c d para seleccionar el país y pulse el botón c d para seleccionar Tune Type Tipo de ajuste y Digital Type Tipo digital Pulse el botón OK para comenzar a explorar Pulse el botón MENÚ para omitir o el botón EXIT SALIR para detener Nota La búsqueda de la plataforma tomará un largo período de tiempo Por favor sea paciente ...

Page 13: ... ajuste manual ATV ulse el botón de MENU para regresar al menú anterior Pulse el botón de EXIT para salir del menú 3 Sintonización digital manual Pulse el botón c d para seleccionar el botón Digital Manual Scan y pulse el botón d para iniciar Pulse el botón de MENU para regresar al menú anterior Pulse el botón de EXIT para salir del menú ...

Page 14: ...e quiere omitir y pulse el botón AZUL para omitirlo Pulse el botón AZUL nuevamente para cancelar la configuración c MOVER Pulse el botón c d para seleccionar el canal y pulse el botón AMARILLO para desplazarse Luego pulse el botón c d para seleccionar el canal con el cual quiere desplazarse Pulse el botón AMARILLO nuevamente para confirmar 5 Schedule List Lista de programas Pulse el botón c d para...

Page 15: ...gnal Information Información de señal y pulse el botón MENÚ para volver al menú anterior Pulse el botón EXIT FINALIZAR para salir del menú 7 Información CI Pulse el botón c d para seleccionar CI Info Información CI y pulse el botón OK para comprobar la información de la tarjeta CI ...

Page 16: ... para seleccionar Color y pulse el botón e f para entrar al menú de ajuste de color para ajustar el color 4 Pulse el botón c d para seleccionar Sharpness Nitidez y pulse el botón e f para entrar al menú de ajuste de nitidez para ajustar la nitidez 5 Pulse el botón c d para seleccionar Tint Tono y pulse el botón e f para entrar al menú de ajuste de tono para ajustar el tono Nota El elemento tinte s...

Page 17: ...seleccionar Modo de sonido y pulse el botón e f para seleccionar 2 Pulse el botón c d para seleccionar Agudos Treble y pulse el botón e f para seleccionar 3 Pulse el botón c d para seleccionar Bajos Bass y pulse el botón e f para seleccionar 4 Pulse el botón c d para seleccionar COAXIAL Mode Modo COAXIAL y pulse el botón e f para ajustar 5 Pulse el botón c d para seleccionar AD Switch Conmutador A...

Page 18: ...ona horaria 2 Pulse el botón c d para seleccionar Sleep Timer Temporizador de apagado automático y pulse el botón ENTER para entrar al submenú Pulse el botón c d para ajustar 3 Pulse el botón c d para seleccionar Auto Standby Apagado automático y pulse el botón ENTER para entrar al submenú Pulse el botón c d para ajustar 4 Pulse el botón c d para seleccionar OSD Timer Temporizador OSD y pulse el b...

Page 19: ...blecer contraseña y establezca su nueva contraseña 3 Pulse el botón c d para seleccionar Channel Locks Bloqueos de canales y pulse el botón VERDE para seleccionar el o los canales para bloquear 4 Pulse el botón c d para seleccionar Parental Guidance Control de los padres y pulse el botón e f para establecerlo 5 Pulse el botón c d para seleccionar Key Lock Bloqueo de tecla luego pulse el botón para...

Page 20: ...otón c d para seleccionar Hearing Impaired Problema de audición y pulse el botón e f para seleccionar On Encendido u Off Apagado 6 Pulse el botón c d para seleccionar Aspect Ratio Relación de aspecto y pulse el botón e f para seleccionar la relación de aspecto Auto 4 3 16 9 Zoom1 Zoom2 7 Pulse el botón c d para seleccionar Blue Screen Pantalla Azul y pulse el botón e f para seleccionar Encendido o...

Page 21: ...e el botón ENTER para ajustar 2 Pulse el botón c d para seleccionar H Offset y pulse el botón e f para ajustar 3 Pulse el botón c d para seleccionar V Offset y pulse el botón e f para ajustar 4 Pulse el botón c d para seleccionar Size Tamaño y pulse el botón ENTER para ajustar 5 Pulse el botón c d para seleccionar Phase Fase y pulse el botón ENTER para ajustar 6 Pulse el botón c d para seleccionar...

Page 22: ...La ventana de Lista de Favoritos se muestra como se indica a continuación Puede pulsar el e f botón para seleccionar el número de lista favorita Información del programa Cuando la fuente es seleccionada como DTV puede pulsar botón visualizar para mostrar la información del canal La ventana de información del programa se muestra como se indica a continuación ...

Page 23: ...n el menú de Idioma de audio Se muestra la ventana idioma de audio y pulse el botón c d para seleccionar el menú de idioma de audio Subtítulos Cuando se selecciona la fuente como DTV los usuarios pueden ir al menú para configurar Nota Las imágenes en relación a la función se proporcionan solo con fines de referencia ...

Page 24: ......

Page 25: ...stema de archivo PVR y pulse el botón ENTER para ingresar 2 Pulse el botón para seleccionar Check PVR File System Comprobar sistema de archivo de PVR y pulse el botón ENTER para ingresar Nota 1 El disco USB se formateará en la grabación no almacene archivos importantes en el disco USB 2 Pulse el botón para comenzar la grabación El ícono del grabador se reducirá pero todaví a está grabando ...

Page 26: ...nte MEDIA Fotografía 1 Pulse el botón para ingresar a la opción PHOTO y pulse el botón Enter para entrar 2 Pulse el botón para seleccionar el disco duro que quiere ver y a continuación pulse el botón Enter para ingresar 3 Pulse el botón EXIT para ingresar al menú anterior ...

Page 27: ... y a continuación pulse el botón Enter para ingresar 3 Pulse el botón EXIT para ingresar al menú anterior Película 1 Pulse el botón para seleccionar MOVIE en el menú principal después pulse el botón Enter para ingresar 2 Pulse el botón para seleccionar el disco duro que desea ver y después pulse el botón enter para ingresar 3 Pulse el botón EXIT para ingresar al menú anterior ...

Page 28: ...eccionar TEXT en el menú principal después pulse el botón Enter para ingresar 2 Pulse el botón para seleccionar el disco duro que desea ver después pulse el botón Enter para ingresar 3 Pulse el botón EXIT para ingresar al menú anterior ...

Page 29: ... 576i 720 x 576i 15 63 50 480p 720 x480p 31 47 59 94 60 576p 720 x 576p 31 26 50 720p 1280 x 720p 37 50 44 96 50 59 94 60 1080i 1920 x 1080i 28 13 33 75 50 59 94 60 1080p 1920 x 1080p 56 25 67 5 50 59 94 60 ENTRADA DEL COMPONENTE YPbPr Modo Resolución Frecuencia horizontal KHz Frecuencia vertical HZ 480i 720 x480i 15 73 59 94 60 576i 720 x 576i 15 63 50 480p 720 x480p 31 47 59 94 60 576p 720 x 576...

Page 30: ...l remoto y a continuación pulse repetidamente el botón para seleccionar la fuente de televisión Mala imagen sonido OK Revise el cable entre el televisor y la antena dispositivo AV externo Intente con otro la estación puede haber tenido dificultades de transmisión Ajuste el brillo contraste en el menú de vídeo Compruebe que la unidad se establece en PAL Ruido de Audio Mueva cualquier equipo de infr...

Page 31: ...1 ...

Page 32: ...2 ...

Page 33: ...3 ...

Page 34: ...USER S MANUAL LED TV SET LED 20H FHDT2 ...

Page 35: ...Contents Introduction Warning Caution Main Unit Description Remote Control OSD basic adjustment DTV Features USB Features PVR Operation Specifications Trouble Shooting ...

Page 36: ...ble viewing Allow enough space between the receiver and the wall to permit ventilation Avoid excessively warm locations to prevent possible damage to the cabinet or premature component failure This TV can be connected to 100 240V 50 60HZ Do not install the TV in a location near heat sources such as radiator air ducts direct sunlight or in a place somewhere like close compartment and close area Do ...

Page 37: ...ance instructions in the literature accompanying the equipment Class I structures of equipment should be connected to the grid power output with a protective earth connection on the socket Power plug as a broken appliance broken installations should be easy to operate CAUTION TO AVOID THE RISK OF ELECTRIC SHOCK DO NOT REMOVE COVER OR BACK NO USER SERVICEABLE PARTS INSIDE REFER SERVICING TO QUALIFI...

Page 38: ...o not drop or push objects into the television cabinet slots or openings Never spill any kind of liquid on the television receiver Caution Avoid exposing the main unit to direct sunlight and other sources of heat Do not stand the television receiver directly on other products which give off heat E g video cassette players Audio amplifiers Do not block the ventilation holes in the back cover Ventil...

Page 39: ...an individual and damage to the television may result if it should fall Caution When the product is not used for an extended period of time it is advisable to disconnect the AC power cord from the AC outlet Caution The LED panel used in this product is made of glass Therefore it can break when the product is dropped or applied with impact Be careful not to be injured by broken glass pieces in case...

Page 40: ...ption Control Panel Button Function TV Terminal Connections VOL Volume up VOL Volume down CH TV channel up CH TV channel down MENU Press to select the main menu SOURCE Select the input signal POWER Turn the TV on or off ...

Page 41: ... Mobile HD works well you should use other power supply for the Mobile HD And do not use the USB jack in the same time It supports Mobile HD by connecting with USB jack must more than 2 GB The partitions of the Mobile HD can t be more than 4 partitions The max partition is 2TB It supports FAT FAT32 document The max FAT document is 4GB and the max FAT32 document is 2TB ...

Page 42: ... do not store important files in the U disk AUTO Adjust the picture automatically in pc mode RED GREEN YELLOW BLUE Correspond to the different colored subjects SLEEP Set the sleep timer SOURCE Press to change signal source ENTER Enter the selected option or execute the selected operation NOTE SUHVV WKLV EXWWRQ WR GLVSOD channel OLVW LQ 79 source MENU Press this button to enter the main menu for va...

Page 43: ...on to go to the index page in Teletext Stop playing the Media Used for models with MEDIA function only Skip to previous chapter Used for models with MEDIA function only S PAGE Carry out the function of SUBCODE in the text while enter the text display mode Skip to next chapter Used for models with MEDIA function only TEXT Press to enter the Tele text mode FAV Switch between customer set Favorite Li...

Page 44: ...here are no programs in the TV memory the installation Guide menu will appear on the screen 1 Press the button to select the language 2 Press the button to select the local country you want to 3 Press the button to select energy mode Note Searching for platform will take a long time please be patient ...

Page 45: ...ain menu 1 Auto Tuning Press button to select Auto Scan Press button to select country and press the button to select Tune Type and Digital Type Press OK button to start scanning Press MENU button to skip or EXIT button to stop Note Searching for platform will take a long time Please be patient ...

Page 46: ... to ATV Manual Tuning Press MENU button to return the previous menu Press EXIT button to exit the menu 3 Digital Manual Tuning Press button to select Diigital Manual Scan and press the button to start Press MENU button to return the previous menu Press EXIT button to exit the menu ...

Page 47: ...to select the channel which you want to skip and press the BLUE button to skip Press BLUE button again to cancel the setting c MOVE Press button to select the channel and press the YELLOW button to move Then press the button to select the channel with which you want to move Press YELLOW button again to confirm 5 Schedule List Press button to select Schedule List and Press ENTER button to enter sub...

Page 48: ...in DTV Press button to select Signal information and Press MENU button to return the previous menu Press EXIT button to exit the menu 7 CI Information Press button to select CI Info and press the OK button to check CI card information ...

Page 49: ...htness adjustment menu to adjust brightness 3 Press button to select Colour and press the button to enter colour adjustment menu to adjust colour 4 Press button to select Sharpness and press the button to enter sharpness adjustment menu to adjust sharpness 5 Press button to select Tint and press the button to enter Tint adjustment menu to adjust Tint Note The hue item is used in NTSC mode only 6 P...

Page 50: ...elect the SOUND menu 1 Press button to select Sound Mode and press the button to select mode 2 Press button to select Treble and press the button to adjust 3 Press button to select Bass and press the button to adjust 4 Press button to select COAXIAL Mode and press the button to adjust 5 Press button to select AD Switch and press the button to adjust ...

Page 51: ...enter submenu Press button to select time zone 2 Press button to select Sleep Timer and Press ENTER button to enter submenu Press the button to adjust 3 Press button to select Auto Standby and Press ENTER button to enter submenu Press the button to adjust 4 Press button to select OSD Timer and Press ENTER button to enter submenu Press the button to adjust ...

Page 52: ...Off 2 Press button to select Set Password and set your new password 3 Press button to select Channel Locks and press the GREEN button to select channel s to lock 4 Press button to select Parental Guidance and press the button to set 5 Press button to select Key Lock then press button to select On or Off The key board will be invalid if you set Lock Keypad On 6 Press button to select Hotel Mode and...

Page 53: ...le language which you desire Note This function is only used for DTV source 5 Press button to select Hearing Impaired and press the button to select On or Off 6 Press button to select Aspect Ratio and press the button to select to select aspect ratio Auto 4 3 16 9 Zoom1 Zoom2 7 Press button to select Blue Screen and press the button to select On or Off 8 Press button to select First Time Installat...

Page 54: ...s the ENTER button to adjust 2 Press button to select H Offset and press the button to adjust 3 Press button to select V Offset and press the button to adjust 4 Press button to select Size and press the ENTER button to adjust 5 Press button to select Phase and press the ENTER button to adjust 6 Press button to select Position Reset and press the ENTER button to adjust ...

Page 55: ...sing FAV button The Favorite List window is illustrated as follows You can press the button to select the favorite list number Program Information When the source is selected as DTV you can press display button to display the channel s information The program information window is illustrated as follows ...

Page 56: ... enter the Audio Language menu The audio language window is illustrated and press button to select the Audio Language menu Subtitle When the source is selected as DTV users can go to the menu to set Note The pictures in regard to function are provided for reference purposes only ...

Page 57: ...el The selected program is also displayed on the top of the screen 1 3UHVV WKH c d EXWWRQ WR VHOHFW WKH Program RX FDQ SUHVV 5 EXWWRQ WR HQWHU UHFRUG PRGH 3UHVV 5 1 EXWWRQ WR GLVSOD WKH SURJUDP V GHWDLO 3UHVV 2 EXWWRQ WR KHFN GHWDLOV DW 395 V 6FKHGXOH LVW LQWURGXFWLRQ 3UHVV OXH EXWWRQ WR HQWHU remind setting 2 3UHVV WKH c d EXWWRQ WR VHOHFW DQG SUHVV WKH e f EXWWRQ WR VHOHFW WKH FKDQQHO QXPEHU WR ...

Page 58: ...DQG SUHVV WKH 17 5 EXWWRQ WR HQWHU 2 Press c d EXWWRQ WR VHOHFW Check PVR File System then press ENTER button to enter Note 1 The U disk will be formatted when in format please do not store important files in the U disk 2 3UHVV EXWWRQ IRU WKH ILUVW WLPH WR VWDUW UHFRUGLQJ IRU WKH VHFRQG WLPH WKH VLJQ RI recorder will be slimmed down but it s still under recording ...

Page 59: ...hange to the MEDIA source Photo 1 Press the button enter the PHOTO option and press ENTER button to enter 2 Press button to select drive disk you want to watch then press enter button to enter 3 Press the EXIT button to back to the previous menu ...

Page 60: ...ou want to watch then press enter button to enter 3 Press the exit button to back to the previous menu Movie 1 Press button to select MOVIE in the main menu then press ENTER button to enter 2 Press button to select drive disk you want to watch then press enter button to enter 3 Press the exit button to back to the previous menu ...

Page 61: ... button to select TEXT in the main menu then press ENTER button to enter 2 Press button to select drive disk you want to watch then press enter button to enter 3 Press the exit button to back to the previous menu 24 ...

Page 62: ...576i 720 x 576i 15 63 50 480p 720 x480p 31 47 59 94 60 576p 720 x 576p 31 26 50 720p 1280 x 720p 37 50 44 96 50 59 94 60 1080i 1920 x 1080i 28 13 33 75 50 59 94 60 1080p 1920 x 1080p 56 25 67 5 50 59 94 60 COMPONENT YPbPr INPUT Mode Resolution Horizontal Frequency KHz Vertical Frequency HZ 480i 720 x480i 15 73 59 94 60 576i 720 x 576i 15 63 50 480p 720 x480p 31 47 59 94 60 576p 720 x 576p 31 26 50...

Page 63: ...e remote then press the button repeatedly to select the TV source Poor picture sound OK Check the cable between TV and antenna external AV device Try another channel the station may have broadcast difficulties Adjust the brightness contrast in the Video menu Check that the unit is set to PAL Audio noise Move any infrared equipment away from the TV The TFT LED panel uses a panel consisting of sub p...

Page 64: ...MANUAL DO UTILIZADOR TV LED LED 20H FHDT2 ...

Page 65: ...Conteúdo Introdução Avisos Precauções Descrição da Unidade Principal Controlo Remoto Ajustamento básico OSD Funcionalidades DTV Funcionalidades USB Funcionamento PVR ESPECIFICAÇÔES Resolução de Problemas ...

Page 66: ...ção mais confortável Deixe um espaço suficiente entre o receptor e a parede para permitir a ventilação Evitar os locais excessivamente quentes para impedir possíveis danos no aparelho ou falhas prematuras nos componentes Esta TV pode ser ligada a um 100 240V 50 60HZ Não instale o aparelho de TV num local perto de uma fonte de calor como por exemplo um aquecimento ductos de ar luz solar directa ou ...

Page 67: ...ções de manutenção importantes no manual de instruções que acompanha este equipamento As estruturas de Classe I de equipamento devem ser ligadas à rede elétrica com uma ligação de proteção terra na tomada A ficha possui um circuito disjuntor portanto deve ser fácil de operar CUIDADO PARA SE EVITAR O RISCO DE CHOQUE ELÉCTRICO NÂO REMOVA COBERTURA OU A PARTE DE TRÁS NÂO EXISTEM PEÇAS REPARÀVEIS NO I...

Page 68: ...objectos sobre a cobertura da televisão fendas ou aberturas Nunca deixe cair qualquer tipo de líquido sobre o receptor de televisão Cuidado Evite a exposição da unidade principal à luz solar directa e outras fontes de calor Não coloque o receptor da televisão sobre outros aparelhos que emitam calor Ex Vídeos leitores de cassetes amplificadores de som Não bloqueie os orifícios de ventilação na tamp...

Page 69: ...r em lesões graves para as pessoas ou no aparelho de televisão se este último vier a cair Cuidado Quando o produto não for utilizado durante um período prolongado de tempo é aconselhável desligar o cabo de alimentação AC da tomada AC Cuidado O ecrã LED deste produto é feito de vidro Portanto está sujeito a partir se se o produto cair ou se lhe aplicarem um impacto Tenha cuidado em não ficar ferido...

Page 70: ... de Botões Ligações no Terminal da TV VOL Aumentar o Volume VOL Baixar o Volume CH Canal da TV para cima CH Canal da TV para baixo MENU Carregar para seleccionar o menu principal SOURCE Seleccionar o sinal de entrada ENERGIA Pressionar para ligar ou desligar a TV ...

Page 71: ...óvel funciona bem deve utilizar outra fonte de alimentação para o disco rígido móvel E não utilize a entrada USB em simultâneo Suporta disco rígido móvel ao ligar através da entrada USB deve ser superior a 2GB As partições do disco rígido móvel não podem ser superiores a 4 O tamanho máximo de partição é 2TB Suporta documentos em FAT FAT32 O tamanho máximo de documento em FAT é 4GB e em FAT32 é 2TB...

Page 72: ...r não armazenar arquivos importantes no disco de U AUTO Ajusta automaticamente a imagem no modo pc VERMELHO VERDE AMARELO AZUL Corresponde a diferentes assuntos com essas cores SLEEP Define o modo do temporizador SOURCE Carregue para alterar a fonte do sinal ENTER Introduza a opção selecionada ou execute a operação selecionada e prima esta tecla para exibir Lista de canal no modo TV MENU Pressiona...

Page 73: ...ra a página do índice do Teletexto Parar a reprodução do disco ou Media Utilizado para modelos apenas com a função MEDIA Passar para a secção anterior Utilizado para modelos apenas com a função MEDIA S PAGE Realizar a função SUB CÓDIGO no texto enquanto entra no modo de apresentação de texto Saltar para o capítulo seguinte Utilizado para modelos apenas com a função MEDIA TEXTO Pressionar para entr...

Page 74: ...ramas na memória da televisão irá surgir no ecrã o menu Installation Guide guia de instalação 1 Prima a tecla c d e f para selecionar o idioma 2 Pressione a tecla c d e f para escolher o país desejado 3 Pressione a tecla c d e f para escolher o modo Nota Pesquisar na plataforma vai demorar algum tempo seja paciente ...

Page 75: ...omática Prima a tecla c d para selecionar Auto Scan pesquisa automática Prima a tecla c d para selecionar o país e prima c d para selecionar Tune Type tipo de sintonização e Digital Type tipo digital Prima OK para iniciar a pesquisa Prima MENU para ignorar ou EXIT sair para parar NOTA Pesquisar na plataforma vai demorar algum tempo Seja paciente ...

Page 76: ...ual Pressione a tecla MENU para regressar ao menu anterior Pressione a tecla EXIT SAIR para sair do menu 3 Ajuste Manual Digital Pressione a tecla c d para escolher Digital Manual Scan Pesquisa manual digital e a tecla d para iniciar Pressione a tecla MENU para regressar ao menu anterior Pressione a tecla EXIT SAIR para sair do menu ...

Page 77: ...ecla c d para selecionar o canal que pretende saltar e prima a tecla AZUL para saltar Prima novamente a tecla AZUL para cancelar a definição c MOVER Prima a tecla c d para selecionar o canal e prima a tecla AMARELA para mover Prima então a tecla c d para selecionar o canal para o qual pretende mover Prima novamente a tecla AMARELA para confirmar 5 Lista de agenda Prima a tecla c d para selecionar ...

Page 78: ... d para selecionar Signal Information informação do sinal e prima ENTER para voltar ao menu anterior Prima a tecla EXIT sair para sair do menu 7 Informação CI Prima a tecla c d para selecionar CI Info info CI e prima OK para verificar a informação do cartão CI ...

Page 79: ...a ajustar a luminosidade 3 Prima a tecla c d para selecionar Colour cor e prima e f para aceder ao menu de ajuste de cor para ajustar o mesmo 4 Prima a tecla c d para selecionar Sharpness nitidez e prima a tecla e f para entrar no menu de ajuste de nitidez para ajustar a nitidez 5 Prima a tecla c d para selecionar Tint tonalidade e prima e f para aceder ao menu de ajuste de tonalidade para ajustar...

Page 80: ...o Sound Mode Modo de Som e pressione a tecla e f para escolher o modo 2 Pressione a tecla c d para escolher Treble Agudos e pressione a tecla e f para ajustar 3 Pressione a tecla c d para escolher Bass Baixos e pressione a tecla e f para ajustar 4 Prima a tecla c d para selecionar COAXIAL Mode modo COAXIAL e prima e f para ajustar 5 Prima a tecla c d para selecionar AD Switch alteração AD e prima ...

Page 81: ...ionar o fuso horário 2 Prima a tecla c d para selecionar Sleep Timer temporizador para hibernar e prima ENTER para aceder ao submenu Prima a tecla c d para ajustar 3 Prima a tecla c d para selecionar Auto Standby standby automático e prima ENTER para aceder ao submenu Prima a tecla c d para ajustar 4 Prima a tecla c d para selecionar OSD Timer temporizador OSD e prima ENTER para aceder ao submenu ...

Page 82: ...r Set Password definir senha e defina a sua nova senha 3 Prima a tecla c d para selecionar Channel Locks bloqueio de canal e prima a tecla VERDE para selecionar o s canal is a bloquear 4 Pressione a tecla c d para escolher Parental Guidance Classificação Parental e a tecla e f para ajustar 5 Prima a tecla para selecionar Key Lock bloqueio de teclado e prima para selecionar On ligado ou Off desliga...

Page 83: ...Prima a tecla c d para selecionar Hearing Impaired deficientes auditivos e prima e f para selecionar On ligado ou Off desligado 6 Prima a tecla c d para selecionar Aspect Ratio proporção e prima e f para selecionar a proporção Auto 4 3 16 9 Zoom1 Zoom2 7 Pressione a tecla c d para escolher Blue Screen Ecrã Azul e a tecla e f para escolher On Ligado ou Off Desligado 8 Prima a tecla c d para selecio...

Page 84: ...justar 2 Prima a tecla c d para selecionar H Offset desvio horizontal e prima e f para ajustar 3 Prima a tecla c d para selecionar V Offset desvio vertical e prima e f para ajustar 4 Prima a tecla c d para selecionar Size tamanho e prima ENTER para ajustar 5 Prima a tecla c d para selecionar Phase fase e prima ENTER para ajustar 6 Prima a tecla c d para selecionar Position Reset repor posição e pr...

Page 85: ...remir a tecla FAV A janela Favorite list lista de favoritos é a seguinte Pode premir o botão e f para seleccionar o número de lista favorita Informação do programa Quando a fonte é selecionada como DTV pode premir a tecla DISPLAY visualização para visualizar a informação do canal A janela program information informação do programa é a seguinte ...

Page 86: ...Idioma Audio A janela audio language idioma audio está ilustrada pressione a tecla c d para escolher o menu audio language idioma de audio Legendas Quando a origem for escolhida como DTV os utilizadores podem ir ao menu para ajustar Nota As imagens relacionadas à função são disponibilizadas apenas com propósitos de referência ...

Page 87: ......

Page 88: ...ficheiros PVR e em ENTER para entrar 2 Pressione em para escolher Check PVR File System Verifica sistema de ficheiros PVR e em ENTER para entrar Nota 1 O disco U será formatado durante a gravação por favor não guarde informações importantes no disco U 2 Pressione a tecla pela primeira vez para iniciar a gravação pela segunda vez o sinal do gravador será reduzido mas ainda está em gravação ...

Page 89: ... para mudar para MEDIA Foto 1 Prima a tecla para aceder à opção PHOTO fotografia e prima a tecla ENTER para aceder 2 Prima a tecla para selecionar o leitor que pretende ver e prima ENTER para aceder 3 Pressione o botão sair para regressar ao menu anterior ...

Page 90: ...ja ver depois pressione a tecla para entrar 3 Pressione o botão exit sair para regressar ao menu anterior Filme 1 Pressione a tecla para escolher MOVIE FILME no menu principal e depois na tecla enter para entrar 2 Pressione para escolher a unidade de disco que deseja ver depois pressione a tecla para entrar 3 Pressione o botão sair para regressar ao menu anterior ...

Page 91: ...a escolher TEXT TEXTO no menu principal e depois na tecla enter para entrar 2 Pressione para escolher a unidade de disco que deseja ver depois pressione a tecla para entrar 3 Pressione o botão EXIT SAIR para regressar ao menu anterior ...

Page 92: ...6i 720 x 576i 15 63 50 480p 720 x480p 31 47 59 94 60 576p 720 x 576p 31 26 50 720p 1280 x 720p 37 50 44 96 50 59 94 60 1080i 1920 x 1080i 28 13 33 75 50 59 94 60 1080p 1920 x 1080p 56 25 67 5 50 59 94 60 ENTRADA DE COMPONENTES YPbPr Modo Resolução Horizontal Frequência KHz Vertical Frequência HZ 480i 720 x480i 15 73 59 94 60 576i 720 x 576i 15 63 50 480p 720 x480p 31 47 59 94 60 576p 720 x 576p 31...

Page 93: ...o e prima repetidamente a tecla para selecionar a fonte de televisão Imagem fraca som OK Verifique o cabo entre a televisão e a antena dispositivo AV externo Tente outro canal pois a estação pode ter dificuldades de transmissão Ajuste a luminosidade contraste no menu Vídeo Verifique se o aparelho está ajustado para PAL Ruído áudio Afaste qualquer equipamento de infravermelhos da televisão O painel...

Reviews: