Grundig XEPHIA 42 PW 110-6609 TOP User Manual Download Page 3

ENGLISH

3

SET-UP AND SAFETY

___________________________

Please note the following information when setting up your television set.

This television set is designed to receive and display video and audio
signals.
Any other use is expressly prohibited.

The ideal viewing distance is 5 times the screen diagonal.
External light falling on the screen impairs picture quality.

To assure sufficient ventilation make sure there is enough space 
around it in the wall unit.

The television set is designed for use in dry rooms. If you do use it in the
open, please ensure that it is protected from moisture, such as rain or
splashing water. Do not expose the television set to any moisture.

Do not place any vessels such as vases on the television, as they may
spill liquid, thus presenting a safety risk.
Place the television set on a solid, level surface. Do not place any 
objects such as newspapers on the television set or cloth or similar items
beneath it. 

Do not place the television set close to heating units or in direct sunlight,
as this will impair cooling. 
Heat build-up can be dangerous and shortens the operating life of the
television set. For reasons of safety, have a specialist remove any dirt
deposits in the set from time to time.

Do not open the television set under any circumstances. Warranty
claims are excluded for damage resulting from improper handling.

Ensure that the mains cable and the mains adapter are not damaged.
The television set may only be operated with the mains cable/adapter
supplied.

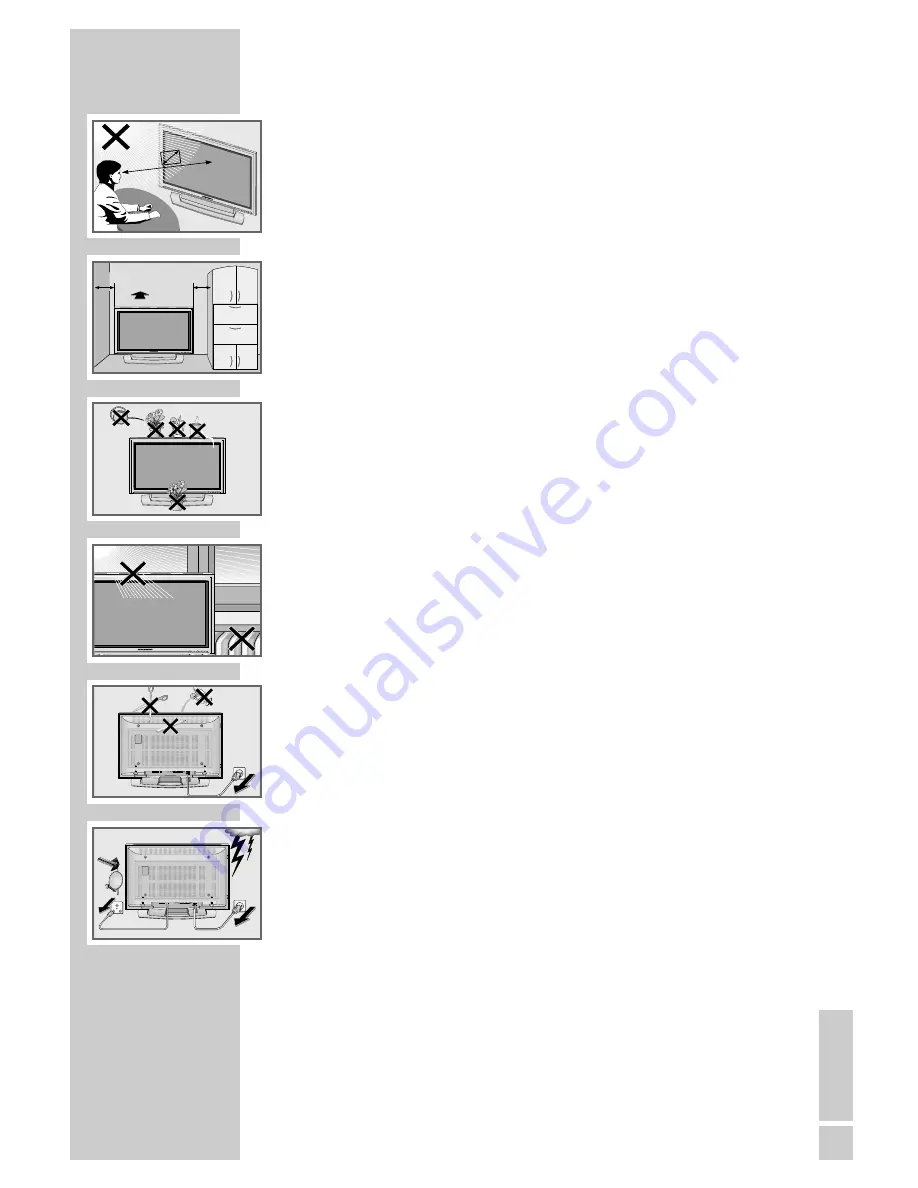
Thunderstorms are a danger to all electrical devices. Even if the tele-
vision set is switched off, it can be damaged by a lightning strike to the
mains or the antenna cable. Always disconnect the mains and antenna
plugs during a storm.

Only clean the plasma screen with a chamois leather and commercially
available glass cleaner.
Only clean the housing of the plasma television with a damp, soft cloth,
and plain water.

The Plasma screen is equipped with a glass plate. If the device is 
subjected to excessive strain, for example through vibration, bending or
heat shocks the glass plate can break.
Do not hit or put pressure on the glass plate.
Should the glass plate be damaged, pull out the main plug immediately.

VOL

PROG

MENU

SOURCE

5 x

10

cm

20 cm

10

cm

VOL

PROG

MENU

SOURCE

VOL

PROG

MENU

SOURCE

VOL

PROG

MENU

SOURCE

L

S-VIDEO

R

AUDIO

VIDEO

! SER

VICE !

! SER

VICE !

! SER

VICE !

L

S-VIDEO

R

AUDIO

VIDEO

TV

R

SAT

Summary of Contents for XEPHIA 42 PW 110-6609 TOP

Page 1: ...COLOR TELEVISION XEPHIA 42 PW 110 6609 TOP en...

Page 2: ...c functions 17 Zap function 18 Zoom function 19 Changing the picture format 20 PIP mode 21 22 Teletext mode 21 TOP text or FLOF text mode 21 Normal text mode 21 22 Additional functions 23 Convenience...

Page 3: ...rating life of the television set For reasons of safety have a specialist remove any dirt deposits in the set from time to time Do not open the television set under any circumstances Warranty claims a...

Page 4: ...ter a lengthy period without use longer than one year a temporary colour discrepancy is possible in some circumstances This effect is normal for plasma screens After a while these colour discrepancies...

Page 5: ...table base 1 Fasten the two brackets to the table base using the hex socket screws supplied 2 Remove four fixing screws for each bracket from the back of the device 3 Place the stand on a level surfac...

Page 6: ...socket Note Only plug the device into the mains socket after you have connected the external devices and the antenna Only connect the television using the power cord supplied to a suitable earthed sa...

Page 7: ...compartment by removing the lid 2 Insert the batteries Mignon type for example UM 3 or AA 2x1 5V Observe the polarity marked on the base of the battery compartment 3 Close the battery compartment Note...

Page 8: ...In L R Audio signal input YUV signal DVI D DVI D socket video signal input for PC DVI HDMI HDMI socket audio video signal input HDMI PC IN VGA socket video signal input for PC PC DVI Audio In Audio si...

Page 9: ...ode TV AV Opens the pre selection for AV channels Select within the menu with P or P confirm with z MENU Opens the INFO menu Press z to select an item Press z to activate a function Press z to set a f...

Page 10: ...or P d Sound on off mute i Calls up the Main menu Z Zap function P P Switches the television on from standby selects stations step by step moves the cursor in the menus up and down Adjusts the volume...

Page 11: ...DVD button has been programmed for operating a GRUNDIG DVD player You can change this programming see AUX button The functions available depend on the model of the device you are using Just try it out...

Page 12: ...switches to channel position 1 and the Program table menu appears Changing stored channels You can delete channels that have been stored more than once during the automatic search You can also store c...

Page 13: ...n mark television channels which should be skipped during selection with P or P A selection with the number keys is also possible 1 In the Program table menu select the desired channel with P P or 2 H...

Page 14: ...ress OK to confirm 6 Press i to finish the settings Audio settings 1 Press i to open the MAIN MENU The MAIN MENU appears 2 Select Sound with P or P and confirm with OK The Sound menu appears Note Furt...

Page 15: ...olume The television channels broadcast at different volumes The automa tic volume limiting AVL function means the volume is kept the same when you switch between channels 1 Select AVL with P or P and...

Page 16: ...ired AV channel position with P or P and press OK to confirm 3 Switch back to the television channel with 1 0 Adjusting the volume 1 Adjust the volume with or Muting 1 Use p to switch the sound off mu...

Page 17: ...sound settings see the Equaliser chapter on page 15 Zap function This function allows you to save the television channel which you are currently watching and switch to other channels zapping 1 Select...

Page 18: ...Select Brightness with P or P and press P again Zoom is selected 4 Press OK to activate the zoom function 5 Press P or P to change the size of the picture 6 To change the picture section press OK and...

Page 19: ...the picture fills the screen completely and with the correct geometry Letterbox format The letterbox setting is especially suitable for programmes in 16 9 format The black borders which are usually at...

Page 20: ...uble window 1 Press P or P to move up and down channel positions one at a time Selecting the channels for the main picture and the right side of the screen double window 1 Press 1 0 to select channels...

Page 21: ...select teletext pages with 1 0 3 Press P to scroll back a page 4 Press P to scroll to the next page 5 Press TXT to switch off teletext mode Additional functions Skipping the waiting time While a page...

Page 22: ...the function Reveal answer Certain teletext pages contain hidden answers or information which can be called up 1 Display information with SCAN 2 Conceal information with SCAN Split screen With this fu...

Page 23: ...Select Parental lock with P or P 2 Press or to activate or deactivate the child lock On or Off 3 Press i to conclude the setting Automatic picture format modification Auto Blackline Detect If this fu...

Page 24: ...s Connecting a DVD player DVD recorder video recorder or set top box With a digital audio video signal Video signal digital video resolution standard 576p HDTV 720p 1080i Audio signal digital audio st...

Page 25: ...h cables audio signal Using the Euro AV socket Video signal FBAS RGB AV 1 FBAS AV 2 Audio signal stereo analogue Channel position AV1 or AV2 1 Connect the AV 1 or AV 2 socket on the television and the...

Page 26: ...signal Using a video recorder DVD player or set top box 1 Switch on the video recorder DVD player or set top box and select the function you wish to use 2 Press AV select the input signal channel with...

Page 27: ...g or AV2 the audio video signal from the Euro AV socket AV2 1 Call up the MAIN MENU menu with i 2 Select Features with P or P and press OK to con firm 3 Select AV2 output or AV output with P or P 4 Se...

Page 28: ...ecting a decoder or satellite receiver 1 Connect the AV 1 socket on the television set and the appro priate socket on the decoder using a EURO AV cable Using a decoder or satellite receiver 1 Switch o...

Page 29: ...ble 2 Connect the white and red sockets L AUDIO R on the televi sion and the corresponding sockets on the camcorder with a cinch cable audio signal Note There must not be video signals at VIDEO and S...

Page 30: ...N MENU menu appears 2 Select Picture with P or P and press OK to confirm The Picture menu appears 3 Select Brightness with P or P and press P again The second page of the picture menu appears 4 Press...

Page 31: ...he search with or If a strong station signal is received the search is interrupted and the picture appears Repeat the search until the channel you want appears on the screen Note The current system is...

Page 32: ...irm with OK 4 Select Program no with P or P and set the preset channel with or 5 Select Band with P or P 6 Press or to choose between S special channel and C channel 7 Select Channel with P or P 8 Pre...

Page 33: ...nu appears 4 Press or to select the country 5 Select Autoprogram with P or P and confirm with OK A warning message appears 6 Press green to start the search The search begins It may last a few minutes...

Page 34: ...to be used within defined voltage ranges 89 336 EEC directive on electromagnetic compatibility The device complies with the following standards EN 60065 EN 55013 EN 55020 Environmental note This prod...

Page 35: ...icure resolution and picture fre quency on the PC Picture format is set to letterbox or subtitles Remedy Is the antenna cable connected Start the station search Adjust the brightness contrast or colou...

Page 36: ...be protected by a 5A fuse either in the plug or at the distribution board If this type of plug becomes defective ensure that the fuse is removed before disposal to eliminate potential shock hazard If...

Page 37: ...Grundig Multimedia B V Atrium Strawinskylaan 3105 NL 1077 ZX Amsterdam http www grundig com 06 34 72011 724 3500...

Reviews: