Grundig VISION 3 26-3830 T Manual Download Page 32

Camcorder

Connecting the camcorder

1

Connect the yellow socket »

VIDEO

« on the television and the

corresponding socket on the camcorder (VHS, Video 8) with a
cinch cable (picture signal);

or
connect the »

S-VHS

« socket (picture signal) on the television and

the corresponding socket on the camcorder (S-VHS, Hi 8) with a
S-Video cable.

2

Connect the white and red sockets »

L R

« on the television and the

corresponding sockets on the camcorder with a cinch cable
(audio signal).

Note:

There must not be video signals at »

VIDEO

« and »

S-VHS

« 

sockets at the same time. This could lead to picture disturbances.

Operating with a camcorder

1

Switch on the camcorder, insert a cassette and start playback.

2

Press »

AV

«, select the »AV3« or »S-VIDEO« channel with »

P+

«

or »

P-

« and press »

OK

« to confirm.

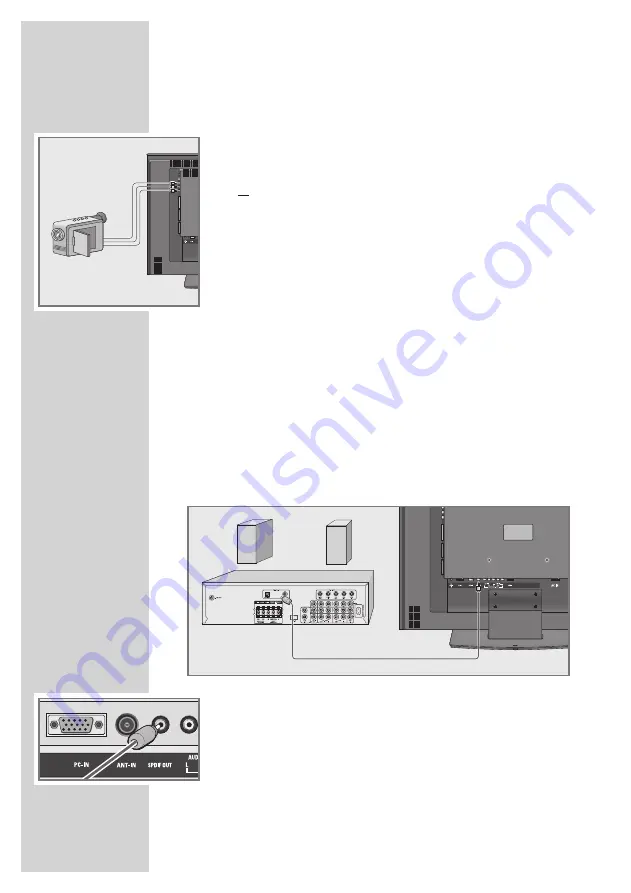
Hi-fi system/AV receiver

Connecting the hi-fi system/AV receiver

1

Connect the socket »

SPDIF OUT

« on the television to the corre-

sponding socket on the AV receiver using a cinch cable (digital
audio signal).

USING EXTERNAL DEVICES

----------------------------------

32

Summary of Contents for VISION 3 26-3830 T

Page 1: ...COLOR TELEVISION VISION 3 26 3830 T VISION 3 32 3830 T VISION 3 37 3830 T...

Page 2: ...c functions 19 Zoom function 20 Zap function 20 Electronic TV guide 21 Changing the picture format 22 TELETEXT MODE 22 FLOF text and normal text mode 22 Additional functions 24 CONVENIENCE FUNCTIONS 2...

Page 3: ...ions 36 Tuning analogue television stations 38 Changing stored channels for analogue stations 40 INFORMATION 40 Technical data 40 Service information for dealers 40 Environmental note 41 Troubleshooti...

Page 4: ...eating units or in direct sun light as this will impair cooling Heat build up can be dangerous and shortens the operating life of the television set For reasons of safety have a specialist remove any...

Page 5: ...n manufacturing technological reasons make it impossible to completely discount the possibility that some pixels may be faulty Provided they are within the thresholds speci ed by the DIN norm pixel fa...

Page 6: ...ations To receive digital stations you need a digital rooftop or indoor an tenna passive or active indoor antenna with its own power supply Unlike analogue broadcasting not every station has its own t...

Page 7: ...ndoor antenna you may have to try it out at di erent positions until you get the best reception 2 Plug the mains cable supplied into the AC IN mains socket of the television 3 Plug the mains cable int...

Page 8: ...levision no longer reacts properly to remote control commands the batteries may be at Be sure to remove used batteries The manufacturer accepts no liability for damage resulting from used batteries En...

Page 9: ...AV socket FBAS signal PC AUDIO IN Audio signal input for PC PC IN VGA socket video signal input for PC ANT IN Antenna socket SPDIF OUT Audio output sockets coaxial for PCM signals For connecting to a...

Page 10: ...volume Select menu functions MENU Opens the MAIN MENU menu Press P or P to select an item Press V or V to activate a function Press V or V to set a function Press MENU to close the menu Opens the pre...

Page 11: ...MENU Z Zap function page stop in teletext mode P P Switches the television on from standby selects stations step by step moves the cursor in the menus up and down 4 3 Adjusts the volume moves the cur...

Page 12: ...a GRUNDIG digital receiver remote control level 1 The DVD button has been programmed for operating a GRUNDIG DVD player You can change this programming see AUX button The functions available depend on...

Page 13: ...it is not already supplied with a voltage via a mains plug or similar supply Otherwise you may cause a short circuit and irreparably damage your antenna Select Active antenna with P or P Press 4 or 3...

Page 14: ...on rm The Program Management TV menu is displayed Moving channels to di erent presets Note that presets whose channels are moved to the back are no longer visible in the channel list 1 In the Program...

Page 15: ...select the channel press 3 to switch to the symbol D and press OK to enable the channel again Deleting channels 1 In the Program Management TV menu press P or P to select the channel to be deleted an...

Page 16: ...alance with P or P and adjust the setting with 4 or 3 Stereo two channel mono If the device receives two channel programmes e g a lm with the original sound on sound channel B display Dual II and the...

Page 17: ...ct On with 4 or 3 Equaliser The equaliser o ers you four preset sound settings Music Sport Cinema and Speech and one which you can create yourself User 1 Select EQUALIZER with P or P and con rm with O...

Page 18: ...verview is displayed 2 Press P or P to select the channel list and OK to con rm 3 Press P or P to select the channel and OK to con rm Selecting AV channels 1 Call up the SOURCE TABLE menu with AV 2 Se...

Page 19: ...cture setting see the Picture settings chapter on page 16 Sound settings You can select various audio settings when watching analogue channels 1 Select User Music Sport Film or Speech by pressing F bl...

Page 20: ...ital stations only 1 Press TV G to see programme information Information about the current and following programme appears together with detailed programme information Notes Not all stations supply pr...

Page 21: ...es from a set top box on the Euro AV socket the picture lls the screen completely and with the correct geometry 4 3 format The picture is shown in 4 3 format LETTERBOX format The letterbox setting is...

Page 22: ...n line 4 Press TXT to switch o teletext mode Additional functions Skipping the waiting time While a page is being searched for you can switch to the television channel 1 Enter the teletext page number...

Page 23: ...Certain teletext pages contain hidden answers or information which can be called up 1 Display information with 2 Conceal information with Split screen Split Screen With this function you can see the...

Page 24: ...e or switches on from standby mode You can enter the channel the tele vision switches on to in the Program no line 1 Select Timer with P or P and press OK to con rm 2 Select O Time or On Time by press...

Page 25: ...ENU menu is displayed 2 Select Features with P or P and press OK to con rm 3 Select Digital features with P or P and press OK to con rm Note Additional operations are explained in the following sectio...

Page 26: ...h 1 0 3 In the Parental control menu item press 4 or 3 to select On 4 With parental control activated press P or P to select Parental Rating and press 4 or 3 to select None Child Youth or Adult 5 Pres...

Page 27: ...ect Software Update with P or P and press OK to con rm 2 Select Automatic Update with P or P and press 4 or 3 to select On The software is updated automatically if possible or Select Search for New so...

Page 28: ...o the mains socket after you have connected the external devices High de nition HD ready Your television can playback high de nition television signals HDTV You can connect the input sources HDTV set...

Page 29: ...o AV socket Video signal FBAS RGB AV1 FBAS AV2 Audio signal stereo analogue Channel position AV1 or AV2 1 Connect the AV1 or AV2 socket on the television and the corresponding socket on the external d...

Page 30: ...top box and se lect the function you wish to use 2 Press AV select the input signal channel with P or P AV1 AV2 AV3 S VIDEO HDMI or YPBPR and press OK to con rm Headphones Connecting headphones 1 Plug...

Page 31: ...oder or satellite receiver 1 Connect the AV1 socket on the television set and the appro priate socket on the decoder using a EURO AV cable Using a decoder or satellite receiver 1 Switch on the televis...

Page 32: ...corresponding sockets on the camcorder with a cinch cable audio signal Note There must not be video signals at VIDEO and S VHS sockets at the same time This could lead to picture disturbances Operatin...

Page 33: ...or P and press OK to con rm Settings for the PC 1 Press i to open the MAIN MENU menu The MAIN MENU menu appears 2 Select SETUP with P or P and press OK to con rm 3 Select the function or setting you...

Page 34: ...i 2 Select Features with P or P and press OK to con rm 3 Select Digital features with P or P and press OK to con rm 4 Select CA Module with P or P and press OK to con rm Notes This menu give operatin...

Page 35: ...for digital TV stations begins This may take several minutes depending on the number of television stations received The search is nished when the last line of the menu shows the number of stations f...

Page 36: ...earch with P or P and start the search with 4 or 3 If a strong station signal is received the search is interrupted and the picture appears Repeat the search until the channel you want appears on the...

Page 37: ...th 4 or 3 4 Select Channel with P or P 5 Press OK to choose between S special channel and C channel 6 Press 4 or 3 to switch up and down channels or use 1 0 to enter the channel number directly Note T...

Page 38: ...stored with the automatic channel search during the tuning of the television channels you can delete them You can also store stations in a di erent preset change or enter the name of a stations as we...

Page 39: ...channel names repeat steps 1 to 4 Skipping television channels You can mark television channels which should be skipped during se lection with P or P A selection with the number keys is also possible...

Page 40: ...ter sup plied The product complies with the following EU directives 2006 95 EG directive for electrical equipment to be used within de ned voltage ranges 2004 108 EG directive on electromag netic comp...

Page 41: ...ard setting if setting option is available Problem at station Volume set to minimum Problem at station Television station has no tele text or antenna system Station signal too weak No optical connecti...

Page 42: ...ed it must be protected by a 5A fuse either in the plug or at the distribution board If this type of plug becomes defec tive ensure that the fuse is removed before disposal to eliminate poten tial sho...

Page 43: ...Grundig Multimedia B V Atrium Strawinskylaan 3105 NL 1077 ZX Amsterdam http www grundig com 08 10...

Reviews: