Grundig UMS 4950 iP User Manual Download Page 31

31 

ENGLISH

INFORMATION

 ------------------------------------------------------------------------------------------------------------------

Troubleshooting

Not every kind of sound interference is caused 

by a defect in your hi-fi system. Cables that have 

accidentally been disconnected, damaged CDs 

and flat battery for the remote control will impair 

functioning.  If  the  following  measures  do  not 

resolve  the  problem  satisfactorily,  please  visit  

www.grundig.com,  product  range:  hi-fi,  micro 

CD stations or contact your specialist dealer.
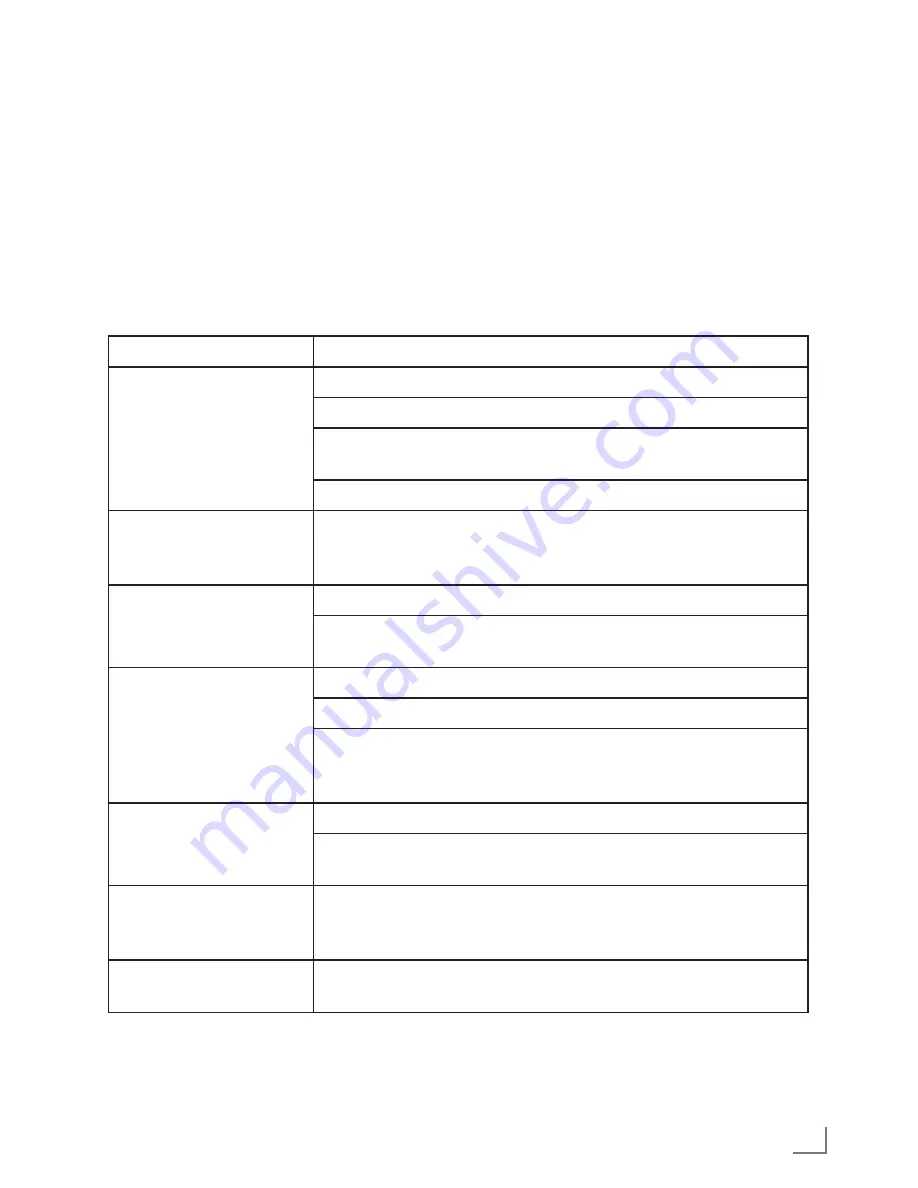
Problem

Possible cause

No sound.  

The volume setting is too low. Increase the volume. 
The headphones are plugged in. Disconnect the headphones.
Power cable is not properly connected. Connect the power cable 
properly.
Mute is activated. Deactivate mute. 

The hi-fi system does not 
react when the buttons are 
pressed.

Static electrical discharge. Switch off the hi-fi system, disconnect the 
power cable and plug it in again after a few seconds.

The remote control does 
not work.

The battery is flat. Replace the battery. 
The remote control is out of range of the hi-fi system. Come closer to 
the hi-fi system.

Poor radio reception.

Weak antenna signal. Check antenna.
Weak FM stereo signal. Switch to mono.
Interference from electrical devices such as televisions, video 
recorders, computers, neon lamps, thermostats or motors.  
Keep the hi-fi system away from such equipment.

Tracks on a CD are 
skipped.

The CD is damaged or dirty. Replace the CD or clean it.
The PROGRAM (playlist) or RANDOM functions are active.
Deactivate the functions.

CD–Rs or CD–RWs are 
not played back, or are 
played back incorrectly.

Faulty software or hardware settings during burning or the CD itself.
Check the components of your CD burner/software or change the 
CD being used.

Recording cannot be 
made.

USB or Memory card is not compatible. Please check with other 
device/card.

Summary of Contents for UMS 4950 iP

Page 1: ...en MICRO HiFi SYSTEM UMS 4950 iP...

Page 2: ...esets 17 Stereo mono reception 17 RDS information 19 CD MODE 19 Selecting the CD input source 19 Inserting and playing CDs 19 Pausing and resuming playback 20 Repeating the current track 20 Selecting...

Page 3: ...esigned for use in dry rooms If you do use it outdoors make sure it is protected from moisture such as dripping or splashing water 7 Only use the hi fi system in a moderate climate 7 Do not place the...

Page 4: ...up when the unit is in the control menu for different modes of operation Display of the hi fi system for more details please see The hi fi system displays section Infrared sensor for remote control si...

Page 5: ...mains is to pull out the plug In tuner mode Selects a preset radio station In iPod iPhone MP3 WMA or CD mode Briefly press to select files or tracks backwards Press and hold down to start searching b...

Page 6: ...s and pauses playback In tuner mode Selects preset In CD USB SD iPod iPhone mode Briefly press to select files or tracks backwards or forwards Press and hold down to start searching backwards for a pa...

Page 7: ...ner mode Cycles through the RDS information In CD USB SD iPod iPhone mode Cycles through the provided information in the tracks or files Press and hold to enlarge the display informations UBS Switches...

Page 8: ...is active PM In clock mode Shows PM if 12H is selected The switch on timer for the buzzer is active The switch on timer for tuner CD USB SD iPod iPhone is active Flashes when the hi fi system is waiti...

Page 9: ...ets AUX IN L and AUX IN R on the back of the hi fi system Connecting a USB memory stick The hi fi system supports most USB memory sticks Note 7 The hi fi system must be switched off while the USB conn...

Page 10: ...re from the ear phones or headphones can cause hearing loss CONNECTION AND PREPARATION Inserting a memory card The hi fi system supports SD SDHC and MMC memory cards Note 7 The hi fi system must be sw...

Page 11: ...Make sure the power plug is easily acces sible during operation and not hindered by other objects CONNECTION AND PREPARATION Putting battery in the remote control 1 Open the battery compartment by pu...

Page 12: ...ividual sound setting Operation Press on the Jog Shuttle to select the next menu and turn the Jog Shuttle to scroll through the menu items Press on the top section of your hi fi system to activate the...

Page 13: ...time information the time is updated automati cally provided that CT is set to ON This takes about five minutes Setting the clock manually The time can be set manually as not all radio stations trans...

Page 14: ...ored at preset position 1 starts to play 7 You can stop the automatic programming Press or 7 buttons Programming radio stations manually 1 Switch on the hi fi system from standby mode by pressing 8 on...

Page 15: ...or press M on the remote control repeatedly to select the input source Display FM TUNER 100 60MHz frequency of the radio station AUX CD SD or USB Adjusting the volume 1 Press repeatedly on the Jog Sh...

Page 16: ...button for 5 seconds the hi fi system will automatically quit the setting Switching the Ultra Bass System on and off with the Jog Shuttle on the hi fi system 1 Press repeatedly the Jog Shuttle on the...

Page 17: ...RDS information RDS Radio Data System is an information system which is transmitted additionally by most FM stations When the hi fi system receives an RDS station the station name appears in the displ...

Page 18: ...c time setting is always activated when the device is switched from standby to tuner mode and receives a RDS station When the device is waiting for an RDS time signal flashes on the display Once RDS t...

Page 19: ...le and confirm with or press M on the remote control repeatedly until CD is displayed Display CD If there is no CD in the compartment NO DISC appears in the display after a short time When a CD is alr...

Page 20: ...uring playback press INT REP on the remote control repeatedly until appears on display Display All the tracks on the CD are played back repeatedly 2 To quit this function press INT REP on the remote c...

Page 21: ...th the first programmed track or file 2 Press 7 twice to stop playback 3 To play the playlist again press CD MODE Repeating the playlist 1 During playback press INT REP on the remote control once Disp...

Page 22: ...rtists 3 Activate the menu item with PROG Repeating the current track 1 During playback press on the hi fi system or on the remote control The track is repeated from the beginning The playing time is...

Page 23: ...te control repeatedly until disap pears from the display of the iPod iPhone Note 7 During repeating you cannot select another file track Repeating all tracks or files Repeat All 1 During playback pres...

Page 24: ...s device is a standard socket Due to rapid developments in tech nology and new manufacturers appearing every day the compatibility of USB memory sticks can only be partially guaranteed Playing the con...

Page 25: ...shows RECORD TO USB Use the Jog Shuttle to select either RECORD TO USB or RECORD TO SD 3 Press to start the recording Display RECORD INIT the current and the subsequent file track will be recorded 4 T...

Page 26: ...e not supplied to connect AUX IN on the back of the hi fi system to an AUDIO OUT or U head phone socket on an external equipment such as CD player 2 Press repeatedly on the Jog Shuttle to select MODE...

Page 27: ...ay TIMER ON or TIMER OFF 2 Select TIMER ON by pressing or and confirm with INT REP 3 Press or to set the hour and confirm with INT REP Display The clock digits for the minutes flash 4 Press or to set...

Page 28: ...ute intervals 1 Press NAP on the remote control Display NAP 10 and NAP 2 Repeatedly press NAP to select the re minder time in 10 minute intervals After the time has expired a signal tone sounds You ma...

Page 29: ...ronic equipment This is indi cated by this symbol on the product in the oper ating manual and on the packaging Please consult your local authorities to learn the nearest collection point Help protect...

Page 30: ...ountries General information on laser devices This device is a CLASS 1 LASER PRODUCT This means that the laser is designed in such a way as to ensure that the maximum permissible emis sion value canno...

Page 31: ...fi system disconnect the power cable and plug it in again after a few seconds The remote control does not work The battery is flat Replace the battery The remote control is out of range of the hi fi...

Page 32: ...www grundig com 43 10 72011 410 5900...

Reviews: